5
SWITCHING BETWEEN ENERGY SOURCES
When switching from one energy source to another, there are
some delays implemented in the AES system. The 15 min.
delay between switching off the engine and starting gas mode
is intended to delay the starting of gas mode e.g. when stopping
at a filling station.
WARNING! It is not allowed to have a naked
flame at a gas filling station. If you are not sure,
that your stop is shorter than 15 min., you are
advised to set the ON/OFF switch (1) to “OFF”,
when stopping at a filling station.
REGULATING THE TEMPERATURE
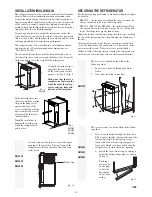
The position number refers to Fig.1.
It will take a few hours for the refrigerator to reach normal
operating temperature. So we suggest you start it well in
advance of a trip and if possible store it with precooled food-
stuffs.
The temperature of the refrigerator main compartment is set
for all three sources of energy, by means of the Temperature
selector button (
3
). After turning on the refrigerator the system
automatically chooses the mid-position. With some experience
you will soon find a suitable setting, bigger circles indicate
lower temperatures. This normally does not need resetting
because the same thermostat controls the main compartment
temperature for any of the three sources of energy.
TRAVEL CATCH
Make sure that the travel catch is engaged when the motor-
home is on the move.
USING THE REFRIGERATOR
WARNING! DO NOT store explosive substances
in the refrigerator, such as cigarette lighter gas,
gasoline, ether or the like.
FOOD STORAGE
Always keep food in closed containers. Never put hot food in
the refrigerator; allow it to cool first.
The frozen food compartment is intended for the storage of fro-
zen food and for making ice. Most kinds of frozen food can be
stored in the frozen food compartment for about a month. This
period of time may vary, however, and it is important to follow
the instructions on the individual packages.
ICE MAkING
Fill the ice tray to just below the brim with drinking water and
place them on the bottom of the freezer compartment. Ice will
be made more rapidly if the thermostat is set at its highest posi-
tion (biggest circle), but be sure to move the thermostat back
to normal setting when the ice is formed; the refrigerator might
otherwise become too cold.
DEFROSTING
Frost will gradually accumulate on the refrigerating surfaces.
Each time the door is opened some of the cold air in the refrig-
erator spills out and is replaced by warm moist room air. As
this air is cooled, the moisture is deposited onto the evapora-
tor coils or other cold surfaces inside the refrigerator and can
cause frost build-up. It is important that you do not leave the
unit’s door open any longer than necessary. This will reduce
frost formation and increase the efficiency of your refrigerator.
The frost must not be allowed to grow too thick as it acts as an
insulator and adversely affects refrigerator performance. Check
the formation of frost regularly every week and when it gets
about 3 mm thick, defrost the refrigerator.
Do not try to accelerate defrosting by using any kind
of heating appliance, as this might damage the plastic
surfaces of the refrigerator. Neither should any sharp
objects be used to scrape off the ice.
To defrost the refrigerator, follow these steps:
Turn off the refrigerator. (Press the ON/OFF
button (
1
) to ”OFF”.)
Empty the refrigerator. (Remove ice trays
and food.)
Leave the drip tray under the finned evapo-
rator.
Leave the cabinet and freezer door open.
Defrost water runs from the drip tray through
a plastic drain water hose to the outside of the
vehicle. When all the frost has melted - dry the
interior of the refrigerator with a clean cloth and
replace ice trays and food. Set the thermostat to
the coldest position for a few hours. Then, reset
the thermostat to the desired setting, usually at
mid setting.
To defrost the refrigerator, follow these steps:
Turn off the refrigerator. (Press the ON/OFF
button (
1
) to ”OFF”.)
Empty the refrigerator. (Remove ice trays
and food.)
Leave the cabinet and freezer door open.
Defrost water runs from a collector channel to a
receptacle at the rear of the refrigerator where it
normally evaporates. With a lot of defrost water,
as a result of heavy frost build-up on the freezer
plate and the cooling fins, move the plastic drain
tube in to a watertight bucket or container. (Ac-
cess through the lower ventilation grill on the
outside of the vehicle). As the frost melts, the
water will flow into the container. Replace the
drain tube to its original position after defrosting.
Defrost water in the freezer compartment should
be mopped up with a cloth.
When the ice has melted - wipe the refrigera-
tor dry, restart it and then, place the food items
back inside but wait until the refrigerator is cold
before making ice cubes.
1.
2.
3.
4.
1.
2.
3.
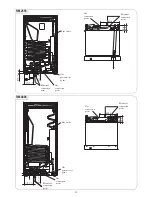
RM 2355
RM 2455
RM 2555
z
P
RM 4605
Содержание RM 23455
Страница 2: ......
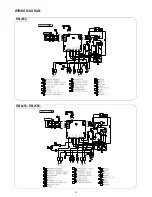
Страница 18: ...18 WIRING DIAGRAM RM 2355 RM 2455 RM 2555...
Страница 19: ...19 RM 4605 WIRING DIAGRAM...
Страница 22: ...22 Appendix A Airing position card RM 4605 1 2 5 4 3...
Страница 23: ...NOTES...
Страница 24: ......


