11
HOW TO USE THE REFRIGERATOR
FOOD STORAGE COMPARTMENT
The food storage compartment is completely closed and
unventilated, which is necessary to maintain the required
low temperature for food storage. Consequently, foods
having a strong odor or those that absorb odors easily
should be covered. Vegetables, salads etc. should be
covered to retain their crispness. The coldest positions
in the refrigerator are under the cooling fins and at the
bottom of the refrigerator. The warmer areas are on the
upper door shelves. This should be considered when
placing different types of food in the refrigerator.
When the refrigerator is heavily loaded, it will take a
longer time to lower the temperature; therefore, to get
maximum efficiency the refrigerator and food items
should be precooled prior to loading. The shelves should
not be covered with paper or plastic, and the food items
should be arranged so air can circulate freely.
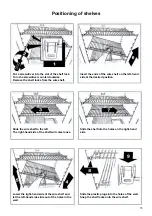
Two door shelves are equipped with fingers. The fin-
gers are designed to prevent large containers (1/2-gal-
lon milk or juice) from shifting or spilling while traveling.
FROZEN FOOD STORAGE
COMPARTMENT
Quick frozen soft fruits and ice cream should be placed
in the coldest part of the compartment, which is on the
top freezer shelf. Frozen vegetables, may be stored in
any part of the compartment.
This compartment is not designed for deep or quick-
freezing of food. Meat or fish, whether raw or prepared,
can be stored in the frozen food storage compartment
provided they are precooled first in the refrigerator. They
can be stored about three times longer in the frozen food
compartment as compared to the fresh food compart-
ment. To prevent food from drying out, keep it in cov-
ered dishes, containers, plastic bags or wrapped in alu-
minum foil.
Total Refrigerated Volume 14 cu.ft.
ICE MAKING
Ice cubes can be made in the ice trays placed in the
freezer compartment. The trays should be filled with
water to within 1/4" (5 mm) from the top. For faster ice
making, the trays should be placed in direct contact with
the freezer shelves.
To release the ice cubes seize the tray with both hands
and twist the tray. Cubes not required should be replaced
in the tray. Refill the tray with water and replace the tray
on the freezer shelf.
Ice will be made more rapidly if the thermostat is set at
its highest position.
It is a good idea to do this a few hours before the antici-
pated need for ice, but be sure to move the thermostat
back to normal setting, usually about mid setting when
the ice is formed. Food in the fresh food compartment
may be frozen if the setting is left on COLDEST posi-
tion.
DEFROSTING
Shut off the refrigerator by pressing the main power ON/
OFF button to the UP (OFF) position.
Empty the refrigerator, leaving the drip tray under the
finned evaporator, and the cabinet and freezer doors
open. Filling the ice trays with hot water and placing them
on the freezer shelves can reduce defrosting time.
When all the frost has melted, dry the interior of the re-
frigerator and freezer with a clean cloth. Replace all food
and set the thermostat to the COLDEST temperature
setting for a few hours. Then reset the thermostat to the
desired setting, usually at mid setting.
DO NOT use a hot air blower. Permanent damage
could result from warping the metal or plastic parts.
DO NOT use a knife or an ice pick, or other sharp
tools to remove frost from the freezer shelves. They
can create a leak in the ammonia system.
CLEANING
Cleaning the refrigerator is usually done after it is de-
frosted or put into storage. To clean the interior liner of
the refrigerator, use lukewarm weak soda solution. Use
only warm water to clean the finned evaporator, ice trays
and shelves. NEVER use strong chemicals or abrasives
to clean these parts, as the protective surfaces will be
damaged. It is important to always keep the refrigerator
clean.
SHUT OFF - STORAGE PROCEDURE
Shut off the refrigerator by pressing the main power ON/
OFF button to the UP (OFF) position.
If the refrigerator will not be in operation for a period of
weeks, it should be emptied, defrosted, cleaned and the
doors left ajar. The ice trays should also be dried and
kept outside the cabinet.
! CAUTION
DO NOT store explosive substances in the refrig-
erator, such as cigarette lighter gas, gasoline, ether
or the like.
NOTE:
Sodium chromate is used for corrosion protec-
tion (less than 2-weight % of the coolant).
CLIMATE CONTROL
During the summer months of high temperatures and
humidity, the metal frame between the freezer and fresh
food compartments may have water droplets forming.
The number of water droplets will increase if the vehicle
isnt air conditioned during these months.
This refrigerator comes standard with a 12 volt (DC)
climate control that will evaporate the water droplets
when they form.
To turn on the climate control, press the CLC-button (4)
on the display panel, the indicator lamp (F) will illumi-
nate. (See FIG. 2 or display panel, section OPERATING
INSTRUCTIONS).
The climate control can be left on continuously or only
used when temperatures require it.
NOTE:
The climate control will draw 12 volt DC power
continuously when in the ON position. It should be turned
OFF when a charging source is not available.
! WARNING
Содержание NDR1492-B
Страница 2: ......
Страница 16: ...16 MO FO 0222...

