background image

Safety Instructions

Page iv

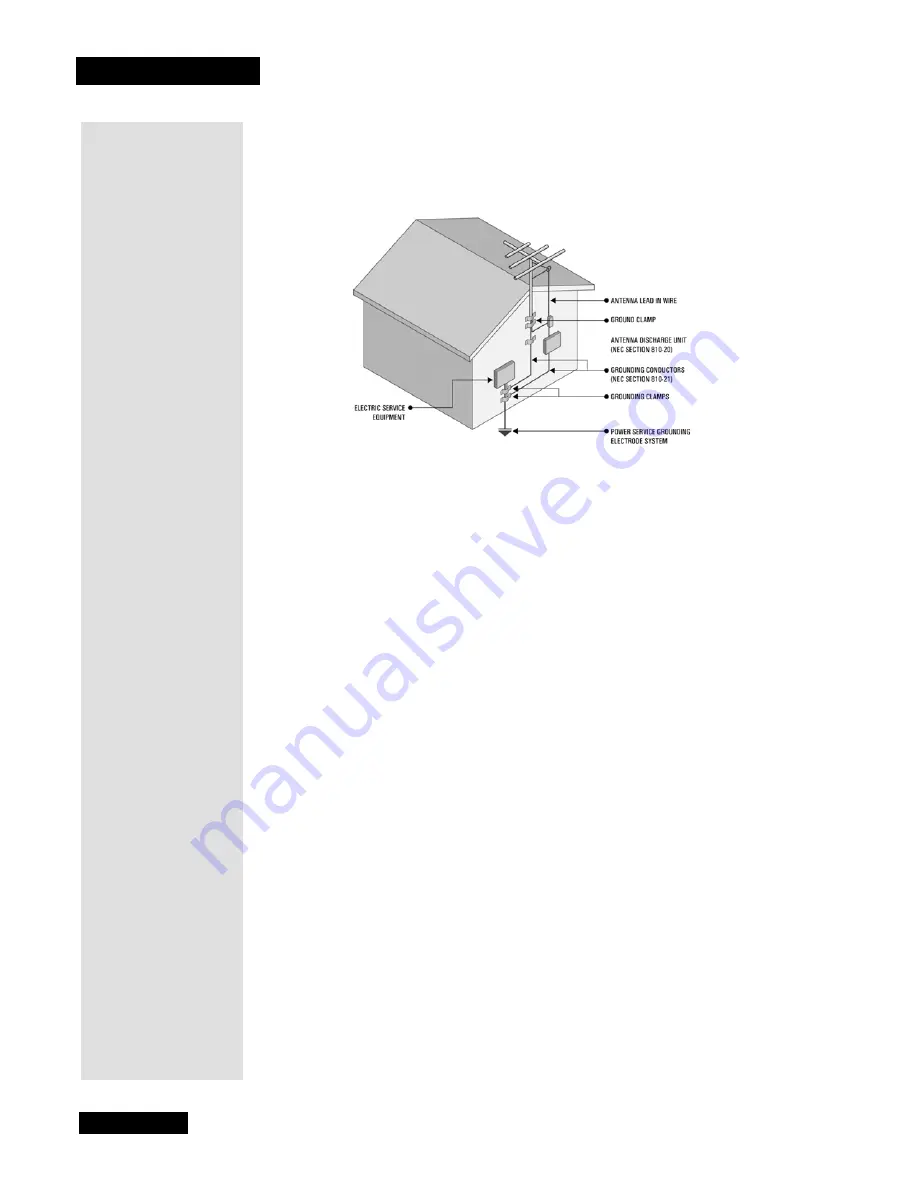
Note to installer

: This reminder is provided to call the satellite TV system 

installer’s attention to Article 820-40 of the 

National Electrical Code

 (NEC) that 

provides guidelines for proper grounding and, in particular, specifies that the 

cable ground shall be connected to the grounding system of the building as close 

to the point of cable entry as practical.

Safety Tips

Unplug the monitor from the AC power outlet 

before

 cleaning.

The use of accessories or attachments not recommended by the monitor 
manufacturer will void the 

Limited Warranty

.

Do 

not

 place the monitor in an enclosure such as a cabinet without proper 

ventilation.

Do 

not

 stack the monitor on top of or below other electronic devices.

Do 

not

 drop or impact the monitor. The LCD monitor is fragile and may break.

Operate the monitor using 

only

 the type of power source indicated on the 

marking label. Unplug the monitor power cord by gripping the power plug, 

not


the cord.

Do 

not

 overload wall outlets or extension cords, as this can result in a risk of 

fire or electrical shock.

Never

 insert objects of any kind into the monitor through openings, as the 

objects may touch dangerous voltage points or short out parts. This could cause 
fire or electrical shock.

Make sure

 that the outdoor parts of the antenna system are grounded in 

accordance with local, state, federal, and 

National Electrical Code

 (NEC) 

requirements.

Do 

not

 locate the antenna near overhead light or power circuits, or where it can 

fall into such power lines or circuits. When installing the antenna, take 

extreme


care to avoid touching such power lines or circuits, as contact with them can be 

fatal

.

Do 

not

 attempt to service the monitor yourself, as opening or removing covers 

may expose you to dangerous voltage, and will void the 

Limited Warranty

Refer all servicing to authorized service personnel.

Use an electrical outlet that contains surge suppression or ground fault 
protection. During a lightning storm, or if the monitor is to be left unattended 
and unused for a long period of time, unplug the power cord from the electrical 
outlet and disconnect the cable between the monitor and an off-air antenna, if 
applicable. This will provide some protection against damage caused by 
lightning or power line surges.

Содержание LCD30-500

Страница 1: ...8 Using the Monitor s Features 13 One Button Features 13 Remote Control Buttons 15 Menu System 16 Picture Menu 16 Sound Menu 17 Settings Menu 18 Options Menu 20 Window Menu 24 Layout Menu 25 Installat...

Страница 2: ...Contents Page ii Troubleshooting 33 Appendix 37 Limited Warranty 37 FCC Compliance 39 Index 41...

Страница 3: ...utlet 10 Protect the power cord from being walked on or pinched particularly at plugs convenience receptacles and the point where they exit from the apparatus 11 Use only attachments accessories speci...

Страница 4: ...in a risk of fire or electrical shock Never insert objects of any kind into the monitor through openings as the objects may touch dangerous voltage points or short out parts This could cause fire or e...

Страница 5: ...V monitor and satellite receiver To program the remote to control other devices see the satellite TV receiver User s Guide How to Use This Guide Tips In the margins of pages throughout this guide are...

Страница 6: ...Chapter 1 Page 2 Introduction Notes...

Страница 7: ...lay using a system cable The Media Box can either be mounted on the back of the monitor display or mounted separately whichever makes getting to the controls or connections easier Note To mount the Me...

Страница 8: ...e Normally you would want to change programming channels using the DISH Network satellite receiver and its Electronic Program Guide Volume Controls Turns the volume up or down While in the menus use t...

Страница 9: ...lue and PR CR red L AUDIO R RCA type audio Provides left white and right red audio connections when using the COMPONENT INPUTS VGA Input Connect a VGA video source such as a computer to VGA IN VGA Pro...

Страница 10: ...composite video output yellow Note This video output does not include menu overlays or messages R AUDIO L RCA type audio Provides right red and left white variable audio outputs Note The AV OUT only p...

Страница 11: ...bar or Press the GUIDE button on the remote control then use the LEFT and RIGHT ARROWS to highlight the input name on the Source bar then press SELECT Note The H1 and C1 inputs share the same physica...

Страница 12: ...emote Control The remote control gives you easy access to the features of your monitor This remote control is provided with your DISH DVI equipped DISH Network satellite receiver Note Your remote cont...

Страница 13: ...DISH Network satellite receiver for instructions on using the VCR and AUX mode buttons to program the remote to control other devices TV Mode Button Pressing the TV mode button puts the remote contro...

Страница 14: ...trol modes Guide Button Press the GUIDE button to display the Source Select menu When displayed use the LEFT and RIGHT ARROWS to highlight an input and then select the input While in the TV menus pres...

Страница 15: ...tellite receiver s off air tuner can receive both analog and digital off air broadcasts integrates off air programming into its Electronic Program Guide and allows all of the satellite and off air pro...

Страница 16: ...ess this button to move the PIP window to different positions on the monitor screen Number Pad Buttons Use the NUMBER PAD buttons to enter a channel number to change the channel Once entered in press...

Страница 17: ...croll through available video modes that enhance your viewing experience by modifying your Brightness and Contrast settings The four options available are Normal Soft Bright and a User definable setti...

Страница 18: ...s when you close the POP window Note In either PIP or POP you can choose where each window s audio is played Press the UP ARROW until the desired window is highlighted Then either press the LEFT ARROW...

Страница 19: ...Page 15 Remote Control Buttons Remote Control Buttons...

Страница 20: ...st the picture will vary depending on which video input is being viewed For example the AV input offers Sharpness Color and Tint options the H1 input instead offers Phase and Frequency options Brightn...

Страница 21: ...he UP and DOWN ARROWS to highlight an option and adjust it using the LEFT and RIGHT ARROWS Audio Mode Scroll through available sound modes to enhance your audio experience The four options available a...

Страница 22: ...eo audio signals Note The MTS option only appears on the TV input Auto Volume Enable Auto Volume to lower the sound level when a program s audio is loud and to raise the sound level when a program s a...

Страница 23: ...ing On Turns on closed captioning On Mute Turns on closed captioning only when the TV is muted Closed Caption Background Select either an Opaque or Transparent background for closed caption displays N...

Страница 24: ...ing the LEFT and RIGHT ARROWS TV Tuner Menus The TV Tuner Menu only available for the TV input allows you to set up and customize your TV channels To open the TV Tuner Menu select TV Tuner from the Op...

Страница 25: ...t Labels Select Edit Labels to allow channel labels to be changed Use the PAGE UP and DOWN buttons to select a channel then use the ARROW BUTTONS to edit that channel s label The INPUT button will cle...

Страница 26: ...he next digit and then select OK Movie Blocking The Movie Blocking Menu is where you can set locks based on non satellite movie ratings To open the Movie Blocking Menu after entering the password high...

Страница 27: ...ieve and reality Themes and elements in this program may include mild fantasy violence FV or comedic violence or may frighten children under the age of 7 TV G General Audience Most parents would find...

Страница 28: ...is stretched vertically and horizontally to fill the display from edge to edge Wide A 4 3 image is stretched to fill a 16 9 display with as little distortion of the image as possible The stretching o...

Страница 29: ...he UP and DOWN ARROWS to zoom in and out Press SELECT OK to switch between Zoom and Pan When panning use the ARROW BUTTONS to move around the screen Layout Menu The Layout menu allows you to alter Pic...

Страница 30: ...he screen POP3 Press the RIGHT ARROW to select POP3 This layout displays one main frame and one scanning frame that shows snapshots as it moves between three positions on the right side of the screen...

Страница 31: ...om it won t flow around other components Position Cable Properly to Avoid Audio Interference Insert each cable firmly into the designated jack If you place components above the monitor route all cable...

Страница 32: ...tor Use the diagram below and the following instructions to connect your DISH Network HD monitor to your DISH Network satellite receiver and other optional devices This is the recommended installation...

Страница 33: ...he satellite TV receiver outputs Note Optionally instead of connecting video using yellow RCA type connections connect an S Video cable at the input on the VCR and satellite TV receiver output Follow...

Страница 34: ...when properly positioned will face you Plug the other provided power cable into the power supply and connect the power supply plug to a power strip Installing the Media Box Stand The DISH Network LCD...

Страница 35: ...d speakers Restoring Your Remote Control s Factory Settings for Monitor Control Your remote control provided with your DISH DVI equipped DISH Network satellite receiver comes from the factory ready to...

Страница 36: ...Chapter 4 Page 32 Installation and Setup Notes...

Страница 37: ...ally with a simple solution for each one To solve a particular problem do the following 1 Review the section in this Guide that relates to the problem 2 If you cannot find a solution then find the sec...

Страница 38: ...Maybe the sound is muted Try pressing the volume up button to restore sound If using S Video Y PB PR or DISH DVI connections remember to also connect the component s left and right audio output jacks...

Страница 39: ...pening What to Do Ratings limits don t work The V Chip Parental Control is not available for DISH DVI HDTV1 or HDTV2 inputs Your DISH DVI equipped DISH Network satellite receiver provides parental con...

Страница 40: ...Chapter 5 Page 36 Troubleshooting Notes...

Страница 41: ...s in exchange for parts determined by EchoStar in its sole judgment to be defective subject to the limitations of this warranty EchoStar warrants any such replacement parts against defects in material...

Страница 42: ...r of nonconforming pixels Legal Limitations REPLACEMENT AND OR REPAIR AS PROVIDED UNDER THIS WARRANTY IS YOUR EXCLUSIVE REMEDY ECHOSTAR SHALL NOT BE HELD LIABLE FOR ANY INCIDENTAL OR CONSEQUENTIAL DAM...

Страница 43: ...limits are designed to provide reasonable protection against harmful interference in a residential installation This equipment generates uses and can radiate radio frequency energy and if not installe...

Страница 44: ...Appendix Page 40 Notes...

Страница 45: ...stallation Considerations 27 K Key Features 1 DISH DVI 1 Unified Remote Control 1 L Layout Menu 25 Left and Right Arrow Buttons 11 M Media Box 3 Antenna Cable Inputs 6 Audio Video Outputs 6 Back Panel...

Страница 46: ...uide Button 10 Left and Right Arrow Buttons 11 Menu Button 10 Mode 9 Mute Button 10 Number Pad Buttons 12 Page Up and Page Down Buttons 11 PIP Button 12 Position Button 12 Pound Button 12 Power Button...

Страница 47: ...Page 43 Index Notes...

Страница 48: ...Index Page 44 Notes...

Страница 49: ...he following information in the spaces provided below You may need to provide this information if you call the Customer Service Center Purchase Location Name Purchase Location Telephone Number Monitor...

Отзывы: