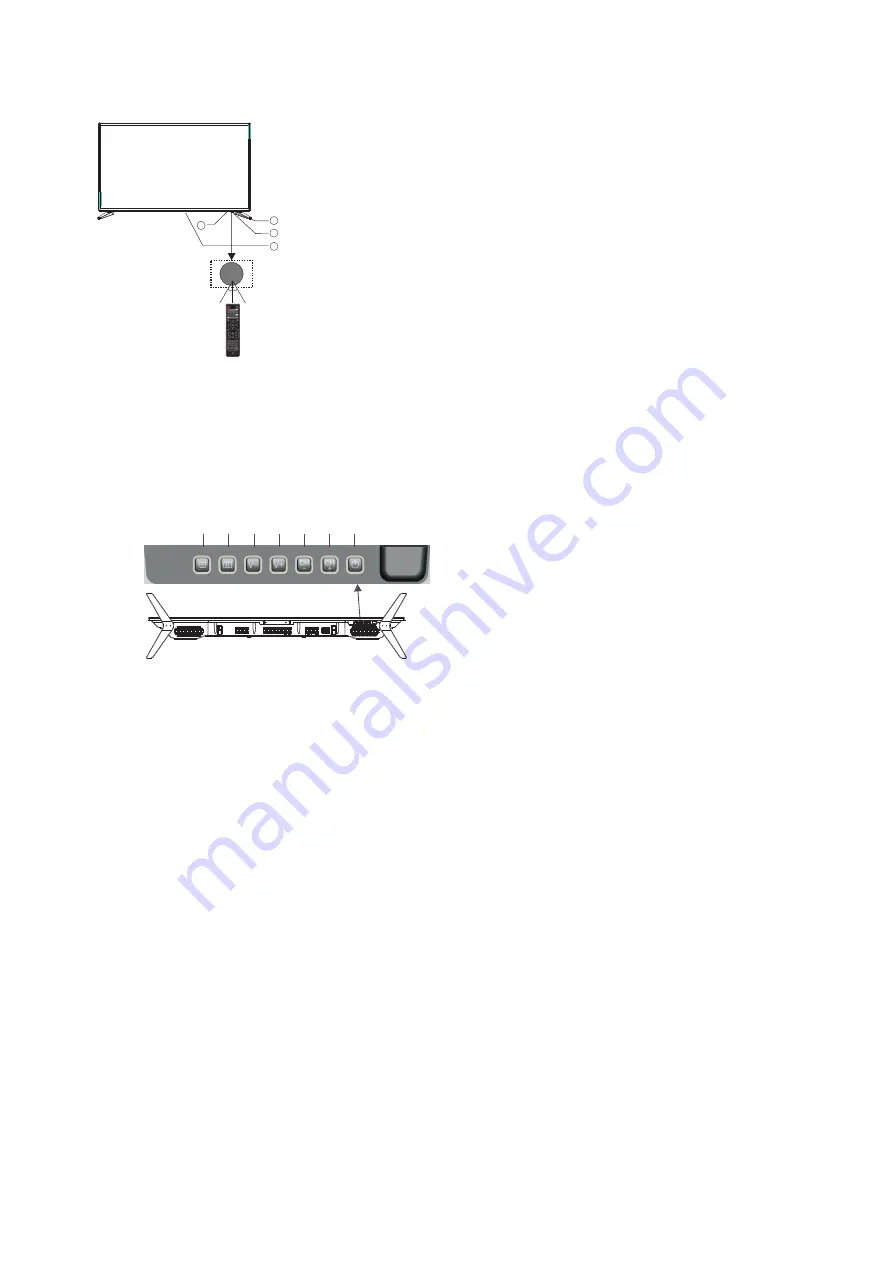
Dick Smith DSLED42FHDYA Скачать руководство пользователя страница 8

Front Panel Layout

1

.

Remote


control


sensor

2

.

Power


indicator


LED

:

3

.

Green

 = 

Power


on

Red

 = 

stand

-

by

4

.

Keyboard

 (

on


bottom of TV)

5

.

Main


power


switch

 (

on


bottom


mid


right

-

hand


panel


of


TV

)

The


remote


control


needs


to


be


pointed


directly


within

 +/- 

30

° 

of


the


sensor


on


the


front


of


the


TV


for


reliable


operation

.

Note

there will be


a


5

-

10 second


delay between


the


power


indicator

of


the


TV


changing


colour


and


the


TV


responding

.

Keyboard Layout 

(

side

-

panel

)

The


TV


is


most


easily


operated


using


the


supplied


remote


control until

but


in


the


event


that


the


remote


is


not


available

there


are various


alternative


controls


for


basic


functions


located


on


the


bottom of the TV (when viewed


from


the


front


of


the


TV

).

1

.

Source
Displays the input


source


menu

2

.

MENU
Displays the main MENU

3

.

V

-/

V

+

Adjusts


the


sound


level

.

In


MENU


mode

press


V

or


V

to adjust


the


item that you have


selected

.

4

.

CH

-/

CH

+

In


TV


mode

press


CH

or


CH

to


change


the


channel


up


or


down

.

In


MENU


mode

press


CH

or


CH

to


select


items

.

5

.

Standby
Once


the


TV

'

s


main


power


switch


has


been


activated

press


this


button


to


turn


the


unit


ON


from


STANDBY


mode

Press


it


again


to


return


the


set


back


to STANDBY

This Standby

button performs


the


same


operation


as


the


Power

/

Standby


button


on


the


Remote


Control

.

7

30 30

3

1

2

4

SOURCE

MENU V-

V+

CH- CH+ Standby

(Input selection)

(Power ON/Stand-by select)

(Bottom view of TV)

Содержание DSLED42FHDYA

Страница 1: ...42 FHD LED TV DSLED42FHDYA USER MANUAL...

Страница 2: ...Powering on the TV 13 Menu Settings 14 Using the Main Menus 14 Channel Menu 14 Auto Tuning 14 DTV Manual tuning 15 ATV Manual tuning 15 Program Edit 15 Signal Information 15 Software Update OAD 15 So...

Страница 3: ...the Kogan customer support team Never attempt to make repairs yourself Never push objects of any kind into the set through the cabinet slots as they may touch dangerous voltage points or short circui...

Страница 4: ...or limited by covering the ventilation slots with items such as newspapers tablecloths curtains etc At least 10cm of space should be left around the apparatus for sufficient ventilation The televisio...

Страница 5: ...ocation allow some time for any dew or condensation inside the television to evaporate fully before you turn the unit on To prevent injury the television must be securely attached to the floor wall in...

Страница 6: ...soft cloth that is large enough to cover the front face of the TV as well as a Philips head screwdriver to attach the base stands Before proceeding to the Getting Started section of this manuals pleas...

Страница 7: ...creen surface Do not exert pressure on the front of the unit at any time as this may damage the LED screen 2 Remove the four long screws from the lower part of the television where the desk stands are...

Страница 8: ...e various alternative controls for basic functions located on the bottom of the TV when viewed from the front of the TV 1 Source Displays the input source menu 2 MENU Displays the main MENU 3 V V Adju...

Страница 9: ...ion All HDMI inputs support limited CEC Consumer Electronics Control functionality AC INPUT 100 240V 50 60Hz RF L R HDMI1 ARC Coaxial AUDIO OUTPUT When viewed from the side of the TV the following con...

Страница 10: ...layers or gaming consoles that were previously connected directly to the TV would now be connected to the amplifier via HDMI and a separate HDMI cable would then be connected between the TV and the AV...

Страница 11: ...V Amp combination as they may be a click or pop sounds on the audio output of the TV during its powering up down phase that can be amplified by your sound system It is highly recommended that the TV i...

Страница 12: ...er s ability to adjust the PC s settings for optimum screen performance Some PC graphics cards will not correctly identify the TV s capabilities and hence will only allow lower resolution screen displ...

Страница 13: ...e program being viewed and what s on next in DTV mode 12 FAV To access your favourite channels list in TV or DTV mode 13 VOL To adjust sound level 14 NUMERIC KEY For direct access to channels 15 AUDIO...

Страница 14: ...er the TV auto tuning mode This where the TV searches for available TV stations and stores the station details it finds Make sure the TV antenna is connected before proceeding with this operation By d...

Страница 15: ...e of the cursor arrow buttons to exist the Menu setting To access the Input Source menu where you can select ATV or DTV reception plus access signals from your connected audio video devices eg AV comp...

Страница 16: ...mote Control to skip this program from future up down manual channel selections The strikethrough symbol will appear to the right side of the program name If you highlight the skipped program and pres...

Страница 17: ...for areas that still have analogue transmissions In Australia this should be set to the OFF position Sound Menu The third item of the MENU is the SOUND MENU You can adjust sound effects such as treble...

Страница 18: ...s from a wide selection At the initial setup of the TV the default language is English and it is recommended that this setting is not changed unless you are fluent in any new language chosen 2 The Aud...

Страница 19: ...ton to start checking the file system of your USB storage or Hard Disk and check the recording speed capability of the connected device Once SUCCESS is shown after checking you will then be able to be...

Страница 20: ...assword is entered Each time one of these blocked channels is selected the PIN must be entered before the channel can be viewed Parental Guidance In this sub menu you can select from a range of Progra...

Страница 21: ...he desired channel 3 Use the Reminder blue button to reserve programs If the TV is in DTV mode it will automatically turn to the reserved program at the scheduled time Use Schedule yellow button to lo...

Страница 22: ...he record time will be shorter depending on the capacity of the device During the check PVR File System checking please do not take any other operation until it is finished The recordings have to be d...

Страница 23: ...e Formatting please wait Format disk MENU Check PVR File System Checking Free Record Limit 6 Hr Select Disk C USB Disk Pass Format Pass Time Shift Size All Speed Checking MENU Check PVR File System SU...

Страница 24: ...ess will take at least 2 minutes depending on the capacity of your USB device Please do not turn off the power or remove the USB device during formatting The High Speed format option is recommended fo...

Страница 25: ...ess EXIT to return to the media type selection menu Once you have selected the required media type and drive details you can view the various files and folders on screen Select the media by pressing o...

Страница 26: ...e Mute Volume check if mute is activated or if the audio systems are not correct No Picture Mute Power cord not inserted Contrast brightness too low Press Power Stand by No Colour Normal Audio Colour...

Страница 27: ...FDM OFDM MOD 2K 8K FFT SFN and MFN Packed Carriers 2K 8K Guard Interval 1 8 1 16 1 32 Terminals HDMI Inputs 3 Audio Input RCA sockets 1 L R Composite Video Input RCA 1 Audio Output RCA sockets 1 L R H...

Отзывы: