background image

50 


DHOLLANDIA 


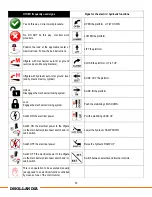
OTHER frequently used signs 

Signs for the electric / hydraulic functions 


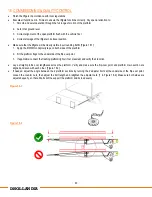
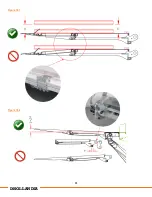
Yes do this way. Correct work procedure. 


OPEN the platform, or TILT DOWN. 


No,  DO  NOT  do  this  way.  -Incorrect  work 
procedure. 


LOWER the platform. 


Position  the  load  at  the  applicable  center  of 
maximum load. Follow the load instructions. 


LIFT the platform. 


Liftgate  with  mechanical  auto-tilt  at  ground 
level (and auto-tilt swing brackets). 


CLOSE the platform, or TILT UP. 


Liftgate with hydraulic auto-tilt at ground level 
(and hydraulic memory cylinder) 


SLIDE OUT the platform. 


Unlock. 
Disengage the mechanical locking system. 


SLIDE IN the platform. 


Lock. 
Engage the mechanical locking system. 


Push the stabilizing LEGS DOWN. 


Switch ON the electrical power. 


Pull the stabilizing LEGS UP. 


Switch ON the electrical power to the  liftgate 
via the main battery disconnect switch and / or 
cabin switch. 


Lower the hydraulic RAMP DOWN. 


Switch OFF the electrical power. 


Raise the hydraulic RAMP UP 


Switch OFF the electrical power to the liftgate 
via the main battery disconnect switch and / or 
cabin switch. 


Switch between external and internal controls. 


This is an operation to be executed manually 
(as opposed to an electrical function controlled 
by means of one of the control units). 


Содержание DH-SM

Страница 1: ...fo dhollandia com 270 Southridge Parkway Bessemer City North Carolina 28016 website www dhollandia com DH SM INSTALLATION MANUAL Read the manual in its entirety before operating the liftgate Keep this manual in the vehicle cab as reference for the driver and liftgate operator 2200 6600lbs 1000 3000kg Pictured SMM liftgate ...

Страница 2: ...OOTHED BARS 28 12 1 Note for liftgates type DH SMR with bolt on mounting plates 30 13 ADDITIONAL END STOPS FOR THE LIFT ARMS AGAINST THE CHASSIS 31 14 ELECTRICAL INSTALLATION 32 14 1 Physical installation of main external control box 32 14 2 Installation of the battery cable and ground cable 33 14 3 Routing of the wire loom 36 14 4 Installation of extra controls 37 15 PUTTING THE LIFTGATE INTO SER...

Страница 3: ...19 7 OAM041 Weld on chassis extension for trailers 60 19 8 OAM 056 1 bolt on kit for trailer bogie rails 61 19 9 End note 63 19 10 Basic wiring diagrams 63 19 11 Checklist for preventative maintenance and repair 63 ...

Страница 4: ...s a potentially hazardous situation which if not avoided could result in minor or moderate injury black letters on yellow background NOTICE is used to address practices not related to physical injury white letters on blue background SAFETY INSTRUCTIONS indicate general instructions relative to safe work practices reminders of proper safety procedures or the location of safety equipment white lette...

Страница 5: ... regarding the installation operation repair and maintenance of DHOLLANDIA liftgates or to obtain replacement copies of manuals or decals DHOLLANDIA US LLC United States West 12968 Santa Ana Avenue Fontana CA 92337 Tel 855 856 8225 Sales USA dhollandia com DHOLLANDIA US LLC United States East 200 Hilton Street West Easton PA 18042 Tel 855 894 1188 Sales USA dhollandia com DHOLLANDIA CANADA Inc Can...

Страница 6: ...laims liability for any personal injury death or property damage that results from improper use of the liftgate or negligence to apply the precautions and instructions of the operation manual DHOLLANDIA disclaims liability for any personal injury death or property damage that results from incorrect of negligent installation There are no warranties express or implied including the warranty of merch...

Страница 7: ...ntact the national DHOLLANDIA distributor for a copy of the latest set of instructions see contact info on page 4 or download the latest edition from the DHOLLANDIA website www dhollandia com Country language selection Downloads Operation manuals General information select required manual WARNING Improper use of the liftgate will put the operator and other parties at great risk of serious bodily i...

Страница 8: ...t overalls protective gloves adequate ear protection a safety helmet when working under the vehicle chassis NEVER wear loose fitting clothes that may get trapped in the moving parts of the liftgate or in any machinery and tools used for the installation Don t wear rings bracelets necklaces watches etc ALWAYS use the proper tool for the job Replace worn or damaged tools before use Pay special atten...

Страница 9: ... galvanization from the areas to weld Most liftgates are equipped with thermoplastic hoses that can be damaged by hot metal chips welding sparks and slag Damage to a hose can lead to sudden loss of hydraulic pressure and an accidental drop of the platform The penetration of welding sparks and slag can also cause a flash fire Both types of incidents can put the welder or installer and any bystander...

Страница 10: ...cg Mounting height Center of lift arm to Ground Mounting height of lift frame above the ground measured from the center of the lift arm to the ground mpg Mounting clearance Plates to Ground Ground clearance under liftgate lbup Lift BUmper to rear of Platform Horizontal dimension from rear of platform to rear of bumper bar lbug Lift BUmper to Ground Vertical clearance of bumper bar to ground pd Pla...

Страница 11: ...ut Width Width of the cut outs for the lift arms and tilt cylinders blb Body Light Boxes Available mounting space for rear truck lights on outside of the tilt cylinders bft Body Floor Thickness Thickness of the rear sill of the vehicle floor lft Lift Floor Thickness Max thickness of the rear sill of the vehicle floor in the maneuver zone bcw for the lift arms and tilt cylinders wot Width Over Tire...

Страница 12: ...utor for further advice Verify and make sure that the vehicle chassis and body are strong enough to support the forces induced by the liftgate at its maximum rated capacity Refer to the instructions of the vehicle manufacturer for calculation and construction guidelines Execute the required stability and weight distribution calculations Make sure that the body is accurately fitted to the vehicle c...

Страница 13: ...nd long sills On trailer chassis Similar slide tubes and mounting brackets are bolted to a subframe installation kit option OAM021 welded to the underside of the cross bearers Similar slide tubes are bolted to a subframe installation kit option OAM056 1 bolted to the bogie rails For installation on European trailer chassis please consult the CE version of the installation manual or contact your lo...

Страница 14: ...on drawing is used max and min installation parameters can be retrieved from the PRODUCT RANGE POCKET GUIDE Figure 7 2 Compare the installation dimensions and maximum installation parameters indicated in these sources with the actual dimensions of the vehicle and make sure they comply The applicable mounting height mfc the position of the mounting brackets and slide tubes are given by the INSTALLA...

Страница 15: ...th the bottom of the chassis Figure 7 4 2 Or in order to gain more ground clearance dismount the tooth rack from the slide tube 1 in Figure 7 5 slide the tube over the rollers measure distance X from the top of the slide tube to the top of the gear wheel cross bar 2 and mount the brackets at a distance X 1 18 above the bottom of the chassis 3 Figure 7 5 NOTICE When determining the mounting height ...

Страница 16: ... 7 6 NOTICE When planning for chassis perforations check and make sure you comply with the instructions of the OEM vehicle manufacturer Ensure all mounting brackets are mounted at equal height under the vehicle body or above the bottom line of the chassis 1 so that the slide tubes end up hanging fully parallel 2 front to rear with zero space 3 between mounting bracket and the top face of the slide...

Страница 17: ... of the OEM vehicle manufacturer Figure 7 6 If no installation drawing is used position the brackets so that they absorb the forces induced by the lift mechanism and the weight of the platform in optimal way conform the instructions in this section Figure 8 2 8 4 In case of 3 mounting brackets per side Figure 8 2 1 The rearmost bracket must be positioned to support the rearmost roller in work posi...

Страница 18: ...e slide plate in work position Bracket 3 is positioned so to support the rearmost roller of the slide plate in travel position In extreme duty applications 5 mounting brackets per side can be used as per Figure 9 4 1 Mounting brackets 1 3 4 remain in the same position as previous set up 2 An additional bracket 5 is added to support the rearmost rollers of the slide plates in work position at 7 for...

Страница 19: ...required If applicable it is convenient to mount the platform stop bumpers ref OAM033 now before the slide tubes are mounted They are usually fixed to the bottom hole of the rearmost mounting bracket 1 and held with the same bolt that holds the mounting bracket to the chassis Figure 8 6 The platform stop bumpers can be mounted at 3 different heights corresponding with variable ground clearances un...

Страница 20: ...sily measured in 1 step If the platform is still detached from the lift frame add the dimensions lof 1p from the outboard edge of the platform to the center of the lift arm 3a plus lof 1f from the center of the lift arm 3b to the point 1 on the slide plate lof 1 lof 1p lof 1f The platform is usually mounted flush with the rear end of the chassis or body Without further consultation of DHOLLANDIA s...

Страница 21: ...nted at a center distance w1 w2 from each other at equal distance from the vehicle chassis and fully parallel to each other Figure 9 3 9 4 Bolt the slide tubes to the mounting brackets on the chassis with 2 bolts bracket as instructed Figure 9 5 Fasten the bolts with the required torque value and check again after completion of the installation and weight test Figure 9 3 Figure 9 4 Figure 9 5 ...

Страница 22: ...e plates must be mounted symmetrically at equal distance from the side of the lift frame so that the lift frame and the platform end up correctly centered at the loading floor of the vehicle To move the slide plates sideways first remove the M8 locking bolt 1 on Figure 9 7 that locks the left side and right side gear wheel tubes together Figure 9 7 The bolt M8 must be repositioned after mounting o...

Страница 23: ...e the function SLIDE IN to retract the lift frame hydraulically Usually method n 1 is applied Position the lift frame on a wheeled jack Figure 10 1 or use a similar device to slide the frame under the vehicle chassis Dismount the toothed bars from the slide tubes 1 in Figure 10 1 Bring the lift frame in front of the slide tubes so that the rollers on the slide plates align up with the openings in ...

Страница 24: ... the slide tubes to the mounting brackets then push or pull the slide tubes laterally to move them into correct position Fasten the bolts again with the prescribed torque See appendix 19 2 on page 51 CAUTION As long as the outboard end stops have not been mounted the lift frame can fall down from the slide tubes when sliding in or out The lift frame is very heavy When falling on a person it can ca...

Страница 25: ...xplained in Figure 10 5 and all bolts fastened to the required torque Figure 10 5 While mounting the bolts it is ESSENTIAL that the L shaped bracket 1 in Figure 10 6 fully slots into the slot 2 in Figure 10 6 foreseen in the slide plate 3 WARNING Incorrect installation of the slide tubes slide plates bolts and small parts can lead to accidental fall of the liftgate off the vehicle chassis A fall o...

Страница 26: ...25 DHOLLANDIA The torque fastenings of all bolts should be checked after completion of the installation and weight test and retightened if required Figure 10 5 Figure 10 6 ...

Страница 27: ...in the rearmost third of the slide tubes Ensure the rollers of the slide plates don t come out of the rear end of the slide tubes Figure 11 1 Dismount the 4 pivot pins 2 for the lift arms L R 2 for the tilt cylinders L R their locking bolts and the platform rollers from the platform Raise the platform safely by hoist overhead gantry crane fork lift etc and bring the brackets for the lift arms on t...

Страница 28: ...locking bolts Fasten the locking bolts with the required torque See appendix 19 2 on page 51 for prescribed torque values Reposition or tilt the platform down towards horizontal work position Align the brackets for the tilt cylinders on the platform 1 with the tilt cylinder extensions 2 themselves Figure 12 3 Insert the pivot pins L R 2 on Figure 11 4 Mount their locking bolts and the platform rol...

Страница 29: ...ment of the platform with the rear sill is ensured by 1 The end stops for the slide plates in the slide tubes 2 End stops for the lift arms against the chassis The end stops for the slide plates consists of a lock plate 1 to be inserted inside the slide tube a toothed clamp 2 to go on the outside below the slide tube and a bolt nut M16 3 to compress both together Figure 12 2 12 3 Figure 12 1 Figur...

Страница 30: ...he rear sill of the loading floor and verify if the alignment is still correct Fine tune the position of the end stops L R if required Now that the stow position and the work position of the slide plates are known verify that the toothed bars on the slide tubes L R fully protrude beyond the gear wheel in both positions to prevent that the gear wheel could run out of the toothed bars and the hydrom...

Страница 31: ...towards their respective slide tube L R Figure 12 7 Verify and make sure that the gear wheels L R 2 in Figure 12 8 run centrally on the toothed bars 1 in Figure 12 8 on the slide tubes L R NOTICE Failure to set and adjust the gear wheels and toothed bars correctly according to the figures 12 5 12 8 can lead to premature failure of the gear wheels and or the toothed bars and can disable the slide i...

Страница 32: ... the lift cylinders at maximum hydraulic working pressure NOTICE Fixed arm stops L R on the chassis or the underside of the vehicle body MUST be positioned as close as possible to the anchor point of the lift cylinder 3 in fig 13 1 to avoid excess stress on the lift arms and potential deformation Example in Figure 14 1 end stop 1 is as close as possible to the lift cylinder anchor point and is OK ...

Страница 33: ... vehicle body but can also be welded NOTICE The control boxes are made of composite material Welding sparks will cause damage To avoid damage to the control boxes and all other composite components dismount them from their steel bracket prior to welding Shield them from hot metal chips welding sparks and slag The mounting bracket is foreseen with a series of holes for M8 bolts or self tapping scre...

Страница 34: ...attery cable from the main battery fuse to the main battery disconnect switch of the control box if applicable or to the incoming main terminal of the starter solenoid 2 and a ground cable from the negative terminal of the batteries to the negative terminal of the electric motor A short ground cable to the vehicle chassis is prone to oxidation bad contact and failure Moreover it is not allowed on ...

Страница 35: ... is mandatory to switch the main power on off 1 battery cable 5 main external control box without main battery disconnect switch 2 ground cable 6 motor relay 3 12V or 24V battery 7 electric motor 4 main external control box with main battery disconnect switch 8 bolted ground connection insulated with a heat shrink wrap 4a main battery disconnect switch 9 cabin switch 4b connection point for the gr...

Страница 36: ...ng system the battery and ground cables and fuses are dimensioned sufficiently strong and fitted with care in accordance with above mentioned instructions Insufficient battery tension will cause harm and irreparable damage to the electric components of the liftgate starter solenoid electric motor electric switches etc Many vehicle manufacturers issue specific instructions where to connect the batt...

Страница 37: ...sible towards the front of the slide tube without being pulled back when the lift frame stands in its work position If 2 brackets 1 2 are supplied 1 must be mounted as above the 2nd 2 in an intermediate position between the 1st 1 and the control box Verify the routing of the conduit 4 and wire loom both at travel position and work position of the liftgate Make sure the conduit 4 cannot be stretche...

Страница 38: ...ad and follow the instructions FIT ELEC OPTION latest update If not supplied with the liftgate these can be downloaded from the DOWNLOAD section on our website www dhollandia com Country language selection Downloads Mounting instructions General select required manual A general wiring schematic for the two button handheld control to the external control box is shown below ...

Страница 39: ... might be trapped in the hydraulic circuits as long as the liftgate has not been bled Air can cause the liftgate to make unexpected movements and can put the installer at great risk of serious bodily injury The installer should remain vigilant and stay out of the range of motion of the platform and the moving parts of the liftgate as long as the hydraulic circuits have not been purged Make sure th...

Страница 40: ...to avoid damage to the liftgate or potential hazards for the operators Bleed all air from the hydraulic circuits Preferably raise the rear end of the vehicle off the ground or raise the vehicle air suspension to its allowed maximum LIFT the platform to vehicle floor level Then LOWER the platform fully to its deepest position at the ground continue to press LOWER for 20 sec LIFT the platform again ...

Страница 41: ...onspicuity tape on both sides of the platform 2 Fit the platform flags to the underside of the flip over point 3 If applicable connect the flashing platform lights if not prewired and verify their function Lay a straight profile over lengthwise across the platform Verify and make sure the flip over point and platform main section are aligned and even with each other Figure 16 2 If needed adjust th...

Страница 42: ...he platform it is strongly recommended to paint a safe work zone of 16 x 16 at a safe distance of 10 removed from the hazardous crushing area between the inboard platform edge and the rear sill of the loading floor Figure 16 3 Work through the PDI checklist in appendix 19 11 and complete the practical load tests indicated Fill out the FITTING DECLARATION During weight test verify if the hydraulic ...

Страница 43: ...e liftgate and vehicle body before delivery to the customer conform with instructions in the manual Figure 17 1 Note the decals marked as EXAMPLE can vary in function of the maximum rated capacity of the liftgate or the chosen type of external control box Figure 17 1 ...

Страница 44: ...43 DHOLLANDIA EF0583 SM EN EF0565 EN EF0619 US EXAMPLE EF0580 EN CAP Serial No EF0585 US Serial No EF0616 ...

Страница 45: ...44 DHOLLANDIA EF0563 EN EF0562 EN EF0581 EN ...

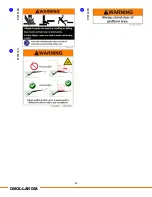
Страница 46: ... any unsafe condition exists or unusual noises or movements are noticed DO NOT use the liftgate and affix the WARNING LIFTGATE OUT OF SERVICE DO NOT ATTEMPT TO OPERATE sign provided with the liftgate on a position clearly visible to other potential operators See examples below The liftgate must not be used again until it has been serviced or repaired by a qualified service technician Place this de...

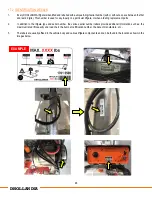
Страница 47: ...rticular liftgate or when ordering replacement parts 2 In addition to the liftgate type and serial number the various serial number labels provide additional information such as the maximum rated lift capacity and load chart the bumper certification number the date of manufacture etc 3 The labels are usually affixed to the vehicle body and various liftgate components and can be found in the locati...

Страница 48: ...use the liftgate will decline slightly when loaded adjust the platform pitch so that the tip is 1 to 2 25 4mm to 50 8mm higher than the extension plate Figure 18 2 4 Adjust the platform pitch using the 2 adjuster bolts at the inboard edge of the platform main section dim Y in Figure 18 2 Loosen the counter nuts then adjust the bolt length and retighten the counter nuts Make sure both sides are adj...

Страница 49: ...48 DHOLLANDIA Figure 18 1 Figure 18 2 ...

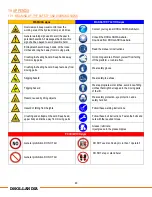
Страница 50: ...d rail Protect yourself from falling off the platform or vehicle floor Crushing shearing hazard Keep feet away from moving parts Wear safety gloves Slipping hazard Wear safety toe shoes Tripping hazard Wear appropriate work clothes avoid loose fitting clothes that might be trapped in the moving parts of the lift Hazard caused by tilting objects Wear safety protection eye protection and a safety ha...

Страница 51: ...ylinder SLIDE OUT the platform Unlock Disengage the mechanical locking system SLIDE IN the platform Lock Engage the mechanical locking system Push the stabilizing LEGS DOWN Switch ON the electrical power Pull the stabilizing LEGS UP Switch ON the electrical power to the liftgate via the main battery disconnect switch and or cabin switch Lower the hydraulic RAMP DOWN Switch OFF the electrical power...

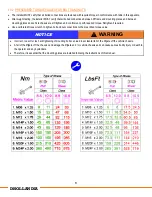
Страница 52: ...ed in conformance with required torque Retighten if required Use a calibrated torque wrench to tighten bolt and nut connections to the prescribed torque value NOTICE WARNING Incorrect too soft or too hard tightening of mounting bolts can lead to accidental fall of the liftgate off the vehicle chassis A fall of the liftgate off the chassis can damage the liftgate and or vehicle chassis and can caus...

Страница 53: ...ables Size electric motor Cable section 500 W 16 mm 5 AWG 12V 1200 2000 W 1100 3300 lbs capacity length 33 ft 1100 3300 lbs capacity length 33 60 ft Capacity 3300 lbs Length 60 ft 3 AWG 1 AWG 0 1 0 AWG 0 1 0 AWG 24V 1200 2000 W 1100 4400 lbs length 60 ft Capacity 4400 lbs Length 60 ft 3 AWG 1 AWG 1 AWG 24V 3000 W Length 60 ft Length 60 ft 1 AWG 0 1 0 AWG Long motor cycles 25 sec double deck power ...

Страница 54: ...f the liftgate but often overlooked in troubleshooting Make sure you take these into consideration when executing repairs or maintenance checks DHOLLANDIA mainly uses 3 types of oils in its hydraulic systems Option code Temperature range Type of oil examples Standard Mild to hot ISO VG 22 OAH001 winter oil Down to 30 C 22 F ISO VG 15 OAH002 arctic oil Down to 50 C 58 F Hydr Fluids such as Castrol ...

Страница 55: ...nt DH SM liftgates A copy of the grease plans can also be obtained from the national DHOLLANDIA distributor see contact info on page 4 or downloaded from the DHOLLANDIA website www dhollandia com Country language selection Downloads Maintenance Repair Grease plans select required plan ...

Страница 56: ...55 DHOLLANDIA ...

Страница 57: ...56 DHOLLANDIA ...

Страница 58: ...f the main battery disconnect switch Fasten the M8 bolt connection torque 17 7 Ft Lbf 24 N m Slide the heat shrink hose over the connection bolt up to the incoming pole 3 of the main battery disconnect switch at the rear of the control box Push the heat shrink hose right up to rear face of the control box Ensure that it completely envelops the PVC base of the incoming pole 3 of the main battery di...

Страница 59: ... control box to allow water to drip off in a natural way Thus you can easily prevent water ingress in the connections of the battery cables 1 and 5 NOTICE To ensure the reliability of the lift over many years it is extremely important that the installer connects the battery cables to the control boxes heatshrinks and seals the connections with due care Insufficient torqueing of the connection bolt...

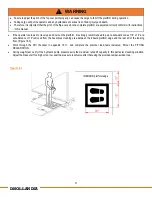
Страница 60: ...e vehicle body This handgrip will enable the operator to maintain 3 points of contact while travelling on the platform in accordance with the operation manual The handgrip is normally foreseen by the body builder as part of the design of the box A DHOLLANDIA alternative can be ordered with spare part ref M1406 To reduce the risk of crushing and shearing permanently mark a safe operator position of...

Страница 61: ...4 Figure 19 2 Weld the chassis extension 1 to the underside of the cross bearers 2 with minimum welding connections as instructed Figure 19 2 Welding must be done at the inside and the outside edge of both chassis extension rails 1a 1b Figure 19 2 NOTICE After grinding and welding the installer should apply adequate anti corrosive coating to protect the affected areas against corrosion Check and m...

Страница 62: ...re 19 3 Fasten the bolts with the required torque Bolt the slide tubes L R 3 to the carriers 1a 1b as instructed Figure 19 3 Fasten the bolts with the required torque See Appendix 19 2 on page 51 for prescribed torque values NOTICE The torque fastenings of all bolts should be checked after completion of the installation and weight test and retightened if required The bush 5 used to connect the car...

Страница 63: ...62 DHOLLANDIA ...

Страница 64: ...d inside the control box or power pack Replacement copies can be obtained from your national DHOLLANDIA distributor or downloaded from our website If in doubt where to find your national DHOLLANDIA distributor visit the official DHOLLANDIA website www dhollandia com Country language selection Distributors service Most wiring diagrams can also be downloaded from the DHOLLANDIA website www dhollandi...

Страница 65: ... Frequency OK Corrected Main external control box cover installation to vehicle body Condition fastening to the vehicle body undamaged 180 days 3500 cycles Main battery disconnect switch in control box dashboard switch in truck cabin Condition operation 180 days 3500 cycles Switches and buttons protective rubber covers Condition operation automatic return to neutral position 180 days 3500 cycles W...

Страница 66: ...nections in pump unit electric connection board Condition all connections tight dry and corrosion free 180 days 3500 cycles Limit switches pressure switches tilt sensors optional Condition operation automatic return to the neutral position 90 days 1750 cycles 5 Hydraulicpipesandconnections Frequency OK Corrected Hydraulic pipes flexible and rigid Condition routing no damage leaks or chafing Replac...

Страница 67: ...lation instructions fastened with required torque 180 days 3500 cycles 9 Platform Frequency OK Corrected Platform construction Condition undamaged no deformation cracks in material or welds no corrosion 180 days 3500 cycles Articulation points articulation pins and bearings Condition no damage or wear fastening of articulation pins locking bolts nuts Presence condition operation of lubrication fit...

Страница 68: ...rm Execute all movements minimum 3 times with all available control units Liftgate should operate smoothly and quietly through its full range of motion Check condition of articulation points no excessive play Verify correct auto tilt function at ground level if applicable 90 days 1750 cycles Dynamic weight test at 100 of the maximum rated lift capacity Place the platform at rest on the ground Put ...

Страница 69: ...maintenance or repair prior to further use Observations Partial works or inspections to follow Maintenance or inspection performed by Service center Name of technician Date of next maintenance inspection Safety first ALWAYS follow the instructions and precautions of the Operation Manual the Safety Instructions for Installation Maintenance and Repair the Maintenance and Repair Manual In order to gu...

Отзывы: