ENGLISH
WARNING:
Always wear proper personal
hearing protection that conforms to
ANSI S12.6 (S3.19) during use.
Under some
conditions and duration of use, noise from this
product may contribute to hearing loss.
WARNING:
This product can expose you
to chemicals including lead, which is known to the
State of California to cause cancer, birth defects or
other reproductive harm. For more information go to
www.P65Warnings.ca.gov.
WARNING:
• TO REDUCE THE RISK OF INJURY, USERS MUST
READ INSTRUCTION MANUAL. DO NOT RUN
UNATTENDED. DO NOT PICK UP FLAMMABLE,
COMBUSTIBLE OR HOT MATERIALS. DO NOT
USE AROUND EXPLOSIVE DUST, LIQUIDS OR
VAPORS. ELECTRICAL DEVICES PRODUCE
ARCS OR SPARKS WHICH CAN CAUSE FIRE
OR EXPLOSION. DO NOT USE AT FILLING
STATIONS OR ANYWHERE GASOLINE IS
STORED OR DISPENSED. DO NOT VACUUM
TOXIC OR CARCINOGENIC MATERIALS OR
OTHER HEALTH ENDANGERING MATERIALS
SUCH AS ASBESTOS OR PESTICIDES.
ALWAYS USE PROPER EYE AND RESPIRATORY
PROTECTION. TO REDUCE THE RISK OF
ELECTRICAL SHOCK, DO NOT EXPOSE TO
RAIN. STORE INDOORS. WHEN SERVICING,
USE ONLY IDENTICAL REPLACEMENT PARTS.
DO NOT TO BE USED AS A STEP STOOL.
To reduce the exposure to these chemicals, wear
approved safety equipment such as dust masks that
are specially designed to filter out microscopic particles.
WARNING:
Always
use safety goggles.
Everyday eyeglasses are NOT safety goggles. Also
use face or dust mask if area of operation is dusty.
ALWAYS WEAR CERTIFIED SAFETY EQUIPMENT:
• ANSI Z87.1 eye protection(CAN/CSA Z94.3),
• ANSI S12.6(S3.19)hearing protection,
• NIOSH/OSHA/MSHA respiratory protection.
1. Pull lid latches in an outward motion, remove
power head and some accessories that may
have been shipped in the tank.
2. Attach heavy-duty rubberized casters
following the instructions in this manual.
3. Before replacing power head, refer to this
manual to ensure you have the proper filter
installed for the cleaning operation.
4. Replace power head, and apply pressure with
thumb to each latch until it snaps tightly in
place. Make sure all lid latches are
clamped securely.
5. Insert the hose end into inlet of tank.
6. Attach the extension wands to the end of the
hose. Apply slight pressure until fitting is tight.
7. Attach one of the cleaning accessories
(depending on the cleaning requirements) to
the extension wands. Twist slightly to tighten
the connection.
8. Plug the cord into the wall outlet. The vacuum
is ready for use.
9. To reduce the risk of injury from accidental
starting, always shut off vacuum and disconnect
the power plug from the wall outlet before
installing any part or cleaning accessory.
1. Invert dust tank, take the casters to align the
tank bottom sinking place. Secure with
screws provided.
2. Return dust tank assembly upright.
PRODUCT SPECIFICATIONS
OPERATING INSTRUCTIONS
CASTER ASSEMBLY
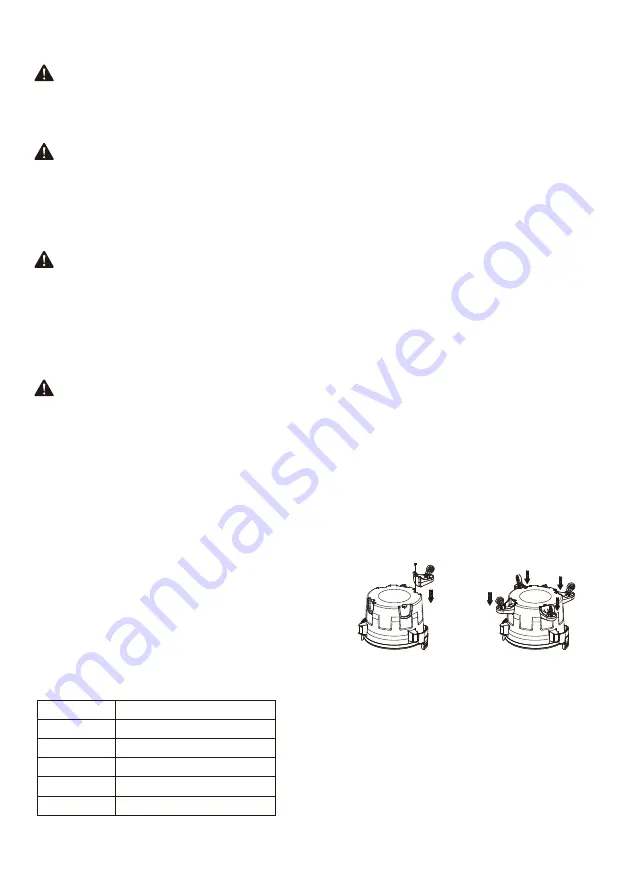
Attach 2 accessory bag holder brackets to tank
with 4 self-tapping screws provided.
(See Illustration F.1
)
ACCESSORY BAG HOLDER BRACKET
ASSEMBLY
UNPACKING & SET-UP SUMMARY
Tank Capacity
Power
Motor
9 Gallon
1-7/8 in. x 7 ft.
Single Stage
120 V / 60 Hz / 10 A
Hose
SJTW18AWG / 10 ft. Length
Power cord
Model
DXV09PA
SAVE THESE INSTRUCTIONS
3


