2.
Plug the power cord into the mains supply. Connecting
the power cord will turn on the charger (the charging
indicator light will then show).
Red light indicates charging
Green light indicates the battery
is fully charged
CAUTION
If the charging indicator light does not show, pull out the
power cord and check the battery is mounted correctly in
the charger.
About 60 minutes is required to fully charge the battery at a
temperature of about 20°C. The charging light will go off to
indicate that the battery is fully charged.
The battery charging time becomes longer when the
temperature is low or if the voltage of the power source
is too low.
If the charging indicator light does not go off even after
more than 120 minutes have elapsed, stop the charging
and contact your
D
e
WALT
AUTHORIZED SERVICE CENTER.
CAUTION
If the battery is heated due to direct sunlight, etc., just
after operation, the charging indicator may not light up. If
this occurs, cool the battery first, then start charging again.
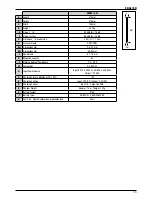
Recharging time
: Table 1 shows the recharging time
required according to the type of battery.
Table 1:
Recharging time (approx. mins) at 20°C
Battery
voltage (V)
Battery Capacity (Ah)
1.6 Ah
6V
DG-B03-XJ
60 mins.
NOTE:
The recharging time may vary according to the
ambient temperature.
3.
Disconnect the charger power cord.
4.
Hold the charger firmly and pull out the battery
NOTE
: After charging, pull out batteries from the charger
first, and store properly.. Do not store the batteries in the
charger .
Power saving mode
if the tool has not been used for about an hour with the
battery still installed, the Power Saving Mode turns on
to minimize unnecessary consumption of battery power.
Power Saving Mode is also activated when the battery
power is extremely low or there’s a fault with the machine,
so please pay attention to the battery indicator light after
reactivating the tool. This is done by removing the battery
and reinstalling it).
2.
Insert fuel cell into the tool
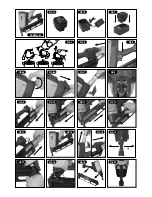
i. Pulling the latch and open the cell cover (Fig.6a & 6b).
ii. Insert the fuel cell into the tool (Fig. 7).
iii. Insert the stem of fuel cell into the hole of adaptor (Fig.
8).
iv. Close the cell cover.
3.
Load nails (see the section below ‘LOADING THE TOOL’)
Preparing to use the tool
Make sure you have read and understood all the warnings
listed in this manual before proceeding to use the tool
l
When fitting fuel or batteries to the tool, the fastener
discharge area of the tool should be pointed away
from the operator and others in the working area.
Place the discharge area of the tool over a test piece of
material of sufficient thickness to fully accommodate
the dimensions of the fastener to be driven. With hands
clear of the trigger and trip mechanism and with limbs
and body clear of the discharge area, the fuel cell and
battery may now be connected.
l
Do not pull the trigger or depress the safety trip while
connecting the fuel cell and battery. The tool could
cycle, possibly causing injury.
SAFETY INSTRUCTIONS
FOR LOADING THE TOOL
When loading the tool:
1.
Never place a hand or any part of the body in fastener
discharge area of the tool;
2.
Never point the tool at self or anyone else.
3.
Do not pull the trigger or depress the safety trip as
accidental actuation may occur, possibly causing injury.
Note:
See the technical specifications in the front of this
manual for specific loading instructions and dimensions of
recommended fasteners.
ENGLISH
11
Содержание DGN9033-XJ
Страница 2: ...DGN9033 XJ ...
Страница 4: ...3 ...

