


Endcap Mounting
Bracket
CD (Cylinder Dogging)
MORTISE CYLINDER INSTALLATION
Mortise Cylinder
Figure A1
Fillerplate
Dogging
Assembly
Spacers
Cylinder Installation
Endcap
104948 Page 16
Follow steps "a" through "g" for CD installations
a. Remove endcap and endcap mounting bracket.
b. Remove fillerplate.
c. Remove and discard shipping insert and nut. Loosen (2) screws from dogging assembly.
d. Install mortise cylinder (sold separately) with large hex nut provided.
e. Trial fit dogging assembly. If cylinder is too short, remove spacers as necessary and reattach them
under the (2) screw heads. Fasten the (2) screws to the rest of the assembly.
NOTE: The key should easily turn in both directions.
f. Rotate key counterclockwise
g. Assembly complete. Continue with Panic Hardware instruction.
Mortise Cylinder with
standard Yale cam
required
.715"
.313"
Cylinder nut socket
p/n 103779
(sold separately)
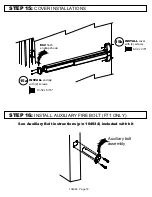
11h
LEVEL
device before installing endcap bracket
ENSURE
that device does not require cutting (see Step 11g on next page).
TEST
device fuction after installation of endcap is complete by depressing &
releasing pushpad. Action should be smooth with full return of pushpad and
latch travel.
INSTALL ENDCAP BRACKET
11g
INSTALL
bracket
with (2) lockwashers & screws
OR
screws & sex bolts
Drill 3/16 pilot hole x 1" deep
OR
Drill exterior door face 1/2" (With Trim)
or 3/8" (Without Trim).
Drill interior door face 9/32".
and