


104948 Page 13
BACKPLATE
BP11
OR
BP13
(VIEWED FROM BOTTOM EDGE OF DOOR)
Note: Bottom bracket may slide up on rod during assembly.
It may be necessary to pull it towards bottom edge of door
with a simple wire hook.
9a.
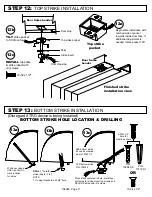
Attach top latch to door with three screws (six for fire rated doors).
(Disregard steps 9b & 9c if TRO device is being installed)
9b.
Attach bottom mounting bracket to bottom latch assembly with three screws.
9c.
Attach bottom mounting bracket assembly to door with three screws.
9d.
Attach back plate to centerlift mechanism with two screws - DO NOT OVERTIGHTEN.
Assembly hint: Assemble one screw loosely without backplate,
then add second screw through backplate. Remove first screw,
align backplate and then re-install first screw.
INSTALL
bracket
with (3) screws
STEP 9:
SECURE ROD / LATCH / CENTERLIFT ASSEMBLY TO DOOR
9a
9b
9c
9d
INSTALL
backplate
with (2) screws
MARK & DRILL
#29 drill x 3/4 deep
pilot hole
INSTALL
bottom assembly
with (3) screws
INSTALL
top latch
with (3) screws
10-24 x 3/4"
10-24 x 5/16"
#10 x 3/4"
USE
included Loctite
MARK & DRILL
#29 drill x 3/4 deep pilot hole
Install with (3) screws
For FIRE RATED
Use 10-32 x 1/2" screws
For NON-FIRE RATED
Use #10 x 3/4" screws