background image

34

ENGLISH

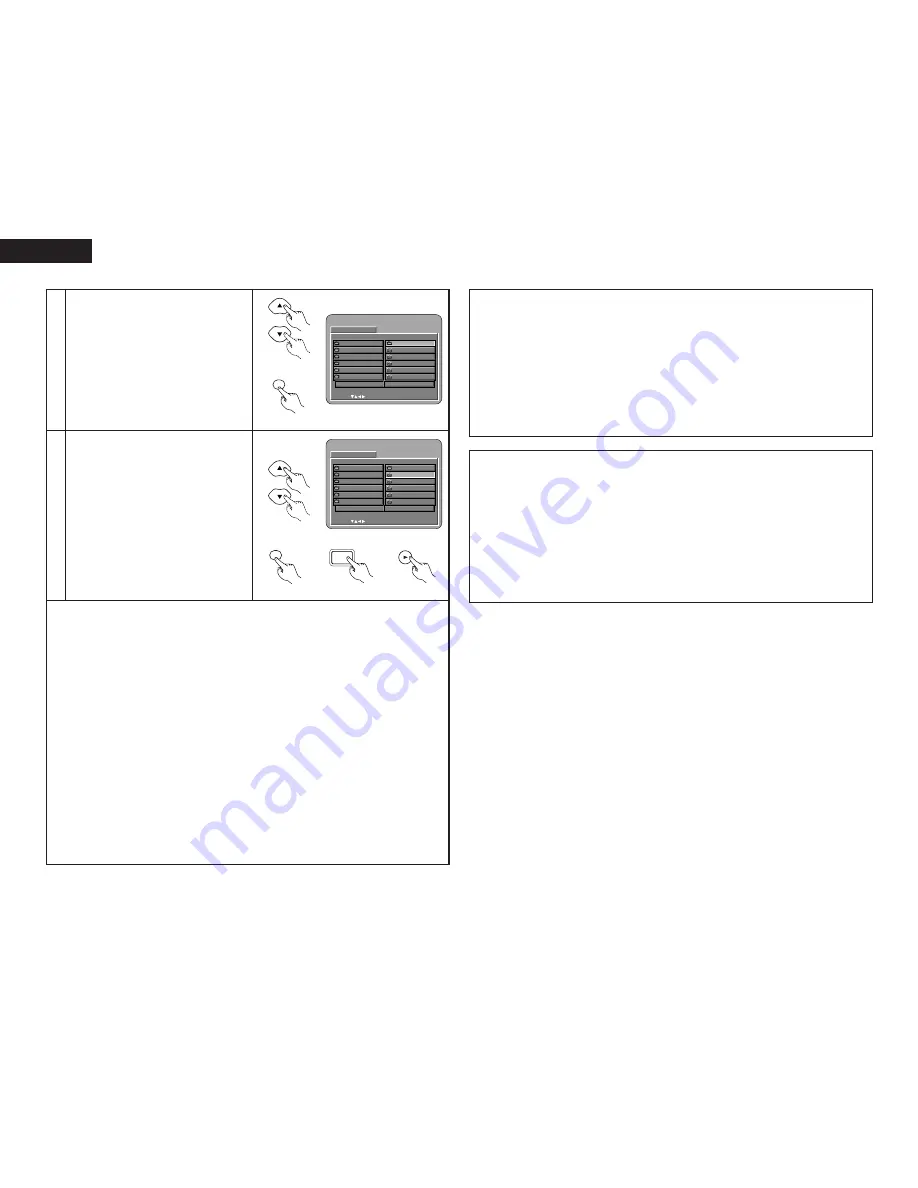
2

Use the 

and 

ª

cursor buttons to select the

folder containing the file(s) you want to play,
then press the ENTER button.

To change the folder

Use the cursor button to select “ROOT”,
then press the ENTER button. The screen in
step 

1

reappears. Select the desired folder.

D I SC   I NF ORMATI ON

S I NGL E :

DEC I S I ON  :  ENTER  BUT TON

0

• •

1

A

2

B

3

C

4

D

5

E

JPEG 1

JPEG 2

JPEG 3

JPEG 4

JPEG 5

ROOT

P L AY    MODE

F OL DE R

S I GNAL     E L APSED

:    - - : - -

B

Remote control unit

3

Use the 

and 

ª

cursor buttons on the remote

control unit to select the still picture file from
which you want to start the slide show, then
press the PLAY button or the ENTER button on
the remote control unit.
• The slide show starts.
• Only the still picture files in the selected folder

are played.

Once all the still picture files in the folder have
been played, the disc information screen
reappears.

D I SC   I NF ORMATI ON

S I NGL E :

DEC I S I ON  :  ENTER  BUT TON

0

• •

1

A

2

B

3

C

4

D

5

E

JPEG 1

JPEG 2

JPEG 3

JPEG 4

JPEG 5

ROOT

P L AY    MODE

F OL DE R

S I GNAL     E L APSED

:    - - : - -

B

Remote control unit

ENTER

Remote control unit

To view several of the still pictures stored on the disc at once:
• To select and view a still picture (to start the slide show from a specific still picture), use the cursor

buttons (

ª

0

and 

1

) to select the desired still picture, then press the ENTER button.

To temporarily stop the slide show:
• Press the STILL/PAUSE button.
• To resume the slide show, press the PLAY button.

To cue a still picture you want to view (from which you want to start the slide show):
• During the slide show, press one of the SKIP (

8

9

) buttons. Press the SKIP 

8

button to cue

back to the previous still picture, the SKIP 

9

button to cue ahead to the next still picture.

Flipping and rotating still pictures:
• Use the cursor buttons (

ª

0

and 

1

) to flip the still picture.

cursor button: The currently displayed still picture is flipped vertically.

ª

cursor button: The currently displayed still picture is flipped horizontally.

0

cursor button: The currently displayed still picture is rotate 90° counterclockwise.

1

cursor button: The currently displayed still picture is rotate 90° clockwise.

Play the image in the zoom mode.
• When the ZOOM button is pressed while playing a JPEG image (“ZOOM ON” is displayed on the

screen at this time) zoom in and zoom out using the search keys.

6

: zoom out, 

7

: zoom in

• When the image is zoomed, use the cursor buttons (

ª

0

and 

1

) to move the zoomed picture.

• Continuous playback (SLIDE SHOW) is not possible in the zoom mode.
• Zooming is not possible with files that have a low resolution.

The way of switching to the next image during continuous JPEG image playback (SLIDE SHOW) can be
selected.
• Preset the V.S.S. button on the remote control unit.
• Select from SLIDE SHOW MODE 1 to MODE 11, MODERAND and MODENONE.

1

PLAY

Main unit

PLAY

Remote control unit

Remote control unit

ENTER

Special play modes for WMA and MP3 and JPEG files

Use the 

0

and 

1

cursor buttons to select the play mode, the 

and 

ª

cursor buttons to select the special

play mode.
• FOLDER (the WMA and MP3 and JPEG files in the folder are played in order starting from the selected

file)

• FOLDER REPEAT (all the WMA and MP3 and JPEG files in the folder are played repeatedly starting from

the selected file)

• DISC (all the WMA and MP3 and JPEG files on the disc are played in order starting from the selected file)
• DISC REPEAT (all the WMA and MP3 and JPEG files on the disc are played repeatedly starting from the

selected file)

• RANDOM ON (all the WMA and MP3 and JPEG files in the folder are played in random order starting from

the selected file)

• TRACK REPEAT (the select WMA, MP3 or JPEG file is played repeatedly)

NOTES:

• The DVD-A11 is compatible with image data stored in JPEG format, but Denon does not guarantee that all

image data stored in JPEG format can be viewed.

• Files with sizes of up to 30 Mbytes can be displayed.
• It may not be possible to play some CD-Rs/RWs due to disc properties, dirt, scratches, etc.
• When storing JPEG files on the CD-R/RW, set the writing program to store the files in the “ISO9660 level

1” format.

• Be sure to give JPEG files the extension “.JPG” and “.JPE”. Files with other extensions or with no

extensions cannot be viewed on the DVD-A11.

• Do not apply stickers, tape, etc., to either the label side or the signal side of CD-R/RW discs. If adhesive

gets on the surface of a disc, the disc may get stuck inside the DVD-A11 and be impossible to eject.

• Do not play CD-R/RW discs containing any files other than music CD files (in CDDA format), WMA, MP3

and JPEG files. Doing so may result in malfunction or damage, depending on the type of file.

• JPEG files written using Macintosh computers cannot be played.

Содержание DVD-A11

Страница 1: ...SP MENU 1 2 9 8 7 6 3 B SUPER AUDIO CD DVI OPEN CLOSE 5 PLAY STOP STILL PAUSE ON STANDBY OFF DVD AUDIO VIDEO SUPER AUDIO CD PLAYER DVD A11 DENON LINK IEEE 1394 AL24 PLUS REMOTE SENSOR MODE SELECT MODE...

Страница 2: ...duct to which this declaration relates is in conformity with the following standards EN60065 EN55013 EN55020 EN61000 3 2 and EN61000 3 3 Following the provisions of 73 23 EEC 89 336 EEC and 93 68 EEC...

Страница 3: ...ANDBY OFF DVD AUDIO VIDEO SUPER AUDIO CD PLAYER DVD A11 DENON LINK IEEE 1394 AL24 PLUS REMOTE SENSOR MODE SELECT MODE SET UP PUSH ENTER q w e u i o 0 r t y 4 3 2 5 6 7 0 8 9 1 1 2 3 4 6 7 8 9 1 0 2 3...

Страница 4: ...surround center and LFE channels to provide optimum sound quality during multi channel playback as well 1 FEATURES IMPORTANT TO SAFETY WARNING TO PREVENT FIRE OR SHOCK HAZARD DO NOT EXPOSE THIS APPLIA...

Страница 5: ...sing such menus is referred to menu playback Video CDs with playback control can be used on the DVD A11 NOTE This DVD player is designed and manufactured to respond to the Region Management Informatio...

Страница 6: ...or warped discs or discs that have been fixed with adhesive etc Do not use discs on which the adhesive part of cellophane tape or glue used to attach the label is exposed or discs with traces of tape...

Страница 7: ...PRODUCT AND MAY CAUSE ARTIFACTS TO BE DISPLAYED IN THE PICTURE IN CASE OF 525 PROGRESSIVE SCAN PICTURE PROBLEMS IT IS RECOMMENDED THAT THE USER SWITCH THE CONNECTION TO THE STANDARD DEFINITION OUTPUT...

Страница 8: ...data 2 No output data No output data 1 44 1 48 kHz 16 bit PCM 44 1 48 kHz 16 bit PCM Copy protection ON 88 2 kHz 16 24 bit PCM 96 kHz 16 24 bit PCM 88 2 kHz 16 24 bit PCM 48 kHz 16 24 bit PCM 96 kHz...

Страница 9: ...ltichannel Super audio CDs can be played when an AV amplifier equipped with analog 5 1 channel audio inputs is connected PHONES DIRECT STEREO ANALOG EXT IN DOLBY SURROUND DTS SURROUND WIDE SCREEN CINE...

Страница 10: ...nel s DENON LINK connector on DENON LINK S E compatible products 2 DENON LINK S E settings At AUDIO SETUP under Default Settings set DENON LINK to 2nd See pages 19 to 21 If you connect the DENON LINK...

Страница 11: ...n parallel and in series using a single IEEE 1394 cord Up to 63 sets can be connected Copyright Protection System To play back through an IEEE 1394 connection the audio of Super Audio CD or DVD except...

Страница 12: ...eparately sold AV amplifier equipped with a Denon Link connector Use it to achieve high quality digital sound with low data loss 7 Digital audio output connector OPTICAL Connect using an optical fiber...

Страница 13: ...the remote control unit at the same time Doing so will result in malfunction 3 Names and Functions of Remote Control Unit Buttons 2 Button not explained here function in the same way as the correspond...

Страница 14: ...e cursor button to select EXIT SETUP then press the ENTER button It is also possible to quit by pressing the SETUP button on the remote control unit SETUP Remote control unit 2 Make the initial settin...

Страница 15: ...nguage code list on page 16 D I SC SETUP SEL ECT DEC I S I ON ENTER BUTTON D I ALOG D I SC MENUS EX I T SETUP SUBT I TL E ENGL I SH FRENCH SPANI SH I TAL IAN GERMAN OTHERS Setup items for use Bold cha...

Страница 16: ...FRENCH SPANI SH I TAL IAN GERMAN OTHERS Language code list Code 6565 6566 6570 6577 6582 6583 6588 6590 6665 6669 6671 6672 6678 6679 6682 6765 6779 6783 6789 6865 6869 6890 6976 6978 6979 6983 6984 6...

Страница 17: ...EX I T SETUP WAL L PAPER ON OF F DI SPLAY 3 w When WALL PAPER is selected BLUE Factory default Select this to display a blue background on the TV display GRAY Select this to display a gray background...

Страница 18: ...TV ASPECT TV TYPE V I DEO OUT NTSC PAL MULT I P I CTURE S I ZE AV1 V I DEO OUT 3 e When VIDEO OUT is selected NOTES PROGRESSIVE Factory default Select this when using the DVD A11 connected to a progre...

Страница 19: ...cursor buttons to select the item to be set then press the ENTER button SPEAKER CONFIGURATION Use this to select the types of the different speakers CHANNEL LEVEL Use this to adjust the output level...

Страница 20: ...4 4 1kHz 4 8kHz BASS ENHANCER NORMAL PCM I EEE 1 3 9 4 DENON L INK EX I T SETUP SOURCE D I RECT AUD I O SETUP SEL ECT DEC I S I ON ENTER BUTTON AUD I O CHANNEL DI G I TAL OUT LPCM 4 4 1kHz 4 8kHz BAS...

Страница 21: ...F ORMAT OFF F ORMAT 1 SEL ECT DEC I S I ON ENTER BUTTON 3 y When SOURCE DIRECT is selected OFF Factory default Please set to OFF when performing speaker settings or setting the delay time and playing...

Страница 22: ...RAT INGS SEL ECT 0 9 DEC I S I ON ENTER BUTTON RAT I NG L EVEL PASSWORD CURRENT PASSWORD PL EASE ENTER PASSWORD 3 Use the number buttons to input a 4 digit password then press the ENTER button The se...

Страница 23: ...ng DVDs containing English captions ON Select this to display the captions on the screen when playing DVDs containing English captions e When COMPRESSION is selected OFF Factory default Select this fo...

Страница 24: ...red item Interactive DVDs are DVDs including multiple angles stories etc 6 Use the cursor buttons 0 and 1 to select the desired item For some discs there is a second menu screen If so press the 9 butt...

Страница 25: ...ng to the Beginning of Chapters or Tracks Cueing using the SKIP buttons During playback press one of the SKIP buttons on the main unit or the remote control unit 8 Reverse direction PREVIOUS 9 Forward...

Страница 26: ...the instructions on the screen Once the password is input the disc can be played as many times as you want until it is removed If you make a mistake when inputting the password press the CLEAR button...

Страница 27: ...setting modes on the display 50 kHz Factory default When playing Super Audio CDs high frequencies of 50 kHz and higher are cut 100 kHz When playing Super Audio CDs high frequencies of 100 kHz and high...

Страница 28: ...0 This performs removal of the color signal component for images in which the color signal component is mixed with the brightness signal Only effective with progressive images MEMORY1 1 2 3 0 2 6 6 R...

Страница 29: ...N 0 05 59 12 USING THE ON SCREEN DISPLAY 2 Use this function to display and change information on the disc titles chapters time etc 1 In the play mode press the DISPLAY button The On Screen Display ap...

Страница 30: ...Normal playback Track repeated Repeat playback cancelled Entire disc repeated To return to normal playback Return to normal playback by pressing the REPEAT button until REPEAT OFF appears on the TV s...

Страница 31: ...ontrol unit ENTER 1 7 0 2 8 10 3 9 4 5 6 TOP MENU DISPLAY NTSC PAL CALL RETURN SKIP SLOW SEARCH POWER ANGLE SUBTITLE AUDIO SEARCHMODE PLAY STILL PAUSE STOP PROG DIR CLEAR SRS TS OPEN CLOSE ON OFF T ME...

Страница 32: ...s or have been finalized is recommended Direct track selection using the remote control numerical keys 0 to 9 and 10 can specify up to 179 tracks 179 files per folder When 179 tracks are exceeded whil...

Страница 33: ...layed by adding the extension MP3 after the file name consisting of up to 8 capital or numbers and recording the files on the CD R RW Do not apply stickers tape etc to either the label side or the sig...

Страница 34: ...on the screen at this time zoom in and zoom out using the search keys 6 zoom out 7 zoom in When the image is zoomed use the cursor buttons 0 and 1 to move the zoomed picture Continuous playback SLIDE...

Страница 35: ...he disc is replaced 2 With DVDs containing multiple subtitle language signals the subtitle language can be switched during playback Switching the Subtitle Language Multiple Subtitle Function ENTER 1 7...

Страница 36: ...At scenes where multiple angles are recorded the angle can be switched TOP MENU Apple Orange Peach Banana Strawberry Pineapple TOP MENU Apple Orange Peach Banana Strawberry Pineapple 20 USING THE MEN...

Страница 37: ...n start playback from the marked position whenever you want 1 During playback press the MARKER button The marker screen appears Use the 0 and 1 cursor buttons to select the X marks X is displayed if t...

Страница 38: ...ondensation on the disc or player Let stand for 1 or 2 hours Discs other than DVDs SuperAudio CDs video CDs and music CDs cannot be played Disc is dirty Wipe off the dirt Check the connections Check t...

Страница 39: ...FL FR output connector Pin jacks 2 sets Multi channel C SW SL SR output connector Pin jack 1 set AV 1 connector 1 set AV 2 connector 1 set Audio output properties 1 Frequency response q DVDs linear PC...

Страница 40: ...16 11 YUSHIMA 3 CHOME BUNKYO KU TOKYO 113 0034 JAPAN Telephone 03 3837 5321 Printed in China 511 4042 001...

Отзывы: