(3) Inputting the Memory Data
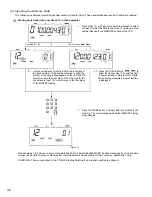
The following examples demonstrate how memory data is input. These examples assume both discs are loaded.
Storing start track data only (track 12 in this example)
Ten key (0 - 9)
2-1. Use the number keys to input a digit for the tens place of
the track number. If the number entered is valid, the
number of the key pressed appears on the LCD and the
cursor moves to the ones place. When the digit for the
ones place is input, the cursor moves to the tens place
of the MINUTE display.
TRACK button
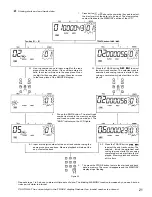
1.
Press button
the disc for which the data is to be input. The memory step
number flashes in the MEMORY section of the LCD.
2-2. Press the TRACK button
select the track number. The selected track
is searched and cueing to music starts.
When cueing completed, music start time
is displayed.
3.
Press the STORE button. The input data is now stored in the
memory. The cursor disappears and the MEMORY display
stops flashing.
Figure
24
Repeat steps 1 to 3 above to store more start track data. The blinking MEMORY location increases by one each time
a new set of data is stored. Remember that these start tracks apply to the currently loaded disc only.
CAUTION: The current digit in the TRACK display flashes if an invalid number is entered.
20
or
above the numerical keypad to select
to


