VIVOTEK
User's Manual - 89
The frame rate will decrease if you select a higher resolution.
■ Intra frame period
Determine how often for firmware to plant an I frame. The shorter the duration, the more likely
you will get better video quality, but at the cost of higher network bandwidth consumption. Select
the intra frame period from the following durations: 1/4 second, 1/2 second, 1 second, 2 seconds,
3 seconds, and 4 seconds.
■ Dynamic Intra frame period
High quality motion codecs, such as H.265, utilize the redundancies between video frames to
deliver video streams at a balance of quality and bit rate.
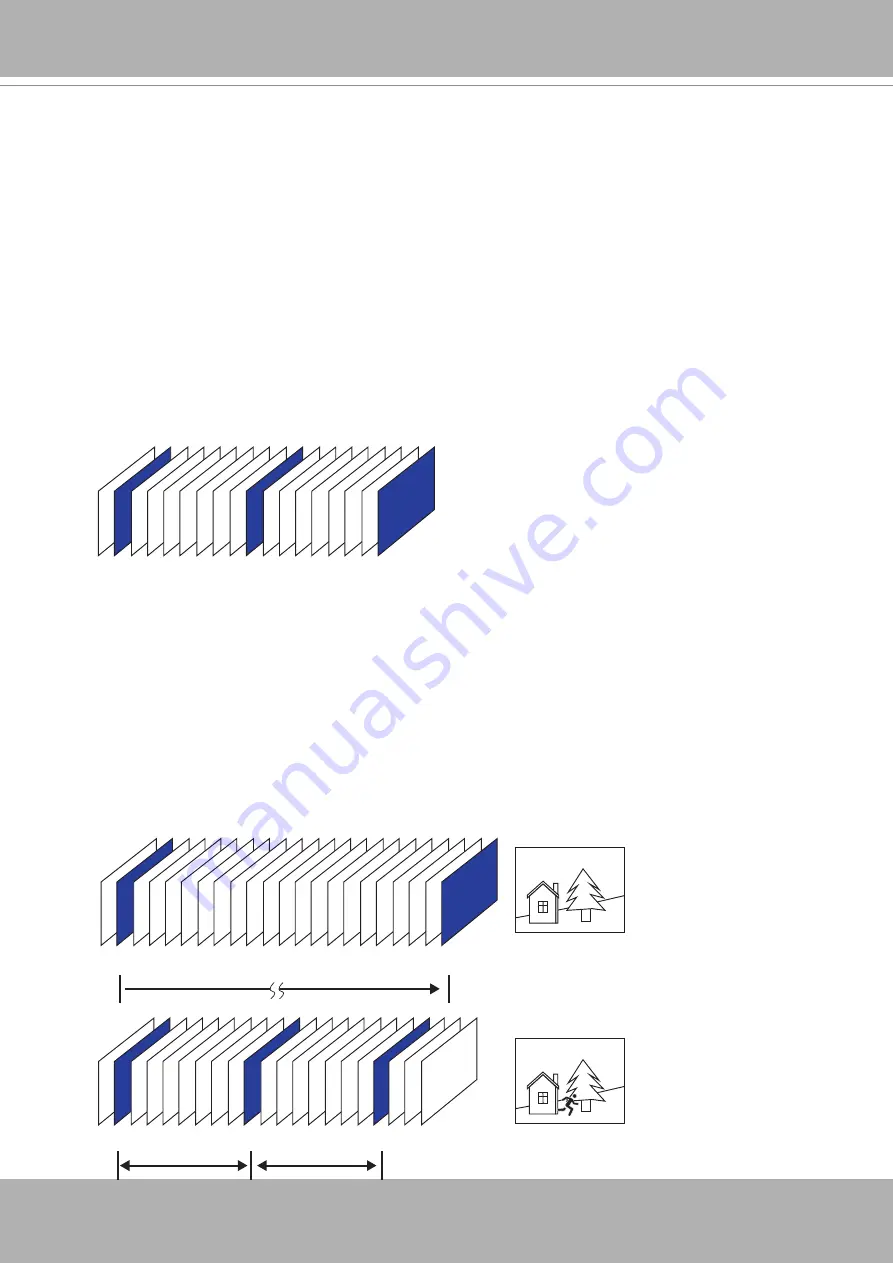
The encoding parameters are summarized and illustrated below. The
I-frames
are completely
self-referential and they are largest in size. The
P-frames
are predicted frames. The encoder
refers to the previous I- or P-frames for redundant image information.
P I P P P P P P P P P P P P P P P P P P P I
P I P P P P P P P I P P P P P P P I
Static scene
Activities
P P P
P I P P P P P P P I P P P P P P P I
By dynamically prolonging the intervals for I-frames insertion to up to 10 seconds, the bit rates
required for streaming a video can be tremendously reduced. When streaming a video of a
static scene, the Dynamic Intra frame feature can save up to 53% of bandwidth. The amount of
bandwidth thus saved is also determined by the activities in the field of view. If activities occur
in the scene, firmware automatically shortens the I-frame insertion intervals in order to maintain
image quality. In the low light or night conditions, the sizes of P-frames tend to be enlarged due
to the noises, and hence the bandwidth saving effect is also reduced.
Streaming a typical 2MP scene normally requires 3~4Mb/s of bandwidth. With the Dynamic Intra
frame function, the bandwidth for streaming a medium-traffic scene can be reduced to 2~3Mb/s,
and during the no-traffic period of time, down to 500kb/s.
H.264/265 Frame Types
Dynamic Intra Frame w/
static scenes
Dynamic Intra Frame w/
activities in scenes
■
Smart stream III
Содержание Vivotek FD9189-H-V2
Страница 9: ...VIVOTEK User s Manual 9 Lens IR LEDs Reset button MicroSD card slot LEDst ...
Страница 13: ...VIVOTEK User s Manual 13 7 Connect the Ethernet cable to the RJ45 socket ...
Страница 20: ...VIVOTEK 20 User s Manual 12 Install the dome cover 13 Remove the protective sheet from the dome cover ...
Страница 26: ...VIVOTEK 26 User s Manual 10 Secure the camera to wall or ceiling using the included screws ...
Страница 104: ...VIVOTEK 104 User s Manual ...


