


Getting Started Guide
9
3
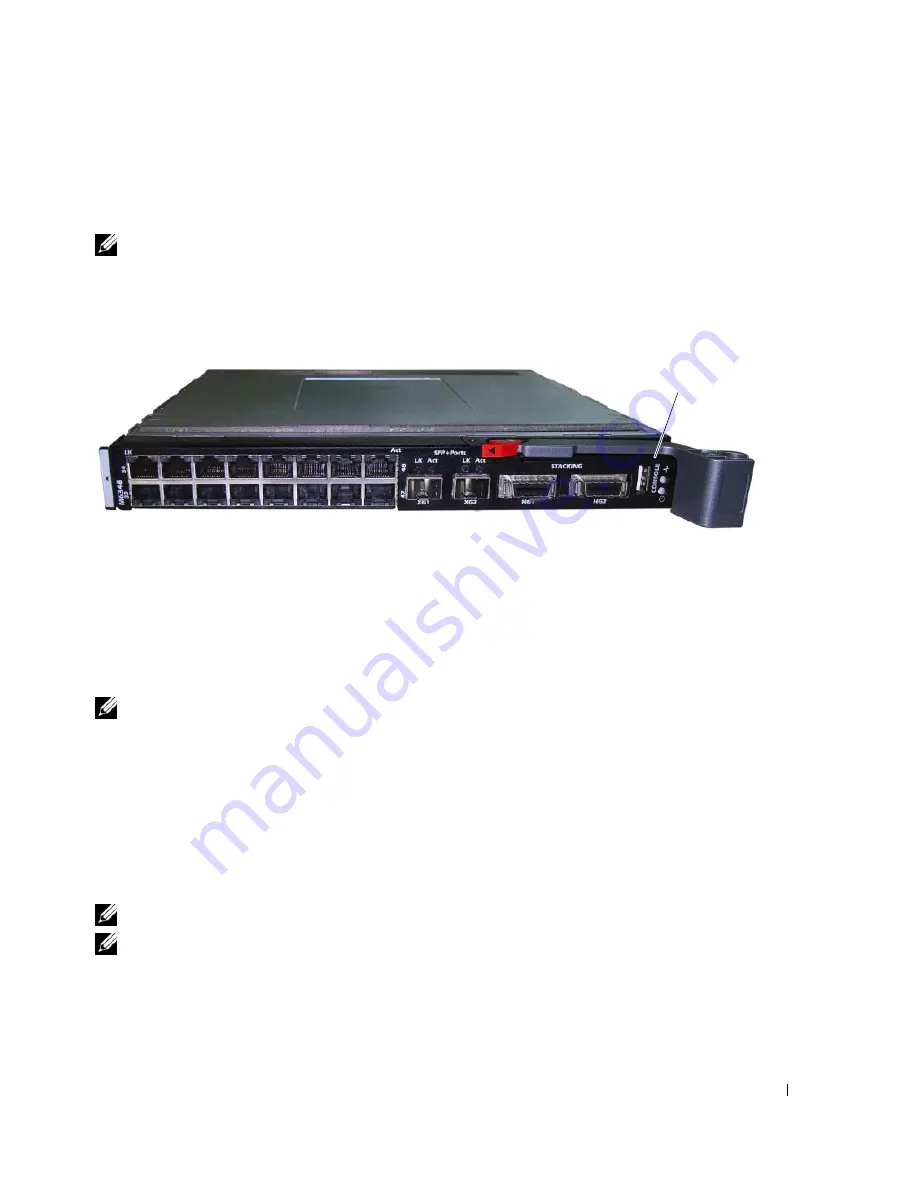
Connect the USB type A connector on the USB cable directly to the switch USB console port.
The PowerConnect M6348 USB console port is located on the left side of the rear panel, as
shown in Figure 2.
NOTE:
If you are installing a stack of switches, connect the terminal to the Master Switch. When a stack
is powered up for the first time, the switches elect the Master Switch, which may occupy any location in
the stack. If you connect the terminal to a member switch, you will not be able to use the CLI.
Figure 2.
Connecting to the Console Port
Booting the Switch
Refer to the
Hardware Owner’s Manual
for instructions on booting the switch.
Initial Configuration
NOTE:
The initial simple configuration procedure is based on the following assumptions:
•
The PowerConnect switch was never configured before and is in the same state as when you
received it.
•
The PowerConnect switch booted successfully.
•
The console connection was established and the Dell Easy Setup Wizard prompt appears on the
screen of a VT100 terminal or terminal equivalent.
The initial switch configuration is performed through the console port. After the initial
configuration, you can manage the switch either from the already-connected console port or
remotely through an interface defined during the initial configuration.
NOTE:
The switch is not configured with a default user name and password.
NOTE:
All of the settings below are necessary to allow the remote management of the switch through
Telnet (Telnet client) or HTTP (Web browser).
console port
Содержание PowerConnect M6348
Страница 2: ......
Страница 23: ...w w w d e l l c o m s u p p o r t d e l l c o m Dell PowerConnect M6348 交换机 使用入门指南 型号 PCM6348 ...
Страница 26: ...24 高级配置 35 从 DHCP 服务器检索 IP 地址 35 安全保护管理和密码配置 37 管理交换机 使用 Web 浏览器管理交换机 39 启动应用程序 39 了解接口 39 ...
Страница 42: ...40 使用入门指南 w w w d e l l c o m s u p p o r t d e l l c o m ...
Страница 43: ...w w w d e l l c o m s u p p o r t d e l l c o m Dell PowerConnect M6348 交換機 入門指南 機型 PCM6348 ...
Страница 46: ...44 進階設定 56 從 DHCP 伺服器擷取 IP 位址 56 安全管理和密碼設定 58 管理交換機 使用 Web 瀏覽器管理交換機 60 啟動應用程式 60 瞭解介面 60 ...
Страница 49: ...入門指南 47 圖 1 連接交換機堆疊 註 形成的環形拓樸可讓整個堆疊用作一台具有靈活故障移轉功能的交換機 堆疊纜線 上層及下層堆疊連 接埠 ...
Страница 84: ...82 Guide de mise en route w w w d e l l c o m s u p p o r t d e l l c o m ...
Страница 106: ...104 Handbuch zum Einstieg w w w d e l l c o m s u p p o r t d e l l c o m ...
Страница 107: ...w w w d e l l c o m s u p p o r t d e l l c o m Dell PowerConnect Switch M6348 Panduan Pengaktifan Model PCM6348 ...
Страница 127: ...w w w d e l l c o m s u p p o r t d e l l c o m Dell PowerConnect M6348 スイッチ はじめに モデル PCM6348 ...
Страница 147: ...w w w d e l l c o m s u p p o r t d e l l c o m Dell PowerConnect M6348 스위치 시작 안내서 PCM6348 모델 ...
Страница 150: ...148 보안 관리 및 암호 구성 162 스위치 관리 웹 브라우저를 사용하여 스위치 관리 164 응용프로그램 시작 164 인터페이스 이해 164 ...
Страница 153: ...시작 안내서 151 그림 1 스위치 스택 연결 주 최종적인 링형 토폴로지를 통해 전체 스택이 고속 장애 복구 기능을 가진 단일 스위치로 작동할 수 있습니다 스태킹 케이블 상위 및 하위 스태 킹 포트 ...
Страница 188: ...186 Guía de introducción w w w d e l l c o m s u p p o r t d e l l c o m ...
Страница 208: ...w w w d e l l c o m s u p p o r t d e l l c o m Dell PowerConnect מתגי M6348 עבודה תחילת מדריך דגם PCM6348 ...


