Back to Contents Page
Fan
Dell™ OptiPlex™ 780 Service Manual—Desktop
WARNING:
Before working inside your computer, read the safety information that shipped with your
computer. For additional safety best practices information, see the Regulatory Compliance Homepage at
www.dell.com/regulatory_compliance.
Removing the Fan
1. Follow the procedures in
Before Working Inside Your Computer
.
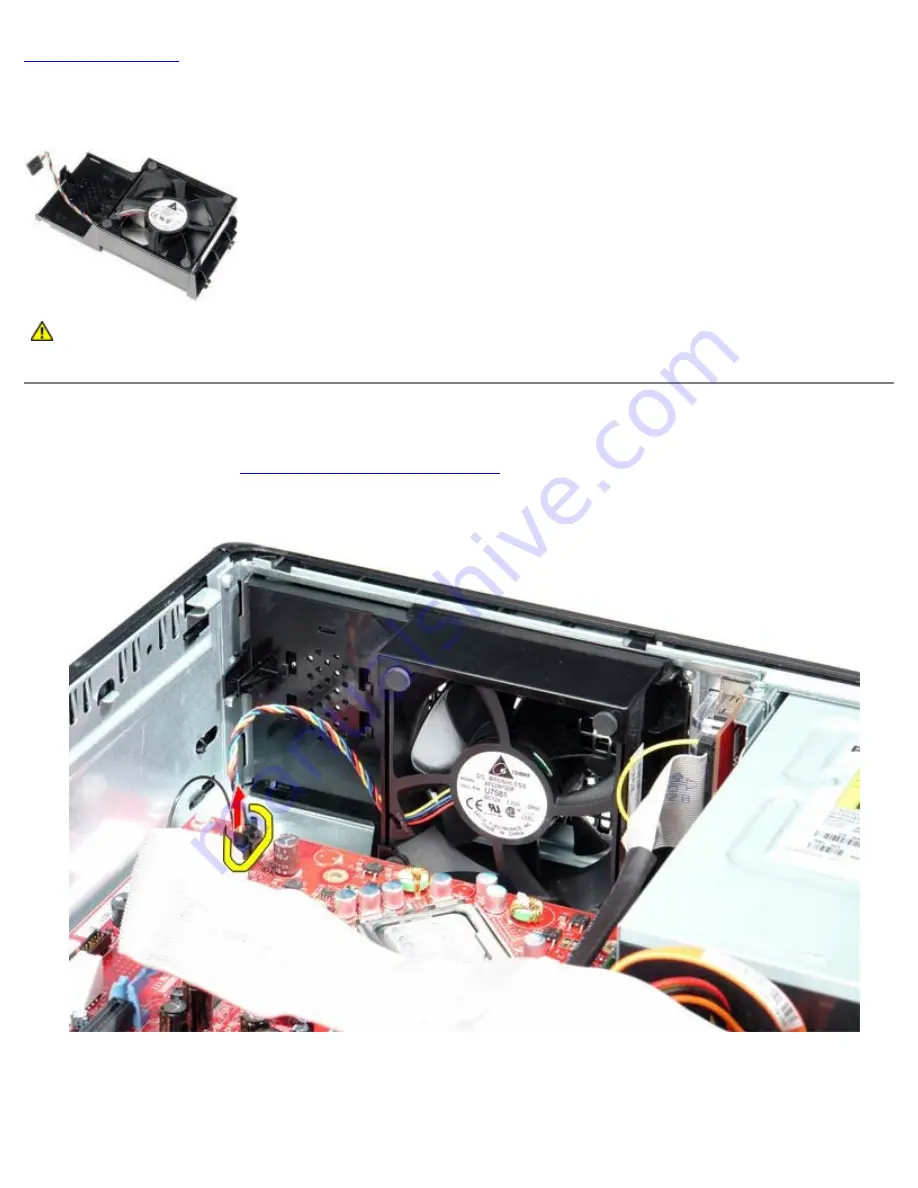
2. Disconnect the fan power cable from the system board.
3. Pull out the fan retention tab, and then shift the fan towards the system board.
Содержание OptiPlex 780
Страница 2: ......
Страница 26: ...7 Lift the hard drive and remove it from the system ...
Страница 29: ...4 Pull up on the drive release latch and then slide the floppy drive towards the back of the computer ...
Страница 30: ...5 Lift the floppy drive up and away from the computer ...
Страница 37: ...7 Release the processor power connector cable from routing guides under the system board ...
Страница 38: ...8 Remove the screws that secure the power supply to the back of the chassis ...
Страница 40: ...10 Lift the power supply up and away from the computer ...
Страница 43: ...4 Lift the fan and remove it from the computer ...
Страница 44: ...Replacing the Fan To replace the fan perform the above steps in reverse order Back to Contents Page ...
Страница 46: ...6 Disconnect the fan power cable 7 Disconnect the main power cable from the system board ...
Страница 47: ...8 Disconnect the IO panel cable ...
Страница 48: ...9 Disconnect the optical drive data cable from the system board ...
Страница 49: ...10 Disconnect the hard drive data cable from the system board ...
Страница 50: ...11 Disconnect the processor power cable ...
Страница 51: ...12 Remove the screws that secure the system board to the computer chassis ...
Страница 52: ...13 Remove the heat sink assembly bracket ...
Страница 56: ...4 Lift the drive release latch and then slide the drive towards the back of the computer ...
Страница 57: ...5 Lift and remove the drive from the computer ...
Страница 61: ...6 Lift the hard drive and remove it from the computer ...
Страница 64: ...4 Gently pull the riser cage handle and lift the riser cage up and away from the computer ...
Страница 65: ...5 On the riser cage rotate the card retention latch upward ...
Страница 69: ......
Страница 71: ...3 Rotate the heat sink upwards 4 Lift the heat sink and remove it from the computer ...
Страница 73: ...6 Lift the processor cover ...
Страница 74: ...7 Remove the processor from the computer ...
Страница 79: ...4 Gently rotate the IO panel away from the computer and then remove it from the computer ...
Страница 80: ...Replacing the IO Panel To replace the IO panel perform the above steps in reverse order Back to Contents Page ...


