background image

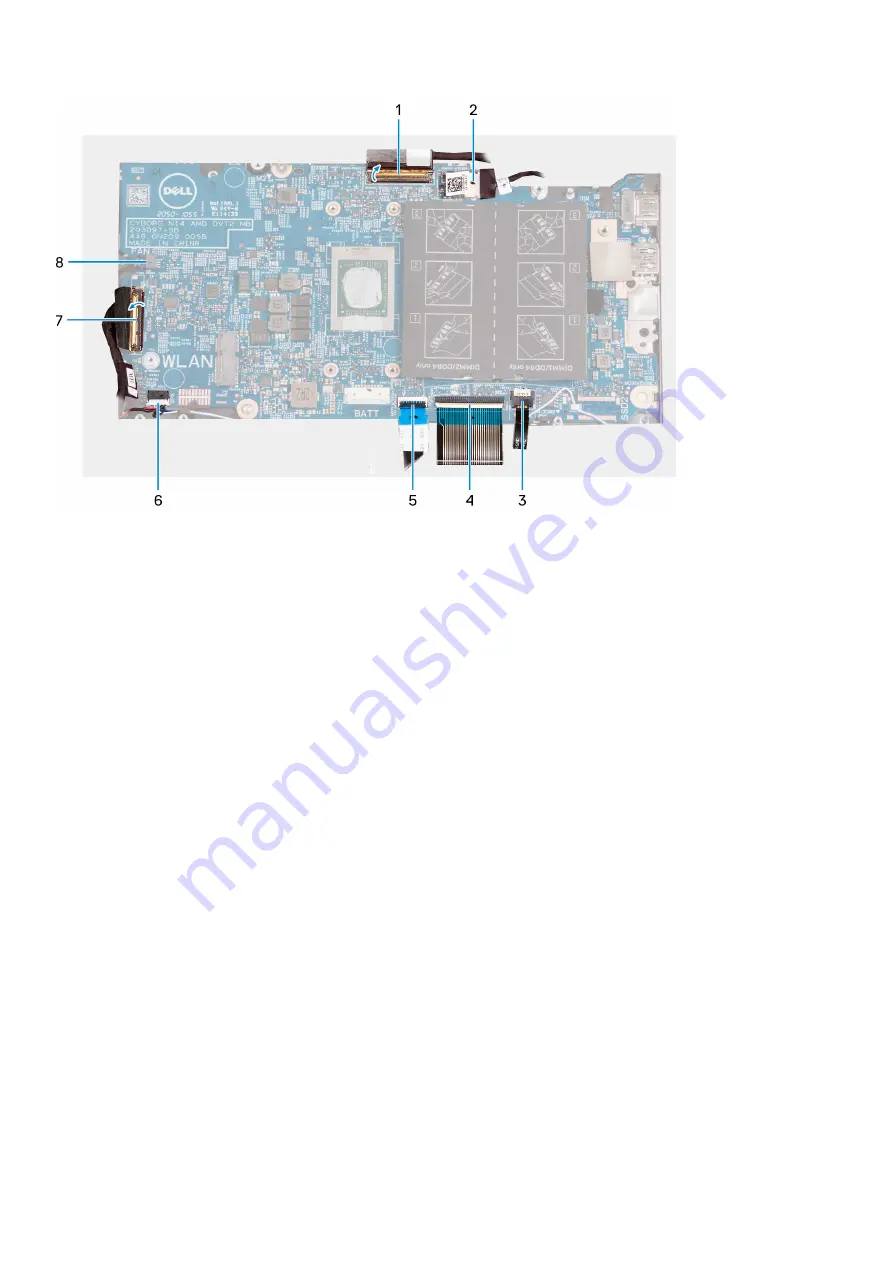
1. display cable
2. power-adapter port-cable
3. keyboard-backlight cable
4. keyboard cable
5. touchpad cable
6. speaker cable
7. I/O-board cable
8. fan cable

The following image(s) indicate the location of the system board and provides a visual representation of the installation
procedure.

56

Removing and installing components

Содержание Inspiron 14 5415

Страница 1: ...Inspiron 14 5415 Service Manual Regulatory Model P143G Regulatory Type P143G002 September 2021 Rev A01 ...

Страница 2: ...ential damage to hardware or loss of data and tells you how to avoid the problem WARNING A WARNING indicates a potential for property damage personal injury or death 2021 Dell Inc or its subsidiaries All rights reserved Dell EMC and other trademarks are trademarks of Dell Inc or its subsidiaries Other trademarks may be trademarks of their respective owners ...

Страница 3: ... cable 18 Installing the 4 cell battery cable 19 Battery 20 Lithium ion battery precautions 20 Removing the 3 cell battery 21 Installing the 3 cell battery 21 Removing the 4 cell battery 22 Installing the 4 cell battery 23 Coin cell battery 24 Removing the coin cell battery 24 Installing the coin cell battery 25 Solid state drive 26 Removing the M 2 2230 solid state drive 26 Installing the M 2 223...

Страница 4: ... Removing the system board 52 Installing the system board 55 Palm rest and keyboard assembly 59 Removing the palm rest and keyboard assembly 59 Installing the palm rest and keyboard assembly 60 Chapter 3 Drivers and downloads 62 Chapter 4 System setup 63 Entering BIOS setup program 63 Navigation keys 63 Boot Sequence 64 System setup options 64 System and setup password 69 Assigning a system setup ...

Страница 5: ...f your Dell computer 73 System diagnostic lights 74 SupportAssist On board Diagnostics 75 Recovering the operating system 75 WiFi power cycle 75 Drain residual flea power perform hard reset 76 Chapter 6 Getting help and contacting Dell 77 Contents 5 ...

Страница 6: ...r computer For more safety best practices see the Regulatory Compliance home page at www dell com regulatory_compliance WARNING Disconnect your computer from all power sources before opening the computer cover or panels After you finish working inside the computer replace all covers panels and screws before connecting your computer to an electrical outlet CAUTION To avoid damaging the computer ens...

Страница 7: ...ethods of handling parts are no longer applicable Two recognized types of ESD damage are catastrophic and intermittent failures Catastrophic Catastrophic failures represent approximately 20 percent of ESD related failures The damage causes an immediate and complete loss of device functionality An example of catastrophic failure is a memory DIMM that has received a static shock and immediately gene...

Страница 8: ...ounds if the test fails Insulator Elements It is critical to keep ESD sensitive devices such as plastic heat sink casings away from internal parts that are insulators and often highly charged Working Environment Before deploying the ESD Field Service kit assess the situation at the customer location For example deploying the kit for a server environment is different than for a desktop or portable ...

Страница 9: ...eep the load close The closer it is to your spine the less force it exerts on your back 5 Keep your back upright whether lifting or setting down the load Do not add the weight of your body to the load Avoid twisting your body and back 6 Follow the same techniques in reverse to set the load down After working inside your computer About this task CAUTION Leaving stray or loose screws inside your com...

Страница 10: ...Ensure that the screws are not left attached to such surfaces when replacing a component NOTE Screw color may vary with the configuration ordered Table 1 Screw list Component Secured to Screw type Quantity Screw image Base cover Palm rest and keyboard assembly M2x4 5 Base cover Palm rest and keyboard assembly M2x7 captive 2 Battery Palm rest and keyboard assembly M2x3 3 cell 4 4 cell 5 Solid state...

Страница 11: ...1 Type C port bracket System board M2x4 2 Display hinges Palm rest and keyboard assembly M2 5x4 4 I O board Palm rest and keyboard assembly M2x3 1 System board Palm rest and keyboard assembly M2x2 2 Major components of Inspiron 14 5415 The following image shows the major components of Inspiron 14 5415 Removing and installing components 11 ...

Страница 12: ... part numbers for the original system configuration purchased These parts are available according to warranty coverages purchased by the customer Contact your Dell sales representative for purchase options Base cover Removing the base cover Prerequisites 1 Follow the procedure in Before working inside your computer About this task NOTE Before removing the base cover ensure that there is no micro S...

Страница 13: ...Removing and installing components 13 ...

Страница 14: ... and keyboard assembly 5 Peel the tape that secures the battery cable to the battery 6 Disconnect the battery cable from the system board 7 Press and hold the power button for 20 seconds to ground the computer and drain the flea power Installing the base cover Prerequisites If you are replacing a component remove the existing component before performing the installation process About this task The...

Страница 15: ...Removing and installing components 15 ...

Страница 16: ...Replace the five screws M2x4 that secure the base cover to the palm rest and keyboard assembly Next steps 1 Follow the procedure in After working inside your computer Battery cable Removing the 3 cell battery cable Prerequisites 1 Follow the procedure in Before working inside your computer 2 Remove the base cover About this task The following image s indicate the location of the 3 cell battery cab...

Страница 17: ... cable from the 3 cell battery 5 Lift the battery cable off the 3 cell battery Installing the 3 cell battery cable Prerequisites If you are replacing a component remove the existing component before performing the installation process About this task The following image s indicate the location of the 3 cell battery cable and provides a visual representation of the installation procedure Removing a...

Страница 18: ...e 3 cell battery Next steps 1 Install the base cover 2 Follow the procedure in After working inside your computer Removing the 4 cell battery cable Prerequisites 1 Follow the procedure in Before working inside your computer 2 Remove the base cover About this task The following image s indicate the location of the 4 cell battery cable and provides a visual representation of the removal procedure 18...

Страница 19: ... cable from the 4 cell battery 5 Lift the battery cable off the 4 cell battery Installing the 4 cell battery cable Prerequisites If you are replacing a component remove the existing component before performing the installation process About this task The following image s indicate the location of the 4 cell battery cable and provides a visual representation of the installation procedure Removing a...

Страница 20: ...t Disconnect the AC power adapter from the system and operate the computer solely on battery power the battery is fully discharged when the computer no longer turns on when the power button is pressed Do not crush drop mutilate or penetrate the battery with foreign objects Do not expose the battery to high temperatures or disassemble battery packs and cells Do not apply pressure to the surface of ...

Страница 21: ...batteries Removing the 3 cell battery Prerequisites 1 Follow the procedure in Before working inside your computer 2 Remove the base cover About this task The following image s indicate the location of the 3 cell battery and provides a visual representation of the removal procedure Steps 1 Peel the tape that secures the battery cable to the 3 cell battery 2 Disconnect the battery cable from the sys...

Страница 22: ...ard assembly 3 Connect the battery cable to the system board 4 Adhere the tape that secures the battery cable to the 3 cell battery Next steps 1 Install the base cover 2 Follow the procedure in After working inside your computer Removing the 4 cell battery Prerequisites 1 Follow the procedure in Before working inside your computer 2 Remove the base cover About this task The following image s indic...

Страница 23: ...nd keyboard assembly 4 Lift the battery off the palm rest and keyboard assembly Installing the 4 cell battery Prerequisites If you are replacing a component remove the existing component before performing the installation process About this task The following image s indicate the location of the 4 cell battery and provides a visual representation of the installation procedure Removing and installi...

Страница 24: ...ures the battery cable to the 4 cell battery Next steps 1 Install the base cover 2 Follow the procedure in After working inside your computer Coin cell battery Removing the coin cell battery Prerequisites 1 Follow the procedure in Before working inside your computer 2 Remove the base cover About this task The following image s indicate the location of the coin cell battery and provides a visual re...

Страница 25: ...nstalling the coin cell battery Prerequisites If you are replacing a component remove the existing component before performing the installation process About this task The following image s indicate the location of the coin cell battery and provides a visual representation of the installation procedure Removing and installing components 25 ...

Страница 26: ...230 solid state drive Prerequisites 1 Follow the procedure in Before working inside your computer 2 Remove the base cover About this task NOTE This procedure applies only to computers shipped with an M 2 2230 solid state drive installed NOTE The M 2 card installed on your computer will depend on the configuration ordered Supported card configurations on the M 2 card slot M 2 2230 solid state drive...

Страница 27: ...sites If you are replacing a component remove the existing component before performing the installation process About this task NOTE This procedure applies if you are installing a M 2 2230 solid state drive NOTE The M 2 card installed on your computer will depend on the configuration ordered Supported card configurations on the M 2 card slot M 2 2230 solid state drive M 2 2230 solid state drive mo...

Страница 28: ...0 solid state drive Prerequisites 1 Follow the procedure in Before working inside your computer 2 Remove the base cover About this task NOTE This procedure applies only to computers shipped with a M 2 2280 solid state drive installed NOTE The M 2 card installed on your computer will depend on the configuration ordered Supported card configurations on the M 2 card slot M 2 2230 solid state drive M ...

Страница 29: ...mponent before performing the installation process About this task NOTE This procedure applies if you are installing a M 2 2280 solid state drive NOTE The M 2 card installed on your computer will depend on the configuration ordered Supported card configurations on the M 2 card slot M 2 2230 solid state drive M 2 2280 solid state drive The following image s indicate the location of the M 2 2280 sol...

Страница 30: ...d state drive to the palm rest and keyboard assembly Next steps 1 Install the base cover 2 Follow the procedure in After working inside your computer Installing the solid state drive mounting bracket About this task The following image provides a visual representation of the procedure to install the solid state drive mounting bracket when replacing a M 2 2230 solid state drive with a M 2 2280 soli...

Страница 31: ...ting bracket and mounting bracket slot 3 Slide and remove the solid state drive mounting bracket from the mounting bracket slot on the palm rest and keyboard assembly 4 Rotate the solid state drive mounting bracket 5 Slide the solid state mounting bracket into the mounting bracket slot on the palm rest and keyboard assembly 6 Adhere the Mylar that covers the solid state drive mounting bracket and ...

Страница 32: ... location of the memory and provides a visual representation of the removal procedure Steps 1 Lift the Mylar to access the memory module 2 Using your fingertips carefully spread apart the securing clips on each end of the memory module slot until the memory module pops up 3 Remove the memory module from the memory module slot on the system board 32 Removing and installing components ...

Страница 33: ...he following image s indicate the location of the memory and provides a visual representation of the installation procedure Steps 1 Lift the Mylar to access the memory module slot 2 Align the notch on the memory module with the tab on the memory module slot on the system board 3 Slide the memory module into the memory module slot on the system board 4 Press down on the memory module till the secur...

Страница 34: ... working inside your computer Wireless card Removing the wireless card Prerequisites 1 Follow the procedure in Before working inside your computer 2 Remove the base cover About this task The following image s indicate the location of the wireless card and provides a visual representation of the removal procedure 34 Removing and installing components ...

Страница 35: ...eless card from the M 2 card slot on the system board Installing the wireless card Prerequisites If you are replacing a component remove the existing component before performing the installation process About this task The following image s indicate the location of the wireless card and provides a visual representation of the installation procedure Steps 1 Connect the antenna cables to the wireles...

Страница 36: ... M2x4 that secures the wireless card and wireless card bracket to the system board Next steps 1 Install the base cover 2 Follow the procedure in After working inside your computer Power adapter port Removing the power adapter port Prerequisites 1 Follow the procedure in Before working inside your computer 2 Remove the base cover About this task The following image s indicate the location of the po...

Страница 37: ...ation of the power adapter port and provides a visual representation of the installation procedure Steps 1 Connect the power adapter port cable to the system board 2 Adhere the tape that covers the power adapter port connector on the system board 3 Route the power adapter port cable through the routing guides on the palm rest and keyboard assembly 4 Place the power adapter port into the slot on th...

Страница 38: ...ollow the procedure in Before working inside your computer 2 Remove the base cover About this task The following image s indicate the location of the display assembly and provides a visual representation of the removal procedure 38 Removing and installing components ...

Страница 39: ... I O board 6 Pry open the left display hinge at an angle of 90 degrees 7 Gently lift the palm rest and keyboard assembly off the display assembly CAUTION To avoid damaging the display do not slide the palm rest and keyboard assembly over the display assembly Installing the display assembly Prerequisites If you are replacing a component remove the existing component before performing the installati...

Страница 40: ...e screw holes on the I O board 4 Replace the two screws M2 5x4 that secure the left display hinge to the palm rest and keyboard assembly 5 Close the right display hinge and align the screw holes on the right display hinge with the screw holes on the system board 6 Replace the two screws M2 5x4 that secure the right display hinge to the palm rest and keyboard assembly 7 Connect the display cable to...

Страница 41: ...oard 2 Pry open the left display hinge at an angle of 90 degrees 3 Lift the I O board cable connector latch and disconnect the I O board cable from the I O board 4 Lift the power button with fingerprint reader cable connector latch and disconnect the power button with fingerprint reader cable from the I O board NOTE This step is only applicable for computers shipped with the optional fingerprint r...

Страница 42: ...rew M2x3 that secures the I O board to the palm rest and keyboard assembly 5 Close the left display hinge and align the screw holes on the left display hinge with the screw holes on the I O board 6 Replace the two screws M2 5x4 that secure the left display hinge to the I O board 7 Connect the I O board cable to the connector on the I O board and close the latch 8 Connect the power button with fing...

Страница 43: ...cell battery or the 4 cell battery whichever applicable About this task The following image s indicate the location of the speakers and provides a visual representation of the removal procedure Steps 1 Peel off the tapes that secure the I O board cable and antenna cables to the palm rest and keyboard assembly Removing and installing components 43 ...

Страница 44: ...ape that secures the speaker cable to the palm rest and keyboard assembly 8 Remove the speaker cables from the routing guides on the palm rest and keyboard assembly 9 Lift the speakers along with their cables off the palm rest and keyboard assembly Installing the speakers Prerequisites If you are replacing a component remove the existing component before performing the installation process About t...

Страница 45: ...se the latch 7 Connect the keyboard backlight cable to the system board and close the latch 8 Place the I O board and antenna cables back into place and adhere the tapes that secure them to the palm rest and keyboard assembly Next steps 1 Install the 3 cell battery or the 4 cell battery whichever applicable 2 Install the base cover 3 Follow the procedure in After working inside your computer Touch...

Страница 46: ...ift the touchpad off the palm rest and keyboard assembly Installing the touchpad Prerequisites If you are replacing a component remove the existing component before performing the installation process About this task The following image s indicate the location of the touchpad and provides a visual representation of the installation procedure Steps 1 Place the touchpad on the palm rest and keyboard...

Страница 47: ...mbly 8 Adhere the tapes that secure the touchpad to the palm rest and keyboard asssembly 9 Connect the touchpad cable to the touchpad and close the latch Next steps 1 Install the 3 cell battery or the 4 cell battery whichever applicable 2 Install the base cover 3 Follow the procedure in After working inside your computer Fan Removing the fan Prerequisites 1 Follow the procedure in Before working i...

Страница 48: ...task The following image s indicate the location of the fan and provides a visual representation of the installation procedure Steps 1 Place the fan on the palm rest and keyboard assembly 2 Align the screw holes on the fan with the screw holes on the palm rest and keyboard assembly 3 Replace the two screws M2x3 that secure the fan to the palm rest and keyboard assembly 4 Connect the fan cable to t...

Страница 49: ...ch the heat transfer areas on the heat sink The oils in your skin can reduce the heat transfer capability of the thermal grease The following image s indicate the location of the heat sink and provides a visual representation of the removal procedure Steps 1 In reverse sequential order 7 6 5 4 3 2 1 loosen the seven captive screws that secure the heat sink to the system board NOTE The number of sc...

Страница 50: ...the location of the heat sink and provides a visual representation of the installation procedure Steps 1 Place the heat sink on the system board 2 Align the screw holes on the heat sink to the screw holes on the system board 3 In sequential order 1 2 3 4 5 6 7 tighten the seven captive screws that secure the heat sink to the system board NOTE The number of screws varies depending on the configurat...

Страница 51: ...tion of the removal procedure Steps 1 Remove the screw M2x3 that secures the power button with optional fingerprint reader off the palm rest and keyboard assembly 2 Peel the tape that secures the fingerprint reader cable to the palm rest and keyboard assembly 3 Lift the power button with optional fingerprint reader off the palm rest and keyboard assembly Installing the power button with optional f...

Страница 52: ...print reader to the palm rest and keyboard assembly 3 Adhere the tape that secures the fingerprint reader cable to the palm rest and keyboard assembly Next steps 1 Install the I O board 2 Install the base cover 3 Follow the procedure in After working inside your computer System board Removing the system board Prerequisites 1 Follow the procedure in Before working inside your computer 2 Remove the ...

Страница 53: ...n your system board 1 display cable 2 power adapter port cable 3 keyboard backlight cable 4 keyboard cable 5 touchpad cable 6 speaker cable 7 I O board cable 8 fan cable The following image s indicate the location of the system board and provides a visual representation of the removal procedure Removing and installing components 53 ...

Страница 54: ...54 Removing and installing components ...

Страница 55: ... Lift the latch and disconnect the touchpad cable from the system board 11 Lift the latch and disconnect the keyboard cable from the system board 12 Lift the latch and disconnect the keyboard backlight cable from the system board NOTE This step is only applicable for computers installed with a backlit keyboard 13 Remove the two screws M2x4 that secure the Type C port bracket to the system board 14...

Страница 56: ...light cable 4 keyboard cable 5 touchpad cable 6 speaker cable 7 I O board cable 8 fan cable The following image s indicate the location of the system board and provides a visual representation of the installation procedure 56 Removing and installing components ...

Страница 57: ...Removing and installing components 57 ...

Страница 58: ...ype C port bracket to the system board 6 Connect the keyboard backlight cable to the connector on the system board and close the latch NOTE This step is only applicable if you are installing a backlit keyboard on your computer 7 Connect the keyboard cable to the connector on the system board and close the latch 8 Connect the touchpad cable to the connector on the system board and close the latch 9...

Страница 59: ...applicable 7 Install the base cover 8 Follow the procedure in After working inside your computer Palm rest and keyboard assembly Removing the palm rest and keyboard assembly Prerequisites 1 Follow the procedure in Before working inside your computer 2 Remove the base cover 3 Remove the 3 cell battery or the 4 cell battery whichever applicable 4 Remove the coin cell battery 5 Remove the M 2 2230 so...

Страница 60: ...d assembly Prerequisites If you are replacing a component remove the existing component before performing the installation process About this task The following image s indicate the location of the palm rest and keyboard assembly and provides a visual representation of the installation procedure 60 Removing and installing components ...

Страница 61: ...y assembly 4 Install the fan 5 Install the touchpad 6 Install the speakers 7 Install the I O board 8 Install the power adapter port 9 Install the wireless card 10 Install the M 2 2280 solid state drive 11 Install the M 2 2230 solid state drive 12 Install the coin cell battery 13 Install the 3 cell battery or the 4 cell battery whichever applicable 14 Install the base cover 15 Follow the procedure ...

Страница 62: ...rivers and downloads When troubleshooting downloading or installing drivers it is recommended that you read the Dell Knowledge Based article Drivers and Downloads FAQ 000123347 3 62 Drivers and downloads ...

Страница 63: ...ling base devices Entering BIOS setup program Steps 1 Turn on your computer 2 Press F2 immediately to enter the BIOS setup program NOTE If you wait too long and the operating system logo appears continue to wait until you see the desktop Then turn off your computer and try again Navigation keys NOTE For most of the System Setup options changes that you make are recorded but do not take effect unti...

Страница 64: ...played Table 4 System setup options Main menu Main System Time Displays the current system time of the computer in HH MM SS format System Date Displays the ownership date of the computer in MM DD YYYY format BIOS Version Displays the BIOS version of the computer Product Name Displays the system model name of the computer Service Tag Displays the service tag of the computer Asset Tag Displays the a...

Страница 65: ...n Key Primary behavior with secondary Options are Multimedia Key Default Function Key Keyboard Illumination Allows to Switch on switch off the Keyboard backlight Options are Disable Dim Bright Default Keyboard Backlight with AC Allows to permanently turn off turn on the Keyboard backlight without the AC adapter Options are from 5 Seconds to 15 Minutes Default option is set to1 Minute Keyboard Back...

Страница 66: ...ot Disable Disable the automatic Boot Options are Enabled Disabled Default Battery Charge Configuration Displays the Battery Charge configuration Options are Adaptive Default Standard ExpressCharge Primarily AC Use Custom Advanced Battery Charge Configutration Displays the Advanced Charge configuration Options are Enabled Disabled Default Power on LID open Controls the Power function on LID open a...

Страница 67: ...nge or delete the administrator password System Password Set change or delete the computer password Password Change Set the status to allow User to set the System Password The options are Permitted Default Disabled Password Bypass Set the status to allow User to bypass System Password The options are Disable Default Reboot Bypass Absolute Set the Status of the Absolute Module on the computer The o...

Страница 68: ...terface PPI When enabled this setting will allow the OS to skip BIOS PPI user prompts when issuing the Clear command The options are Disabled Default Enabled TPM Status Displays the Status of the TPM Module on the computer The options are Disabled Enabled Default UEFI Firmware Capsule Updates Enable or disable BIOS updates through UEFI capsule update packages By default the option is enabled Secur...

Страница 69: ... level of security for the data on your computer CAUTION Anyone can access the data stored on your computer if it is not locked and left unattended NOTE System and setup password feature is disabled Assigning a system setup password Prerequisites You can assign a new System or Admin Password only when the status is in Not Set About this task To enter the system setup press F12 immediately after a ...

Страница 70: ...tem and or Setup password reenter the new password when prompted If you delete the System and or Setup password confirm the deletion when prompted 5 Press Esc and a message prompts you to save the changes 6 Press Y to save the changes and exit from System Setup The computer restarts Clearing CMOS settings About this task CAUTION Clearing CMOS settings will reset the BIOS settings on your computer ...

Страница 71: ... www dell com support 3 Copy the BIOS setup program file to the bootable USB drive 4 Connect the bootable USB drive to the computer that needs the BIOS update 5 Restart the computer and press F12 6 Select the USB drive from the One Time Boot Menu 7 Type the BIOS setup program filename and press Enter The BIOS Update Utility appears 8 Follow the on screen instructions to complete the BIOS update Up...

Страница 72: ...2 menu CAUTION Do not turn off the computer during the BIOS update process The computer may not boot if you turn off your computer Steps 1 From a turn off state insert the USB drive where you copied the flash into a USB port of the computer 2 Turn on the computer and press F12 to access the One Time Boot Menu select BIOS Update using the mouse or arrow keys then press Enter The flash BIOS menu is ...

Страница 73: ...cks and cells Do not apply pressure to the surface of the battery Do not bend the battery Do not use tools of any type to pry on or against the battery If a battery gets stuck in a device as a result of swelling do not try to free it as puncturing bending or crushing a battery can be dangerous Do not attempt to reassemble a damaged or swollen battery into a laptop Swollen batteries that are covere...

Страница 74: ...e following diagnostic light codes and recommended solutions are intended for Dell service technicians to troubleshoot problems You should only perform troubleshooting and repairs as authorized or directed by the Dell technical assistance team Damage due to servicing that is not authorized by Dell is not covered by your warranty Table 10 Diagnostic light LED codes Diagnostic light codes Amber Whit...

Страница 75: ... the diagnostic tests are performed For more information see SupportAssist Pre Boot System Performance Check Recovering the operating system When your computer is unable to boot to the operating system even after repeated attempts it automatically starts Dell SupportAssist OS Recovery Dell SupportAssist OS Recovery is a standalone tool that is preinstalled in all Dell computers installed with Wind...

Страница 76: ...o known as a performing a hard reset is also a common troubleshooting step if your computer does not power on or boot into the operating system To drain residual flea power perform a hard reset Steps 1 Turn off your computer 2 Disconnect the power adapter from your computer 3 Remove the base cover 4 Remove the battery 5 Press and hold the power button for 20 seconds to drain the flea power 6 Insta...

Страница 77: ... Service Tag or Express Service Code at www dell com support For more information on how to find the Service Tag for your computer see Locate the Service Tag on your computer Dell knowledge base articles for a variety of computer concerns 1 Go to www dell com support 2 On the menu bar at the top of the Support page select Support Knowledge Base 3 In the Search field on the Knowledge Base page type...

Отзывы: