


68
www
.dell.com | support.dell.com
3
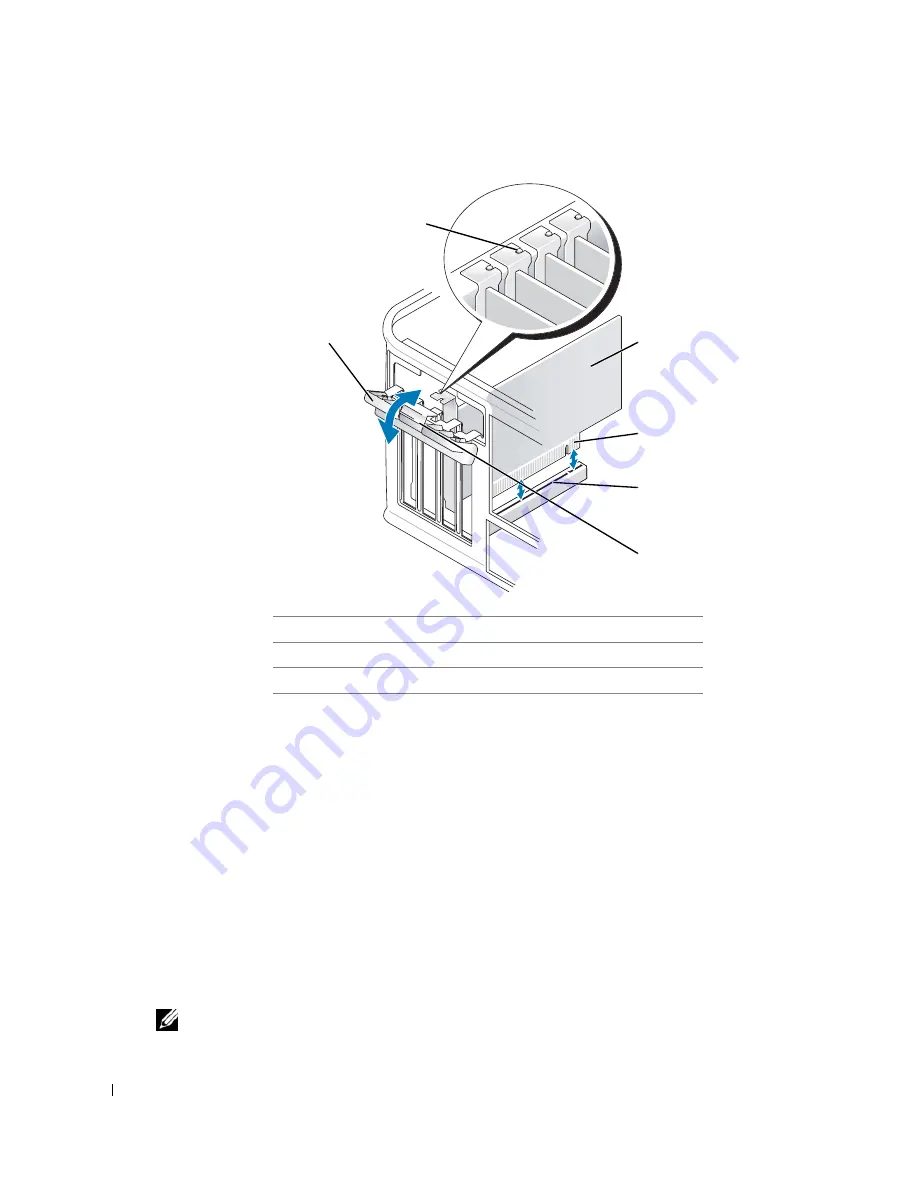
Open the card retention mechanism that secures the card in place from the top:
a
Place your thumb on the top of the card retention mechanism and grip the bottom of the
retention mechanism with your fingers.
b
With your free hand, gently squeeze the sides of the card retention mechanism to release it
from the tab slots holding it in place.
c
Pivot the card retention mechanism upward to release it from the two tab slots.
4
Set the card retention mechanism aside in your work area.
5
If you are installing a new card, remove the filler bracket to create a card-slot opening. Then
continue with step 5.
6
If you are replacing a card that is already installed in the computer, remove the card. If necessary,
disconnect any cables connected to the card.
7
Prepare the new card for installation.
NOTE:
See the documentation that came with the card for information on configuring the card, making
internal connections, or customizing it for your computer
1
card retention latch
4
card-edge connector
2
alignment guide
5
card connector
3
card
6
release tab
2
3
1
4
5
6
Содержание GX620 - 3.6GHz Desktop 1GB RAM 80GB Windows XP SFF
Страница 1: ...1 Dell OptiPlex GX620 User s Guide ...
Страница 14: ...14 Contents ...
Страница 22: ...22 Chassis Intrusion Switch w w w d e l l c o m s u p p o r t d e l l c o m Desktop Computer ...
Страница 23: ...Chassis Intrusion Switch 23 Small Form Factor Computer ...
Страница 27: ...27 Mini Tower Computer w w w d e l l c o m s u p p o r t d e l l c o m Back View 4 3 5 6 2 1 ...
Страница 40: ...40 w w w d e l l c o m s u p p o r t d e l l c o m ...
Страница 64: ...64 w w w d e l l c o m s u p p o r t d e l l c o m ...
Страница 65: ...65 ...
Страница 66: ...66 w w w d e l l c o m s u p p o r t d e l l c o m ...
Страница 82: ...82 w w w d e l l c o m s u p p o r t d e l l c o m ...
Страница 90: ...90 w w w d e l l c o m s u p p o r t d e l l c o m ...
Страница 96: ...96 w w w d e l l c o m s u p p o r t d e l l c o m ...
Страница 112: ...112 w w w d e l l c o m s u p p o r t d e l l c o m 1 security cable slot 2 cover release latch 3 padlock ring ...
Страница 144: ...144 w w w d e l l c o m s u p p o r t d e l l c o m ...
Страница 151: ...151 2 COM Black 3 5 VDC Red 4 COM Black 5 12 VDC Yellow Pin Number Signal name 18 AWG Wire ...
Страница 152: ...152 w w w d e l l c o m s u p p o r t d e l l c o m ...
Страница 170: ...170 w w w d e l l c o m s u p p o r t d e l l c o m ...
Страница 196: ...196 w w w d e l l c o m s u p p o r t d e l l c o m ...
Страница 212: ...212 Ultra Small Form Factor Computer w w w d e l l c o m s u p p o r t d e l l c o m ...
Страница 217: ...217 Altitude Operating 15 2 to 3048 m 50 to 10 000 ft Storage 15 2 to 10 668 m 50 to 35 000 ft Environmental ...
Страница 218: ...218 w w w d e l l c o m s u p p o r t d e l l c o m ...
Страница 220: ...220 w w w d e l l c o m s u p p o r t d e l l c o m ...
Страница 225: ...225 1 bottom of computer 2 device locking screw 1 2 ...
Страница 226: ...226 w w w d e l l c o m s u p p o r t d e l l c o m ...
Страница 238: ...238 w w w d e l l c o m s u p p o r t d e l l c o m ...
Страница 255: ...Advanced Features 255 Small Form Computer Ultra Small Form Factor Computer ...
Страница 262: ...262 Battery w w w d e l l c o m s u p p o r t d e l l c o m ...
Страница 265: ...Replacing the System Board 265 Desktop System Board Screws 1 desktop system board 2 screws 10 1 2 ...
Страница 274: ...274 Replacing the Computer Cover w w w d e l l c o m s u p p o r t d e l l c o m ...
Страница 284: ...284 Reinstalling Drivers and the Operating System w w w d e l l c o m s u p p o r t d e l l c o m ...
Страница 302: ...302 Microsoft Windows XP Features w w w d e l l c o m s u p p o r t d e l l c o m ...
Страница 326: ...326 Troubleshooting Tools and Utilities w w w d e l l c o m s u p p o r t d e l l c o m ...
Страница 350: ...350 Warranty w w w d e l l c o m s u p p o r t d e l l c o m ...


