


88
Installing System Components
4
Locate the memory module sockets. See Figure 6-1.
5
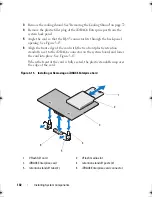
Press the ejectors on the memory module socket down and out, as shown
in Figure 3-10, to allow the memory module to be inserted into the socket.
6
Handle each memory module only on either card edge, making sure not to
touch the middle of the memory module.
Figure 3-10.
Installing and Removing a Memory Module
7
Align the memory module's edge connector with the alignment key of the
memory module socket, and insert the memory module in the socket.
NOTE:
The memory module socket has an alignment key that allows you to
install the memory module in the socket in only one way.
8
Press down on the memory module with your thumbs to lock the memory
module into the socket.
When the memory module is properly seated in the socket, the ejectors on
the memory module socket align with the ejectors on the other sockets
that have memory modules installed.
1
memory module
2
memory module socket ejectors (2)
3
alignment key
2
1
3
book.book Page 88 Friday, February 26, 2010 11:22 AM
Содержание DX6012S
Страница 1: ...Dell DX6012S Systems Hardware Owner s Manual Regulatory Model E13S Series Regulatory Type E13S001 ...
Страница 10: ...10 Contents ...
Страница 40: ...40 About Your System ...
Страница 62: ...66 Using the System Setup Program and UEFI Boot Manager ...
Страница 118: ...122 Installing System Components ...
Страница 134: ...144 Troubleshooting Your System ...
Страница 144: ...154 Jumpers and Connectors ...
Страница 146: ...156 Getting Help ...
Страница 152: ...162 Index ...