


Installing System Components
119
11
Remove the nine screws securing the system board to the chassis and then
slide the system board assembly toward the front end of the chassis.
CAUTION:
Do not lift the system board assembly by grasping a memory module,
processor, or other components.
12
Grasp the system board assembly by the edges and lift the system board
assembly away from the chassis. See Figure 3-21.
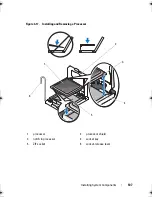
Figure 3-21.
Removing and Installing the System Board
1
screws (9)
2
system board assembly
1
2
book.book Page 119 Friday, February 26, 2010 11:22 AM
Содержание DX6012S
Страница 1: ...Dell DX6012S Systems Hardware Owner s Manual Regulatory Model E13S Series Regulatory Type E13S001 ...
Страница 10: ...10 Contents ...
Страница 40: ...40 About Your System ...
Страница 62: ...66 Using the System Setup Program and UEFI Boot Manager ...
Страница 118: ...122 Installing System Components ...
Страница 134: ...144 Troubleshooting Your System ...
Страница 144: ...154 Jumpers and Connectors ...
Страница 146: ...156 Getting Help ...
Страница 152: ...162 Index ...