Advanced
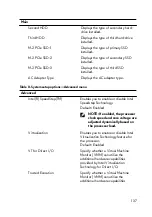
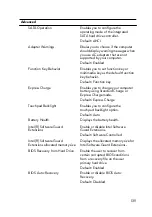
SATA Operation
Enables you to configure the
operating mode of the integrated
SATA hard drive controller.
Default: AHCI
Adapter Warnings
Ebales you to choose if the computer
should display warning messages when
you use AC adapters that are not
supported by your computer.
Default: Enabled
Function Key Behavior
Enables you to set function key or
multimedia key as the default function
key behavior.
Default: Function key
Express Charge
Enables you to charge your computer
battery using Standard Charge or
Express Charge mode.
Default: Express Charge
Touchpad Backlight
Enables you to configure the
touchpad backlight option.
Default: Auto
Battery Health
Displays the battery health.
Intel(R) Software Guard
Extensions
Enable or disable Intel Software
Guard Extensions.
Default: Software Controlled
Intel(R) Software Guard
Extensions allocated memory size
Displays the allocated memory size for
Intel Software Guard Extensions.
BIOS Recovery from Hard Drive
Enable the user to recover from
certain corrupted BIOS conditions
from a recovery file on the user
primary hard drive
Default: Enabled
BIOS Auto-Recovery
Enable or disable BIOS Auto-
Recovery.
Default: Disabled
139
Содержание Alienware 17 R5
Страница 20: ...5 Replace the six screws M2 5x13 that secure the base cover to the computer base 20 ...
Страница 23: ...7 Disconnect the interposer from the hard drive 23 ...
Страница 26: ...7 Connect the hard drive cable to the system board Post requisites Replace the base cover 26 ...
Страница 32: ...3 Slide and remove the solid state drive from the solid state drive slot 32 ...
Страница 36: ...2 Slide and remove the memory module from the memory module slot 36 ...
Страница 38: ...Post requisites Replace the base cover 38 ...
Страница 40: ...3 Pull the rear I O cover from the computer base 40 ...
Страница 42: ...Post requisites Replace the base cover 42 ...
Страница 46: ...6 Lift the computer base off the palm rest assembly 46 ...
Страница 51: ...5 Gently peel the coin cell battery along with its cable off the palm rest assembly 51 ...
Страница 55: ...3 Lift the speakers along with its cable off the palm rest assembly 55 ...
Страница 59: ...4 Turn the I O board over 5 Disconnect the subwoofer cable 59 ...
Страница 60: ...6 Lift the I O board off the palm rest assembly 60 ...
Страница 64: ...2 Lift the subwoofer along with its cable off the palm rest assembly 64 ...
Страница 72: ...25 After performing all the above steps you are left with the system board 72 ...
Страница 80: ...8 Lift the heat sink assembly off the system board 80 ...
Страница 85: ...5 Remove the cable from the routing guides on the palm rest assembly 85 ...
Страница 89: ...2 Lift the power button board along with its cable off the palm rest assembly 89 ...
Страница 95: ...7 Lift the display assembly off the computer base 95 ...
Страница 100: ...2 Lift the battery off the palm rest assembly 100 ...
Страница 108: ...7 Replace the base cover 108 ...
Страница 111: ...4 Peel off the macro keys cable and macro keys backlight cable from the keyboard 111 ...
Страница 112: ...5 Lift the keyboard at an angle and remove it from the tabs on the palm rest assembly 112 ...
Страница 116: ...13 Replace the base cover 116 ...
Страница 118: ...Procedure Lift the macro keys at an angle and release it from the tabs on the palm rest assembly 118 ...
Страница 122: ...Procedure After performing all the prerequisites we are left with the palm rest 122 ...
Страница 124: ...19 Replace the base cover 124 ...


