


16
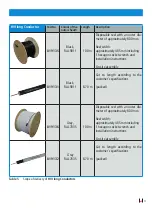
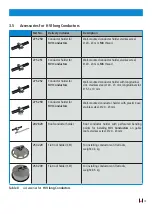
4. Assembly/pre-assembly of HVI Conductors
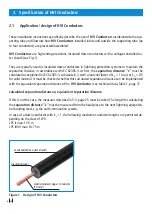
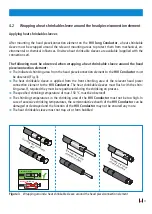
4.1 Mounting the head piece/connection element
To mount/pre-assemble the head piece/connection element, the insulation of the
HVI Conductor
must
be removed by 35 mm (
HVI strip 20
, Part No. 597 220). We recommend to use the
DEHNhelix
stripping tool (Part No. 597 230) to strip the additional grey sheath. If set correctly, the
stripping tool ensures safe stripping without damaging the black semiconductive sheath.
After removing the insulation, the head piece/connection element is attached to the conductor ends of
the
HVI Conductor
.
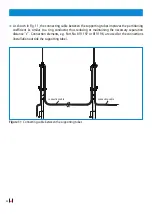
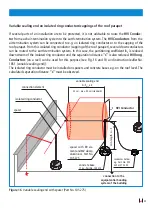
The following steps must be observed (see also Fig. 2):
Â
Bring the head piece/connection element to the
HVI Conductor
and turn it clockwise onto the re-
levant conductor end as far as it will go. To this end, an open-end wrench (wrench size 19) can be
used on the wrench contact surface of the head piece/connection element.
Â
Tighten the two threaded pins (Allen setscrew) using a tightening torque of 5 Nm. Now the copper
conductor of the
HVI Conductor
is safely electrically connected (capable of carrying lightning cur
-
rents).
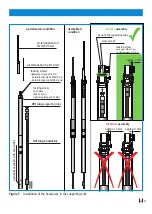
Figure 2
Mounting the head piece/connection element
Ø 10 mm
35 mm
30 mm
M12 thread
grey sheath
HVI long Conductor
threaded pins (coated), tigh
-
tening torque of 5 Nm
head piece
wrench contact surface
(wrench size 19)
wrench contact surface
(wrench size 19)
connection element
solid/stranded copper conductor


