background image

41

 WARNING

O

  Get into the wheelchair in a level and stable location. If you park the wheelchair on 

an incline and try to get into it from there, you may lose your balance and fall

 o

ut. 

O

 When operating the 

E-Drive

 16", have the assistant shift the left and right 

clutch levers. Even if there is no assistant, the individual in the wheelchair should 
still not shift the clutch levers.

O

  If you get into the wheelchair when the left and right clutch levers are in the man-

ual position and the parking brakes are released, the wheelchair may move unex-
pectedly, causing you to fall out and injure yourself. When getting into the wheel-
chair, make sure that the left and right clutch levers are in the power drive position 
and the parking brakes are applied.

O

  When switching the clutch levers to the manual position, apply the parking brakes 

in a level and stable location and have the assistant do so when the power is 
turned off. 

O

  If you are using a wheelchair with no parking brakes, have the assistant hold the 

wheelchair to ensure that it doesn’t move when you are getting into it. If you are 
getting into a wheelchair with no parking brakes when alone, the wheelchair may 
move unexpectedly, causing you to injure yourself or those around you.

O

  Do not ride the wheelchair while a USB device is connected to the USB power port.

Otherwise, the controller might be damaged if the wheelchair bumps into an object. 
Also, a cable connected to the USB device might become coiled around the joy-
stick, the clutch lever, or a rear tire, possibly causing an accident.

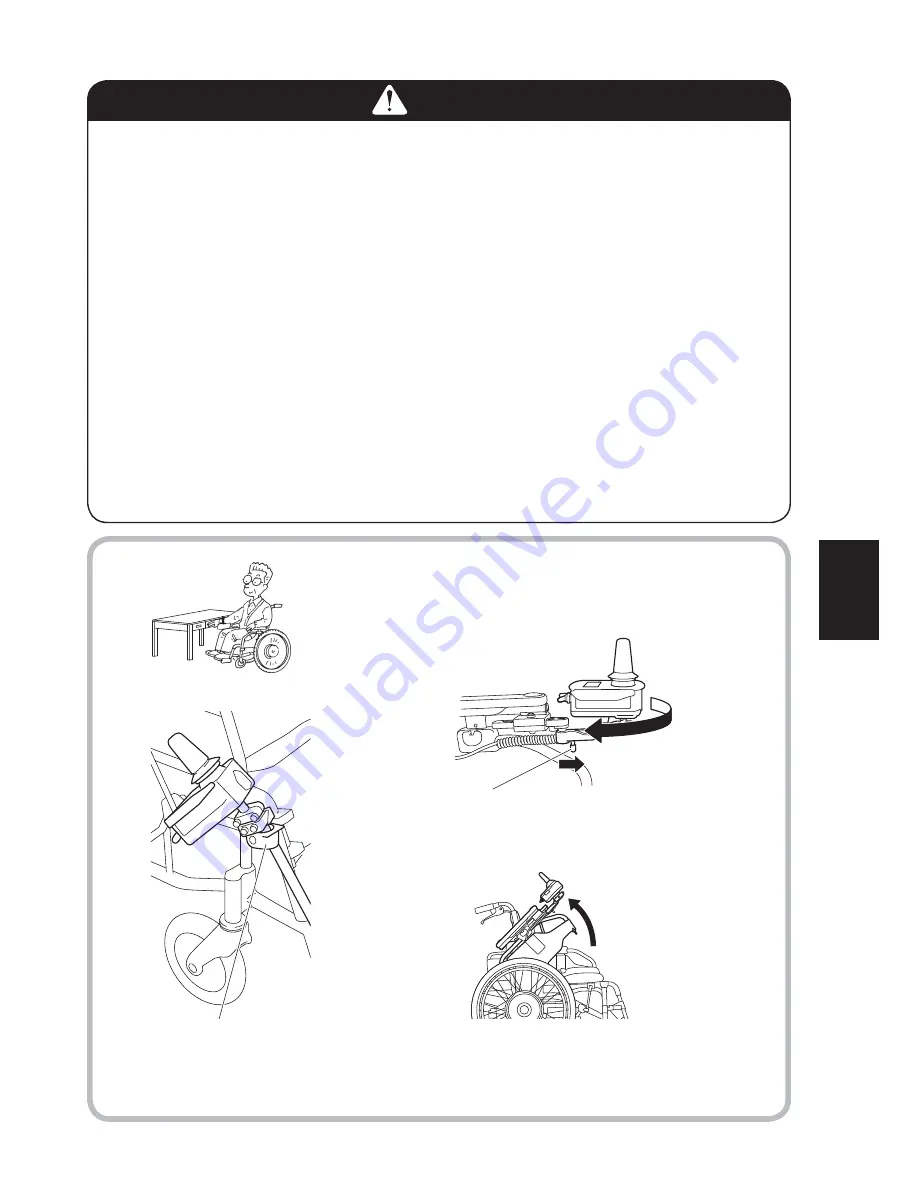
TIP

If the controller is in the way when you get in the wheelchair or 
sit at a table in the wheelchair:

Remove the controller and stow 
it on the lower holder.
For details, refer to pages 79 and 80.

Push the knob forward to turn the controller.

Lift the arm support.

E-Drive

 PLUS

JW Active PLUS

Содержание e-drive plus

Страница 1: ...User manual E Drive plus Decon Wheel AB 2015 Version 1 0...

Страница 2: ...2 HYLTEBRUK SWEDEN Herewith declares that the product E Drive part no series Is in confo The manufacturer is exclusively responsible for this declaration ve including all applicable amendments ve Clas...

Страница 3: ...are located inside the battery box Within the rims there is a registration number with production year and month CE Marks are placed on the motor battery label and charger label Manuals for visually i...

Страница 4: ...ride Battery JWB2 2 6 Nickel Metal Hydride Battery Charger JWC 2 2 7 Lithium Ion Battery ESB1 2 8 Lithium Ion Battery Charger ESC1 33 3 Before Sitting in the Wheelchair 34 3 1 Inspecting the Wheelchai...

Страница 5: ...8 2 How to Use the Nickel Metal Hydride Battery JWB2 59 8 3 Characteristics and Handling of the Nickel Metal Hydride Battery JWB2 61 8 4 How to Charge the Nickel Metal Hydride Battery JWB2 63 8 5 Ref...

Страница 6: ...4 11 2 Anti tip Device 87 11 3 Controller 89 11 4 Assistant Controller Optional 93 11 5 Clutch Levers 93 11 6 Parameter Settings 93 11 7 Smart Tune Settings 95 12 Maintenance Daily Check Periodic Insp...

Страница 7: ...chair frame For the initial use the customer does not have to use tools and so on to assemble the wheelchair Refer to 2 Names of Parts to ensure that these components are installed to the wheelchair t...

Страница 8: ...2 The E Drive 24 withstands a load of 125 kg Use with a total maximum load including the chairframe weight of 125 kg The E Drive 16 withstands a load of 100 kg Use with a maximum load of 100 kg If the...

Страница 9: ...ient attention to safety while traveling 1 Are you able to move the joystick and switches on the controller at your own will 2 Are you able to cor rectly perceive visu ally the conditions of the road...

Страница 10: ...1 Are you able to correctly perceive the conditions of the road surface and your surroundings and avoid dangerous areas 2 Are you able to assist the user to get on and off the wheelchair and to replac...

Страница 11: ...e assistant s com petence consult expert opinions as a point of reference If your judgment is based solely on your own opinion you or other people around you may get injured Expert O If you lack the c...

Страница 12: ...es Always keep the air pressure in the rear tires at a normal level If the air pressure in the rear tires decreases the parking brakes may become ineffective O Before using the wheelchair every day en...

Страница 13: ...ment The wheelchair could easily fall backward on an inclined slope and may cause you or other people around you to get injured O The wheelchair may tip over if it is operat ed with the anti tip devic...

Страница 14: ...do not switch the clutch levers to the manual position The wheelchair may start moving unexpectedly and may collide or tip over O Do not operate the clutch levers while the wheelchair is in motion Th...

Страница 15: ...rated or after operation do not touch the back of the drive units During or after operation the back of the drive units may be hot In addition if the wheelchair is near a source of heat the drive unit...

Страница 16: ...ith the power turned off switch the clutch levers O If you are using a wheelchair with no park ing brakes have the assistant hold the wheelchair to ensure that it does not move Failure to observe the...

Страница 17: ...and other electronic devices turned off Otherwise there is a risk of an accident O Do not operate the wheelchair near a de vice that produces strong radio waves If the wheelchair is near a source of r...

Страница 18: ...ur pose than to provide assistance to a disabled person O Do not ride with clothing that is unsafe for wheelchairs such as shown below If you drive with such clothing you or other people around you ma...

Страница 19: ...re pedestrians walk O If two or more wheelchairs are traveling together outdoors the wheelchairs should be operated in a single line with sufficient space between the wheelchairs The wheel chairs shou...

Страница 20: ...tch the tire may fall into it if there is a gap even if it is cov ered Have an assistant accompany you instead of traveling alone O If there are any obstacles stop the wheelchair and check in front of...

Страница 21: ...may become ineffec tive O When going up down a particular slope for the first time have an assistant accompany you to ensure safety O In areas with an incline do not switch the clutch levers to the m...

Страница 22: ...r ward when descending the passenger may plunge forward and fall off the wheelchair WARNING The wheelchairs equipped with the E Drive are built to be lighter compared to other electric wheelchairs tha...

Страница 23: ...mall they are able to travel over only small curbs Therefore caution is necessary when trav eling over curbs in power drive mode O When traveling between a sidewalk and a road be careful of curbs O To...

Страница 24: ...olded temporarily depending on the height of the curb After traveling over the curb be sure to place the safety wheels of the anti tip device in the correct position before oper ating the wheelchair W...

Страница 25: ...ad at a location where there is a traffic light or crosswalk O When crossing a street at a crosswalk with no traffic light pay sufficient attention to the traffic O If there is a pedestrian signal lig...

Страница 26: ...t caught in the railroad tracks O Be careful not to travel too close to the edge when traveling over a railroad cross ing Otherwise the wheels could accidentally move off the railroad crossing If case...

Страница 27: ...r on a frozen surface You may not be able to stop the wheelchair O Go around locations where snow or water has accumulated or have an assistant ac company you In such places where you do not know the...

Страница 28: ...instructions when boarding the ve hicle O When using a private automobile do not use the wheelchair as a seat Sit in one of the automobile s seats O When getting on off a lift vehicle always have an...

Страница 29: ...When getting in the wheelchair in a crowd ed area do so with sufficient attention to your surroundings If you bump into people or objects your body may plunge forward or other people around you may ge...

Страница 30: ...quip ment O Do not turn the wheelchair upside down Doing so may cause parts of the wheel chair to fall off resulting in an injury or damage to the equipment O Do not put your hands or fingers beside o...

Страница 31: ...h the protective cap on it Exposed con tacts can cause short circuits and lead to a fire or battery rupture O Do not store in places that can get wet by rain or that are high in humidity O Do not stor...

Страница 32: ...alfunction O Do not clean with solvents such as gaso line or paint thinner This may damage the painting and plastic parts Thinner Gasoline WARNING O During assistant operations in case of an emergency...

Страница 33: ...Location Diagram Lithium Ion Battery and Charger Nickel Metal Hydride Battery and Charger Power Unit and Controller E Drive 16 E Drive 16 E Drive16 E Drive 16 Battery seat side surface Battery seat ba...

Страница 34: ...lder lock lever Assistant controller Optional Pages 29 and 51 54 Anti tip device Page 34 Brake lever Optional Lower holder Drive unit AC servo motor Upper holder Clutch lever Pages 40 51 82 84 Rear ti...

Страница 35: ...ithium ion battery set is supplied Drive unit AC servo motor Controller Pages 29 42 44 45 Upper holder Rear tire Page 35 Assistant controller Optional Pages 29 and 51 54 Anti tip device Page 34 Brake...

Страница 36: ...apacity lamp Page 51 Power lamp Green Pages 36 42 45 Pages 51 54 Joystick Page 42 2 3 Controller 2 4 Assistant Controller Optional NOTICE O The USB power port is used only to supply power It does not...

Страница 37: ...liminating what caused it to blow the fuse may blow again or the main unit may malfunction A code indicating the model JWB2 and the manufactured lot is printed Spare battery fuse Yellow 20 A Protectiv...

Страница 38: ...Pages 63 66 68 Power cord Page 63 Refresh switch Page 66 CHARGING REFRESH TYPE JWC 2 For indoor use only Contacts 4 locations Charge lamp Green Pages 63 and 68 The label on the reverse side shows the...

Страница 39: ...el ESB1 Grip Handle Capacity indicator lamp Pages 38 69 72 74 76 Protective cap Contacts Page 38 Connector for charger Pages 74 and 75 Connector cover Pages 74 and 75 Indicator switch Pages 38 69 74 7...

Страница 40: ...33 2 8 Lithium Ion Battery Charger ESC1 Handle Charger plug Pages 74 and 75 The model ESC1 is shown on the label on reverse side Charge lamp Page 78 Power plug Pages 74 and 75...

Страница 41: ...ce to ensure that they are in the correct position for operation For details refer to the wheelchair frame manual Click If the anti tip device is not locked in posi tion perform the following actions...

Страница 42: ...ause sudden damage to the wheelchair while traveling and may re sult in a rollover or fall 2 Rear tire Check to ensure that there is tire depth Check the surface of the tire to ensure that there are n...

Страница 43: ...o ensure that there is tire depth Check the tires to ensure that they are not damaged Check the caster forks to ensure that there are no cracks in them Check the nuts to ensure that they are not loose...

Страница 44: ...perate position 8 Battery bag optional Make sure that the left and right cable connectors are securely connected Make sure that the entire surfaces of the fasteners on the upper straps and lower fixin...

Страница 45: ...ttery rupture 2 Check the contacts to ensure that they are not dirty or rusted If the contacts are dirty or severely rusted the wheelchair may be rendered immobile 3 Install the battery on the wheelch...

Страница 46: ...tery when the power is turned on Doing so may damage the battery terminals and cause a malfunction WARNING O When handling the lithium ion battery ensure that you do not pinch your finger with the gri...

Страница 47: ...r drive position 1 Power drive Traveling in power drive is pos sible The brakes are applied when not traveling Normally use the wheelchair in this state 2 Manual The brakes are released and the assist...

Страница 48: ...arking brakes in a level and stable location and have the assistant do so when the power is turned off O If you are using a wheelchair with no parking brakes have the assistant hold the wheelchair to...

Страница 49: ...idual capacity warning 2 If necessary adjust the maximum speed For the adjustment method refer to 4 3 Adjusting and Confirming the Maximum Speed 3 Release the parking brakes 4 The wheelchair starts mo...

Страница 50: ...wer lamp green ashes Release the joystick turn off the power and then turn it back on again b Are you tilting the joystick with the left and right clutches in the manual position This is a buzzer to w...

Страница 51: ...ps to adjust the maximum speed 1 Move the speed selector switch to change the speed Hold the switch up to move the lamp up continuously towards high speed To decrease the maximum speed perform the sam...

Страница 52: ...dica tion changes to E and flashes a long buzzer beeps Pi once and stops 2 Battery residual capacity warning When the battery residual capacity becomes less than 10 the residual capacity indication fl...

Страница 53: ...d on if the joystick is not operated for 10 minutes the power turns off automatically To resume operation turn the power switch off and then back on 4 5 Other Functions 1 Using the horn When you push...

Страница 54: ...actice until you can travel in the desired direction Learn the feel of speed and timing when making turns Practice avoiding obstructions Stop before reaching the obstruction 1 In the beginning adjust...

Страница 55: ...and the sidewalk Get the feel of riding up and down a slope Restart carefully on an uphill Practice at the proper stopping position 2 Practice in an actual location where you intend to use the wheelc...

Страница 56: ...get off it from there onto a bed or a chair you may lose your balance and fall off the wheelchair O If you get off the wheelchair with the left and right clutch levers in the manual position and the...

Страница 57: ...onnected battery with the protective cap on it Exposed contacts can cause short circuits and lead to a fire or battery rupture Protective cap 5 2 Removing the Battery Disconnect the battery from the w...

Страница 58: ...nished Riding the Wheelchair 1 Switch the left and right clutches to the power drive position All lamps turn on The battery residual capacity lamp indicates the current battery residual capacity The w...

Страница 59: ...erations after turning off the power and switching the clutches to the manual position 3 Adjust the speed as necessary Turn the speed adjustment dial clockwise to increase speed and counterclockwise t...

Страница 60: ...bat tery has run out If the warning lamp turns on immediately after replacing the battery with a fully charged battery and the wheelchair does not move there may be a malfunction in the unit Contact...

Страница 61: ...is on when the user get off the wheelchair the body may hit against the switches causing it to start moving and you or other people in your surrounding may get injured O Get off the wheelchair in a l...

Страница 62: ...lithium ion battery Both types of batteries are sealed dry cell batteries with a built in microcomputer Since the bat teries differ in characteristics and charging method first check the battery type...

Страница 63: ...anything other than the specified wheel chair Do not disassemble or modify the battery Do not place the bat tery near an open fire or throw it into a fire Do not place the battery in water or splash w...

Страница 64: ...store the bat tery in a place where children or pets could come near it Do not drop or apply impact to the battery Do not use a broken or damaged battery Do not charge the bat tery in a place where ch...

Страница 65: ...dify the charger Do not drop or apply impact to the charger While charging do not block the intake and exhaust vents of the charger When using the nickel metal hydride battery charger JWC 2 If the bat...

Страница 66: ...acity Capacity 24 V 6 7 Ah 8 2 How to Use the Nickel Metal Hydride Battery JWB2 1 Attaching and removing the battery to and from the wheelchair For instructions on attaching and removing the nickel me...

Страница 67: ...ng Fully charge the battery that you do not plan to use for a long period of time 30 days or more If you intend to store the battery for more than 3 months without using it fully charge the battery ev...

Страница 68: ...order to maximize the battery s performance it is recommended that you use the battery under the following conditions 2 Memory effect and refresh charging When a shallow discharging and charging cycle...

Страница 69: ...atteries alternate between the batteries The extent of the deterioration of a nickel metal hydride battery can be checked after charg ing is done by pushing the indicator switch The capacity has deter...

Страница 70: ...harger as shown in the diagram 3 The charge lamp green on the charger turns on and the battery starts charging The capacity indicator lamps on the bat tery flash and the number of lamps that are lit i...

Страница 71: ...ort the charging process The battery deterioration has ad vanced and the capacity is decreas ing and so on 5 Unplug the power cord from the power outlet 6 Remove the battery from the charger If you wa...

Страница 72: ...change from a flashing to an on state and charging will start auto matically The length of the standby time varies with conditions The battery temperature increases during charging However if the bat...

Страница 73: ...he battery reaches an appropriate temperature the charge lamp will change from a flashing to an on state and charging will start automatically If you perform a refresh recharge when the internal tempe...

Страница 74: ...Since the refresh charging process recharges after discharging all of its remain ing electricity it will take a long time if you perform it on a battery with a high residual capacity It is recommended...

Страница 75: ...lashing Refresh charging is being requested While the refresh lamp is flashing press the refresh switch to perform a refresh charge cycle If you do not press the refresh switch a normal charging begin...

Страница 76: ...ges can be replenished additively An environmentally friendly battery that does not contain mercury or cadmium Compact but high capacity Capacity 25 V 11 2 Ah 9 2 How to Use the Lithium Ion Battery ES...

Страница 77: ...long period of time 30 days or more charge it so that 3 of the capacity indicator lamps light up and then store it To store the battery without using it for over 3 months check every 3 months to see...

Страница 78: ...ormal operation generates electricity and charges the battery Charging a lithium ion battery when its temperature is 0 C or below 45 C or above causes its deterioration to progress extremely rapidly F...

Страница 79: ...hes 7 800 Ah When charging has completed and the charger plug is unplugged the capacity indicator lamps turn on and off as shown in the figure on the right TIP TIP For a lithium ion battery its capaci...

Страница 80: ...te above Once the integral charge capacity reaches 8 000 Ah the battery will not be usable even if it has not been 8 years The integral charge capacity of 8 000 Ah is approximately 700 times the capac...

Страница 81: ...hat the charge lamp green on the charger turns on If the charge lamp does not light green see 9 6 Charge Lamp Indi cation 6 While charging you can check the charge status using the capacity indicator...

Страница 82: ...3 Insert the power plug of the dedicat ed charger ESC1 into the residen tial power outlet 4 Open the connector cover and in sert the charger plug into the charge connector on the battery 7 After charg...

Страница 83: ...rging has completed Assuming that charging started with the battery in an empty state the time to completion is typically 4 5 hours 7 After charging has completed un plug the charger plug and the powe...

Страница 84: ...green will change from a flashing to an on state and charging will start automatically The length of the standby time varies with the conditions The battery temperature increases during charging Howe...

Страница 85: ...lamp flashes rapidly in green Lit or flashing red The charger has detected a problem in the charger or the battery and is unable to charge Stop charging by disconnecting the charger plug and the power...

Страница 86: ...levers to the power drive position so that the wheels will not spin and then apply the parking brakes 4 Remove any detachable parts Remove the foot leg supports and any other parts that can be detache...

Страница 87: ...elchair TIP Strap it down with a belt etc or place a shock absorbing material under and around the wheelchair Cushions 7 Load the wheelchair into the car Gently load the wheelchair by holding the fram...

Страница 88: ...harp impact TIP WARNING O If the foot leg supports are removed or foldable parts are folded be sure to place them in their original positions before operating the wheelchair Never operate the wheelcha...

Страница 89: ...clutch levers in the power drive position 2 Turn off the power and remove the battery When storing the battery for a long period of time see sections below and observe the cautionary notes For the ni...

Страница 90: ...ery you are using below Q Nickel metal hydride battery shown as Ni MH on the label Model JWB2 Voltage 24 V Capacity 6 7 Ah Type Dry cell with a built in microcomputer Q Lithium ion battery shown as Li...

Страница 91: ...atures according to your purposes For information on the wheelchair frame to which E Drive is attached see the owner s manual from the frame manufacturer 11 1 Removing and Installing the Unit The powe...

Страница 92: ...pushing the middle of the center cap a with your fingers pull out each power unit using both hands 2 Installing the power units to the frame 1 Place the wheelchair so that it will not become unstable...

Страница 93: ...L mark on the wheel side and connect the cable with an R mark to the connector with an R mark on the wheel side 9 Make sure that the connector will not be disconnected White dot White dot Cap Connect...

Страница 94: ...O When a person is sitting in the wheelchair do not remove or install the wheels The person riding in the wheelchair or people around the wheelchair may get injured O After the power units are instal...

Страница 95: ...wheels facing upwards when going over bumps with the as sistant operations and other such situations O Make sure you return the safety wheels to the correct position after going over the bump O A roa...

Страница 96: ...lock lever of the holder is pushed forward To return the controller to its original posi tion reverse the procedure Make sure that the controller is locked in position 2 JWX 1 PLUS Turn off the power...

Страница 97: ...wer holder To return the controller to its original posi tion reverse the procedure Lower holder WARNING O Do not remove the controller from the upper holder with the power on and do not turn on the p...

Страница 98: ...ver some of the springs cannot be used depending on the type of joystick 3 Adjusting the heaviness of the joystick on the controller 2 Adjusting the angle You can adjust the forward backward left and...

Страница 99: ...se the procedure Make sure that the controller is locked in position WARNING O Do not retract or pull out the controller from holder with the power on and do not turn on the power after retracting or...

Страница 100: ...s is a function that turns off the power after a specified time of non opera tion Setting 1 The power turns off if the joystick has not been operated for 10 minutes Default setting Setting 2 The power...

Страница 101: ...nction adjusts the time until the electromagnetic brake is applied after the wheelchair stops Setting 1 The electromagnetic brake is applied 10 seconds after the wheelchair stops Default setting Setti...

Страница 102: ...tically 2 Buzzer sound This function is for sounding a buzzer when the power is turned on or when an error such as disengaged clutches occurs Setting 1 The buzzer sound is enabled Default setting Sett...

Страница 103: ...apists and occupa tional therapists at the dealer 2 Driving Parameters You can adjust settings such as speed acceleration and joystick sensitivity 1 Preset mode Select from 3 preset modes Setting 1 So...

Страница 104: ...tening Dust cover installation Anti tip device looseness deformation damage Dirty terminals on battery seat Clutch operation clutch cable damage Wire connection looseness damage 2 Controller Damage de...

Страница 105: ...es 7 Battery bag Fray wear and tear or damage Fray damage or foreign material on the straps belt or the cable fasteners on the bag Looseness or slack in the upper straps and lower belt Pinched if the...

Страница 106: ...or service the wheelchair or remove pack and send the parts to request repairs If the wheelchair is not repaired or assembled completely the user or those around the user could be injured To perform...

Страница 107: ...4 Parking brakes Make sure that the parking brakes can stop the wheels from moving and that they are installed securely to the frame 5 Wheels Make sure that the wheels are not deformed and the spokes...

Страница 108: ...can be gone over Varies depending on the wheelchair the unit is installed on and the caster size Operating conditions environment Inside and outside temperature 0 C to 35 C humidity No condensation IE...

Страница 109: ...11 8 Ah 280 Wh Battery Charger Model JWC 2 ESC1 Charging method Automatic Charging controlled by the microprocessor Rated output during charging 29 V 2 6 A 29 2 V 3 A Chargeable battery JWB2 4 ESB1 4...

Страница 110: ...h as inside a car Switch to manual operation Is the battery properly inserted Insert the battery properly When operated by the rider is the as sistant controller turned on In this case turn off the po...

Страница 111: ...Is the speed parameter set to the stan dard setting Contact your dealer Is the speed setting set to a low speed setting Adjust it to a higher speed setting Sluggish manual travel Is the air pressure...

Страница 112: ...mperature ap propriate Wait until the battery reaches an appropriate temperature Flashing green Residual capac ity indicator lamps are lit Is the ambient temperature ap propriate Charge the battery in...

Страница 113: ...does not cover malfunctions due to modification of the unit or continuous use under conditions other than the specified conditions such as exceed ing the maximum weight etc regardless of the cause of...

Страница 114: ......

Страница 115: ...Decon Wheel AB S dra Ekeryd 115 SE 31493 Hyltebruk Sweden 46 345 40880 www decon se...

Отзывы: