background image

Hollywood DV-Bridge User’s Guide • Using Hollywood DV-Bridge With a PC • Page 16

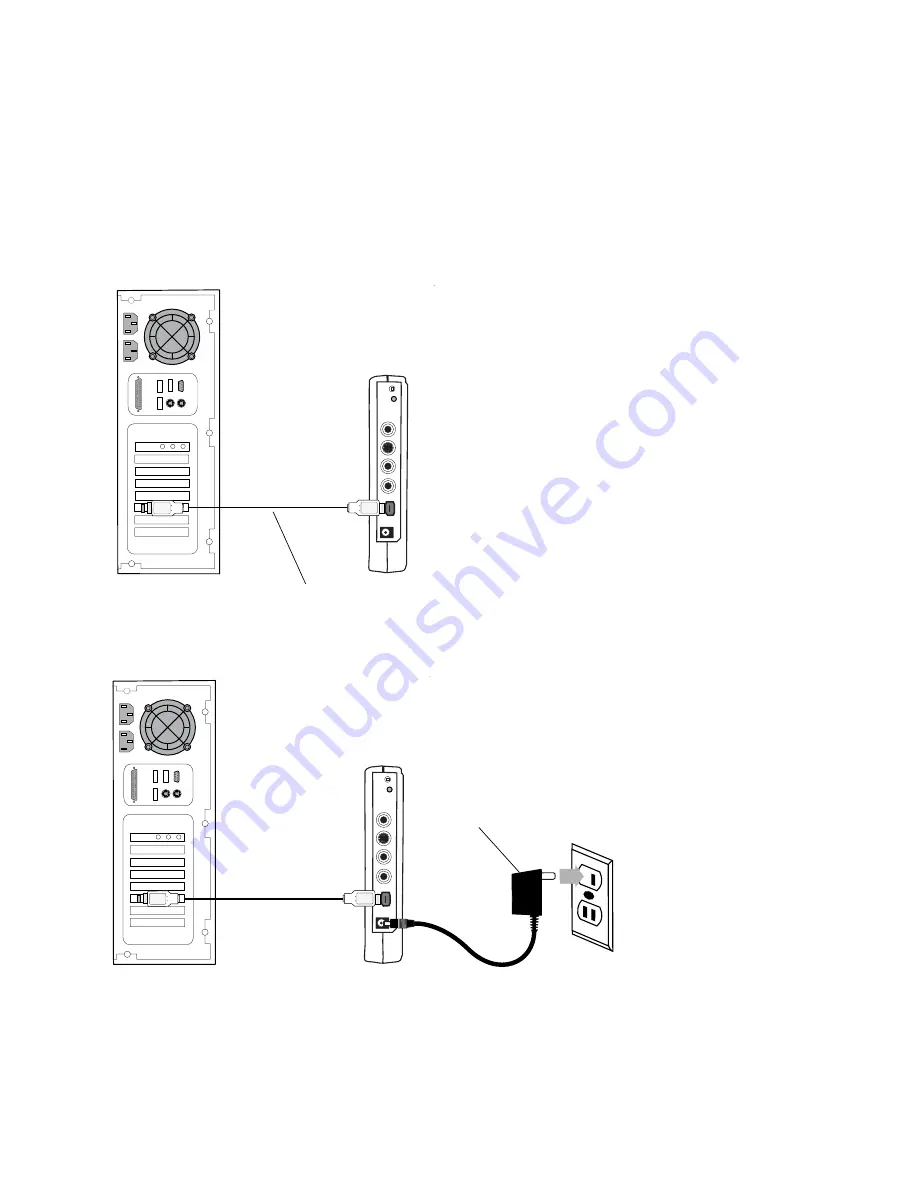
Hardware Installation

After you install the Dazzle software applications included with the Hollywood DV-Bridge, 
you can install the hardware. Installing the Hollywood DV-Bridge hardware is an easy, two 
step process, as described below 

1.

Connect the 1394/FireWire/i.LINK cable from the back of the Hollywood DV-Bridge to 
an available 1394 por t on your computer.

2.

Connect one end of the AC power cord to the back of the Hollywood DV-Bridge, and the 
other end to an electrical outlet.


Back

Hollywood DV-Bridge

1394/FireWire/i.LINK Cable


Power Adapter

Содержание Hollywood DV-Bridge

Страница 1: ...Dazzle Hollywood DV Bridge User s Guide Copyright SCM Microsystems All rights reserved Trademarks are used for informational purposes and remain the property of their owners Revision A...

Страница 2: ...tor 20 Capturing Video 22 Editing Video 23 Creating DVDs VCDs and S VCDs 23 Outputting Video 24 Connecting Analog Video Output 24 Connecting DV Output 26 Connecting an Optional Preview Monitor 27 Outp...

Страница 3: ...DV Input 48 Connecting Analog Video Output 49 Connecting an Optional Preview Monitor 50 Converting DV to Analog 51 Copying Analog to Analog 52 Connecting Analog Video Input 52 Connecting Analog Video...

Страница 4: ...It offers professional quality without the expensive and complicated computer equipment previously required for video editing Many editing programs can convert DV material to other formats for output...

Страница 5: ...as electronic files Hollywood DV Bridge Software CD PC only Power Adapter Stand Hollywood Quickstart Guide Registration Card Warranty Card DVD Complete User s Guide OnDVD User s Guide Hollywood User s...

Страница 6: ...to the Hollywood DV Bridge For example if you are outputting to a VCR you may want to connect a TV monitor to the VCR to view your material This requires the right kind of cable which varies dependin...

Страница 7: ...t allows you to convert analog video to DV convert DV to analog or to pass DV video directly through a computer PC only There are three mode indicator LEDs on the front of the Hollywood DV Bridge to l...

Страница 8: ...der to the Hollywood DV Bridge RCA video input to capture video to the computer the Hollywood DV Bridge automatically activates Analog to DV mode If you connect an analog VCR to the Hollywood DV Bridg...

Страница 9: ...se LANC with a supported device follow these steps 1 Plug one end of a LANC cable into the LANC connector on the Hollywood DV Bridge 2 Plug the other end of the cable into the appropriate connector on...

Страница 10: ...ftware installation Monitor 1024 x 768 pixel resolution 24 bit color DirectX 8 or above Sound Standard sound card DV interface OHCI compliant 1394 card or port with the appropriate driver s installed...

Страница 11: ...Media or Windows Media internet ready streaming videos Then upload them for free to the Dazzle Webcasting site to share streaming video across the internet For instructions on editing video refer to y...

Страница 12: ...dge uses drivers that are built into Windows the provided CD does not contain drivers To install the software applications included with the Hollywood DV Bridge follow these steps 1 Insert the provide...

Страница 13: ...lywood DV Bridge With a PC Page 13 2 Click Next The License Agreement screen appears To use the Hollywood DV Bridge you must agree to the terms of the license 3 Click Yes to accept the license agreeme...

Страница 14: ...le strongly recommends installing all the software applications MovieStar is required for video capture and playback DVD Complete is required to design and burn DVDs OnDVD is required to create Slides...

Страница 15: ...a successful installation 6 Click Finish to restart your computer and complete the installation After restarting your computer a browser window appears with a message that reminds you to check the Da...

Страница 16: ...ardware Installing the Hollywood DV Bridge hardware is an easy two step process as described below 1 Connect the 1394 FireWire i LINK cable from the back of the Hollywood DV Bridge to an available 139...

Страница 17: ...d VCR or similarly named device Windows may also add additional entries to the Device Manager when the Hollywood DV Bridge is connected This is normal If the Hollywood DV Bridge does not appear in the...

Страница 18: ...ng time to come Also archiving your video in DV is best since it allows for unlimited copying of the video without quality loss from generation to generation 1 Connect one end of an RCA composite vide...

Страница 19: ...DV device directly to your PC However it might be more convenient to capture and output through the Hollywood DV Bridge If your computer is not in a convenient location it may be easier to simply conn...

Страница 20: ...tor on your TV monitor Note Some older model TVs may not have Video In connectors For specific details check the documentation included with your TV 3 Connect an RCA audio cable red and white from the...

Страница 21: ...al cable Method B results in the configuration shown below IMPORTANT Make sure that the camcorder or VCR and TV monitor are set up properly to receive a video signal It may be necessary to set a camco...

Страница 22: ...For a DV video tape choose DV In this window you can also select a broadcast standard NTSC or PAL 2 Choose a project profile then click OK 3 Click the Capture button to display the Capture window 4 En...

Страница 23: ...u ve captured your video you can edit it Cut out unwanted scenes splice together different clips and add Hollywood style special effects like titles transitions voiceovers and background music For det...

Страница 24: ...st disconnect it to attach the analog camcorder or VCR that you want to record to However you may be able to con nect it to the output device as described later in this section 1 Connect one end of an...

Страница 25: ...ive a video signal It might be necessary to set a camcorder to VTR mode while a VCR might need to be set to Line In L1 L2 Aux or a similar channel Check the cam corder or VCR s documentation for speci...

Страница 26: ...nt to capture and output through the Hollywood DV Bridge If you computer is in an out of the way location you may find it easier to simply connect the DV device to the Hollywood DV Bridge as follows 1...

Страница 27: ...er that you need to use a Y adapter if your monitor only supports mono input If the TV monitor does not support the kinds of cables shown below you may be able to connect it using a coaxial cable Many...

Страница 28: ...udio cable red and white from the Audio Out connector on the back of the Hollywood DV Bridge to the Audio In connector on the monitor Note Your audio cable may have separate connectors for left and ri...

Страница 29: ...kinds of cables shown above you might be able to connect it using a coaxial cable Many VCRs and most TVs have this kind of connec tor and many VCRs come with a coaxial cable IMPORTANT Make sure that...

Страница 30: ...4 including OS X Note that OS X does not support 1394 when running applications in Classic mode so OS X support is currently limited to OS X native programs RAM 64 MB minimum at least 128 MB recommen...

Страница 31: ...No software is included with the Hollywood DV Bridge for the Macintosh No device drivers are necessary since the unit utilizes drivers that are part of the Mac OS Although no Mac video editing softwar...

Страница 32: ...to the back of the Hollywood DV Bridge and the other end to an electrical outlet Note The Hollywood DV Bridge utilizes DV drivers that are built into your operating sys tem Once the unit is connected...

Страница 33: ...Hollywood DV Bridge User s Guide Using Hollywood DV Bridge With a Macintosh Page 33...

Страница 34: ...ur old VHS and even Beta tapes and analog camcorder videos to high quality DV Since DV is the future of video you can be sure that your converted material will be around in a convenient high quality f...

Страница 35: ...ors on the front of the Hollywood DV Bridge Note Your audio cable may have separate connectors for left and right or the connec tors might be joined as shown in the illustration below Remember that yo...

Страница 36: ...ctor on your TV monitor Note Some older model TVs may not have Video In connectors For specific details check the documentation included with your TV 3 Connect an RCA audio cable red and white from th...

Страница 37: ...s documentation for specific details Capturing Analog Video 1 Launch your DV editing software It is important not to launch the software before all the hardware devices are con nected If you are usin...

Страница 38: ...e special effects like titles transitions voiceovers and background music Connecting DV Input If you have a DV camcorder or VCR there may be times when you would like to capture DV into your computer...

Страница 39: ...onnect it to attach the analog camcorder or VCR that you want to record to However you may be able to con nect it to the output device as described later in this section Before you start outputting ma...

Страница 40: ...an connect a preview monitor as follows 1 Connect an RCA video cable yellow or S Video cable black from the Video Out con nector on the camcorder or VCR to the corresponding Video In connector on the...

Страница 41: ...amcorder to VTR mode while a VCR or monitor might need to be set to Line In L1 L2 Aux or a similar channel Or if a monitor is connected to a VCR with a coaxial cable you might need to set the monitor...

Страница 42: ...der of VCR and then click the Play or Output button in the DV editing software to begin recording from the computer to the cam corder or VCR The Hollywood DV Bridge converts the signal from DV to anal...

Страница 43: ...nect an RCA composite video cable yellow or S Video cable black to the Video Out connector on an analog camcorder VCR or TV S Video provides higher quality video capture than composite video and shoul...

Страница 44: ...tors might be joined as shown in the illustration below Remember that you need to use a Y adapter if the analog camcorder or VCR only supports mono output Connecting DV Output Connect a 1394 FireWire...

Страница 45: ...itor 2 Connect an RCA audio cable red and white from the Audio Out connector on the back of the Hollywood DV Bridge to the Audio In connector on the monitor Note Your audio cable may have separate con...

Страница 46: ...our convenience in case you have an analog output device attached IMPORTANT Make sure that the camcorder or VCR and monitor are set up properly to receive a video signal It may be necessary to set a c...

Страница 47: ...o DV 1 Use the Mode Selector button on the back of the Hollywood DV Bridge to change the mode to Analog to DV The LED indicators on the front of the unit show the active mode see the illustration belo...

Страница 48: ...procedures below Connecting DV Input Connect a 1394 FireWire i LINK cable from the 1394 connector on the front of the Holly wood DV Bridge to the DV connector on the DV camcorder or VCR Note This is t...

Страница 49: ...nnect an RCA audio cable red and white from the Audio Out connectors on the back of the Hollywood DV Bridge to the Audio In connector s on the analog camcorder or VCR Note Your audio cable may have se...

Страница 50: ...deo sig nal It might need to be set to Line In L1 L2 Aux or a similar channel Check the monitor s documentation for specific details Note If the TV monitor does not support the kinds of cables shown b...

Страница 51: ...f you are using a DV camcorder as your input source device put it into Video Tape Recorder mode Cue the tape to the spot where you want to start playing If you are using an analog camcorder as your ou...

Страница 52: ...log device has an S Video output Note Some TVs do not have Video Out connectors For specific details check the doc umentation included with your TV 2 Connect the other end of the video cable to the co...

Страница 53: ...an RCA audio cable red and white from the Audio Out connectors on the back of the Hollywood DV Bridge to the Audio In connector s on the analog camcorder or VCR Note Your audio cable may have separat...

Страница 54: ...upports mono output If the TV monitor does not support the kinds of cables shown below you might be able to connect it using a coaxial cable Many VCRs and most TVs have this kind of connec tor and man...

Страница 55: ...ow If you are using a camcorder as your input source device put it into Video Tape Recorder mode Cue the tape to the spot where you want to start playing If you are using a camcorder as your output ta...

Страница 56: ...to 4 pin connectors and you only have 4 pin to 6 pin cables To begin copying make sure that the Hollywood DV Bridge is powered up Then follow the procedures below Connecting DV Input Connect a 1394 F...

Страница 57: ...tor 2 Connect an RCA audio cable red and white from the Audio Out connector on the back of the Hollywood DV Bridge to the Audio In connector on the monitor Note Your audio cable may have separate conn...

Страница 58: ...ve an analog output device attached even though it is not needed for this pro cess IMPORTANT Make sure that the camcorder or VCR and monitor are set up properly to receive a video signal It might be n...

Страница 59: ...f you are using a camcorder as your input source device put it into Video Tape Recorder mode Cue the tape to the spot where you want to start playing If you are using a camcorder as your output target...

Страница 60: ...the red button a drop down box appears Click the drop down arrow and select S Video Your device is now configured for S Video capture When I try to capture video using the Hollywood DV Bridge and Mov...

Страница 61: ...oose Settings option Set both numbers to 1 1 2 times the amount of physical memory RAM installed on your PC maximum and minimum Click OK Click Yes Note If you experience any problems after setting vir...

Страница 62: ...nter 1 1 2 times the amount of physical memory RAM installed on your PC for Initial Size and Maximum Size Click the Set Button Click OK three times Restart your computer For more information regarding...

Страница 63: ...rt from the provided menu E mail support is also available via our Interactive Knowledgebase Dazzle s Technical Resource Center can be reached 24 hours a day 7 days a week If you are calling for the f...

Отзывы: