background image

25

Davicom FMBM, Reference Manual, March 2015

25

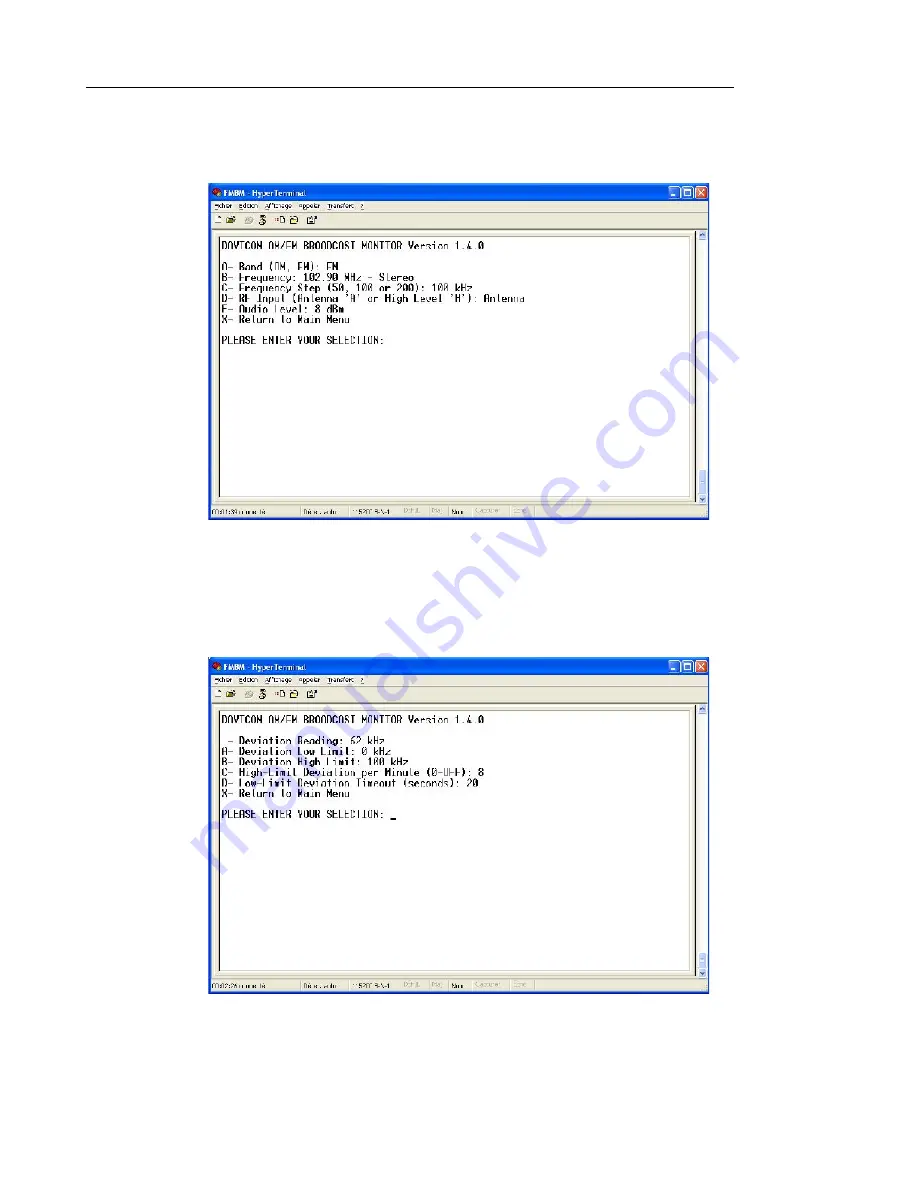
Pressing  A  (for  Radio  Settings)  will  display  the  following  screen  and  allow  setting  of
parameters such as the operating band, receive frequency, etc.

Figure 13. “A” Radio Setting menu

Starting from the main screen of Figure 12 and pressing “B” will display the menu of Figure
14.

Figure 14. “B” Deviation Alarm Setting menu

Содержание FMBM-01

Страница 1: ...M Broadcast Monitor Reference Manual MAN1024 Version 2 0 March 2015 Davicom a division of Comlab Inc 2300 Leon Harmel suite 220 Quebec QC Canada G1N 4L2 Tel 1 418 682 3380 Fax 1 418 682 8996 w w w d a v i c o m c o m ...

Страница 2: ...Man 1024 Davicom AM FM Broadcast Monitor Reference Manual www davicom com ...

Страница 3: ...2 Davicom FMBM Reference Manual March 2015 2 ...

Страница 4: ...12 4 Operation 13 4 1 Local operation with front panel display buttons 15 4 1 1 Default display 15 4 1 2 Menu selection mode 16 4 2 Remote operation through Davicom unit 19 4 3 Remote operation with a PC 24 4 4 Settings adjustments 29 4 4 1 Program de emphasis jumper JP7 29 4 4 2 Relay mode selection jumpers JP2 JP6 29 4 4 3 Power monitor filter jumper for AM mode JP1 29 4 4 4 RF alignment 29 4 4 ...

Страница 5: ...le Comlab reserves the right to make design changes to its products without incurring any obligation to make the same changes to previously purchased units This warranty is the full extent of obligation and liability assumed by Comlab with respect to its products Comlab neither makes nor authorizes any person or company to make any other guarantee or warranty concerning its products 1 2 Safety The...

Страница 6: ...iate radio frequency energy and if not installed and used in accordance with the instruction manual may cause harmful interference to radio communications Operation of this equipment in a residential area is likely to cause harmful interference in which case the user will be required to correct the interference at his own expense Changes or modifications not expressly approved by Comlab may void t...

Страница 7: ...deviation measurement and alarms Multiplex Input Output model 02 only Selectable pre emphasis on analog and digital audio outputs model 02 only AES digital audio output option model 02 only Carrier frequency measurement and alarms RDS RBDS decoding Balanced audio output on back panel and headphone output on front Alarm contacts for o stereo absence o high deviation o low deviation o low power o ca...

Страница 8: ... impedance 600Ω Level 0 to 7Vdc 33 mV kHz 75kHz set for 2 5V out RF power monitor Connector Pluggable screw terminal Output impedance 600Ω Level 0 to 7Vdc adjustable 0 5 V dB Peak Detector model 02 only Integration time 1 ms 2 5 ms and 5 ms selectable internal jumpers Alarm relays Normally open isolated contacts that can be individually set to normally closed by internal jumpers Absolute maximum r...

Страница 9: ...me in Default mode and scrolls backward through configuration menu in Menu mode Power LED Indicates that unit is powered up and operational Menu Button Shifts to Menu mode when in Default mode and selects menu item when in Menu mode Alarm LED Shows aggregate status of all alarms in FMBM Power Monitor Calibration 10 turn potentiometer allows calibration of back panel RF Level DC output See Section ...

Страница 10: ...s Antenna Input Type F connector for low level RF input from 75Ω antenna Ground Terminal Chassis ground lug High Level RF Input Input for use with on site directional couplers or other signal sampling devices that allow the FMBM to measure and monitor transmitter levels Note that when using the high level input nothing must be left connected to the low level antenna input and vice versa because th...

Страница 11: ... Output is a TA3FSH from Switchcraft Inc This connector is not provided with the unit See Appendix B for AES digital output option installation instructions MPX IN OUT BNC connector Model 02 only multiplex input output selectable from the on screen menu Can accept more than 1Vpp in input mode and provides up to 3Vpp in output mode MPX IN Level Model 02 only MPX In level adjust Attention To ensure ...

Страница 12: ...ay be affected DEV OUT Modulation Monitor Output This output produces a voltage that is proportional to the FM Modulation Deviation at 33mV kHz It is factory set to produce 2 5V for 75 kHz of deviation Audio Outputs Balanced audio outputs for Left and Right audio signals Default level is 8dBu and is adjustable from 0 to 10dBu through the Audio Level Menu item Adjusting the analog audio level will ...

Страница 13: ...e file itself and an electronic version of this manual The FMBM itself requires no other special software installation It is normally delivered with its operating firmware pre installed It is however possible to update this firmware when new features or bug fixes become available The firmware can be updated by following the procedure given in Appendix A ...

Страница 14: ...nd alone operation where the FMBM s alarm contacts are connected to external alarm monitoring status inputs Figure 4 Stand alone operation Described in Section 4 1 The second mode operates through any Davicom Intelligent Remote Control system that is running firmware version 5 42 or higher This mode offers remote control capability and close integration with the Davicom s automation structure ...

Страница 15: ...s back panel USB connector in conjunction with a communications terminal program such as HyperTerminal commonly found on Windows Operating Systems The FMBM s USB communications driver must be installed prior to operating in this mode This driver is included on the CD supplied with the FMBM Figure 6 Operation with a PC Described in Section 4 3 ...

Страница 16: ... The display alternates between the 2 screens over an 8 second period The shaded fields would obviously vary depending on the frequency selected and on the station s signal parameters The fields indicate the selected receive Frequency the frequency Deviation FM Modulation the presence or absence of a Stereo Mono signal the amount of carrier Frequency Drift between the received carrier frequency an...

Страница 17: ... No Alarms or list of active alarms 6 RF Input RF Input Antenna or High Level 7 MPX Mode MPX Mode Input or Output 8 Source Source Tuner or MPX Input 9 Audio Level Audio Level 8 dBm 10 Peak Deviation Limit Peak Dev Limit 75 kHz 11 Peaks min Count Peaks min Count 8 12 Low Deviation Limit Low Dev Limit 0 kHz 13 Low Deviation Timeout Low Dev Timeout 30 14 Power Monitor Calibration Pwr Mon Cal Ref Lvl ...

Страница 18: ... in series with the high level input Both the high level and low level antenna inputs are connected together through the 51dB attenuator Therefore only one input must be connected at a time for readings to be accurately measured 7 MPX Mode selects the MPX connector as an Input or an Output 8 Source selects the signal source Tuner Antenna or MPX MPX connector 9 Audio Level sets the audio level for ...

Страница 19: ...presence alarm This is useful for stations that normally transmit in Mono mode only It is used on the FM band only 18 RDS Data turns on the RDS data display mode that shows the Program Station Program Type and Radio Text data as it is transmitted by the station It is useable on the FM band only for stations that do transmit RDS or RDBS data RDS data is displayed for a period of approximately 2 min...

Страница 20: ...f this is not the version of Firmware you have please go to the www davicom com web site for support Power up the FMBM and wait a few seconds for it to automatically sync with the Davicom To connect to the FMBM through the Davicom first connect to the unit in your usual way start up DavLink and connect to your unit Once connected click on the Configuration icon in the DavLink Toolbar The following...

Страница 21: ...ck on the Davicom Expansions button as shown in Figure 8 below Figure 8 Devices window Clicking on the Davicom Expansions button brings up the window of Figure 9 which allows configuration of the FMBM and all its settings Figure 9 FMBM Configuration window ...

Страница 22: ... and Alternate These descriptions are used to identify the FMBM whenever alarms are sent or events are logged in the Davicom unit s System Log The Default description is in Unicode and can accommodate any compatible international alphabet The Alternate description is in ASCII and is generally used for an English description The Davicom automatically copies the Default into the Alternate descriptio...

Страница 23: ...ion Alarm and 1FM03 flag will be turned on Low deviation Timeout This field indicates the time in seconds during which the low deviation condition must be continuously present for the Low Deviation Alarm and 1FM03 flag to be turned on Frequency Drift Limit The frequency Drift Limit field indicates the number of kHz above which the Frequency Drift Alarm will be set to on This alarm will also turn o...

Страница 24: ...he FMBM go back to the DavLink main screen and click to the View eyeglasses icon as shown below This will display the screen as shown in Figure 10a below a b Figure 10 Site Views screen Click on the Devices tab and then on the FMBM button Figure 10b this will display the screen shown in Figure 11 ...

Страница 25: ...e VT 100 mode You must also have previously installed the FMBM s USB driver so that your PC can communicate with the FMBM This driver is included in the software package found on the CD supplied with the FMBM see section 3 2 The communications parameters that must be set in your communications program HyperTerminal or equivalent are 115200 baud No parity 8 bits 1 stop bit no flow control and the a...

Страница 26: ...will display the following screen and allow setting of parameters such as the operating band receive frequency etc Figure 13 A Radio Setting menu Starting from the main screen of Figure 12 and pressing B will display the menu of Figure 14 Figure 14 B Deviation Alarm Setting menu ...

Страница 27: ... Davicom FMBM Reference Manual March 2015 26 The following screens are obtained by pressing the corresponding letters on your keyboard Figure 15 C RSSI Menu screen Figure 16 D Frequency Drift Menu screen ...

Страница 28: ...27 Davicom FMBM Reference Manual March 2015 27 Figure 17 E Stereo Alarm Menu screen Note that the F key has no effect in VT 100 mode Figure 18 G Alarm Summary Menu screen ...

Страница 29: ...reen Note that the I Update Firmware selection is used to set the FMBM in firmware update mode where it awaits input from the FMBMUpgradeTool exe software see Appendix A Pressing the X key exits the VT 100 mode and terminates communications To re start simply press the M key again ...

Страница 30: ...wer Monitor filter jumper adds extra filtering to the detected signal envelope in order to smooth out variations when in AM mode This helps to improve the RF Power detection readings when operating on the AM band This jumper s location is shown at the bottom left of Figure 20 Set the jumper as shown on the PCB silk screen Default position is set to FM 4 4 4 RF alignment RF Alignment is not necessa...

Страница 31: ...d scroll down to the Power Monitor Calibration Menu item Press Menu again and you will see the current value of the reference level Press the Up or Down button and you will see Pressing Menu here samples the input signal and sets the new reference level to the currently received signal level and exits the menu item To exit simply press the Up or Down buttons to scroll to the Menu mode exit High Le...

Страница 32: ... monitor output With a small screwdriver adjust the RF Power Monitor Adjust on the right side of the FMBM s front panel to obtain a 5V output that will correspond to the nominal RF Power at the input The transfer function is 0 5V dB Pressing the Menu button again will exit this mode and allow you to scroll back up or down to the Menu mode exit Pwr Mon Cal 4 57 V ...

Страница 33: ...32 Davicom FMBM Reference Manual March 2015 32 Figure 20 Printed Circuit Board Layout and jumper locations ...

Страница 34: ...lease consult the www davicom com web site or contact us By telephone at 1 866 282 3380 toll free in North America or at 1 418 682 3380 from elsewhere Through our web site at www davicom com contact Davicom s address is Davicom a division of Comlab Inc 2300 León Harmel Suite 220 Quebec City Quebec Canada G1N 4L2 ...

Страница 35: ...ver is installed you will be able to communicate with the FMBM 1 Start the FMBMUpgradeTool program The screen shown in Figure 21 will appear 2 On the FMBM s front panel press the Menu button and use the down button to scroll to the Firmware Upgrade menu item 3 Press Menu again to select this item and enter the actual upgrade mode 4 Press the Up or Down button to select Update 5 Press the Menu butt...

Страница 36: ... output option 1 Remove the FMBM cover screws 10 places as shown below 2 Insert the AES card into the J15 socket 3 Secure the card with the 4 screws provided with the AES card 4 Re install the FMBM cover 5 Remove the Not Installed sticker located above the Mini XLR connector on the rear panel ...

Отзывы: