background image


51 

4.8 Streaming/Recording


4.8.1 Streaming 
 
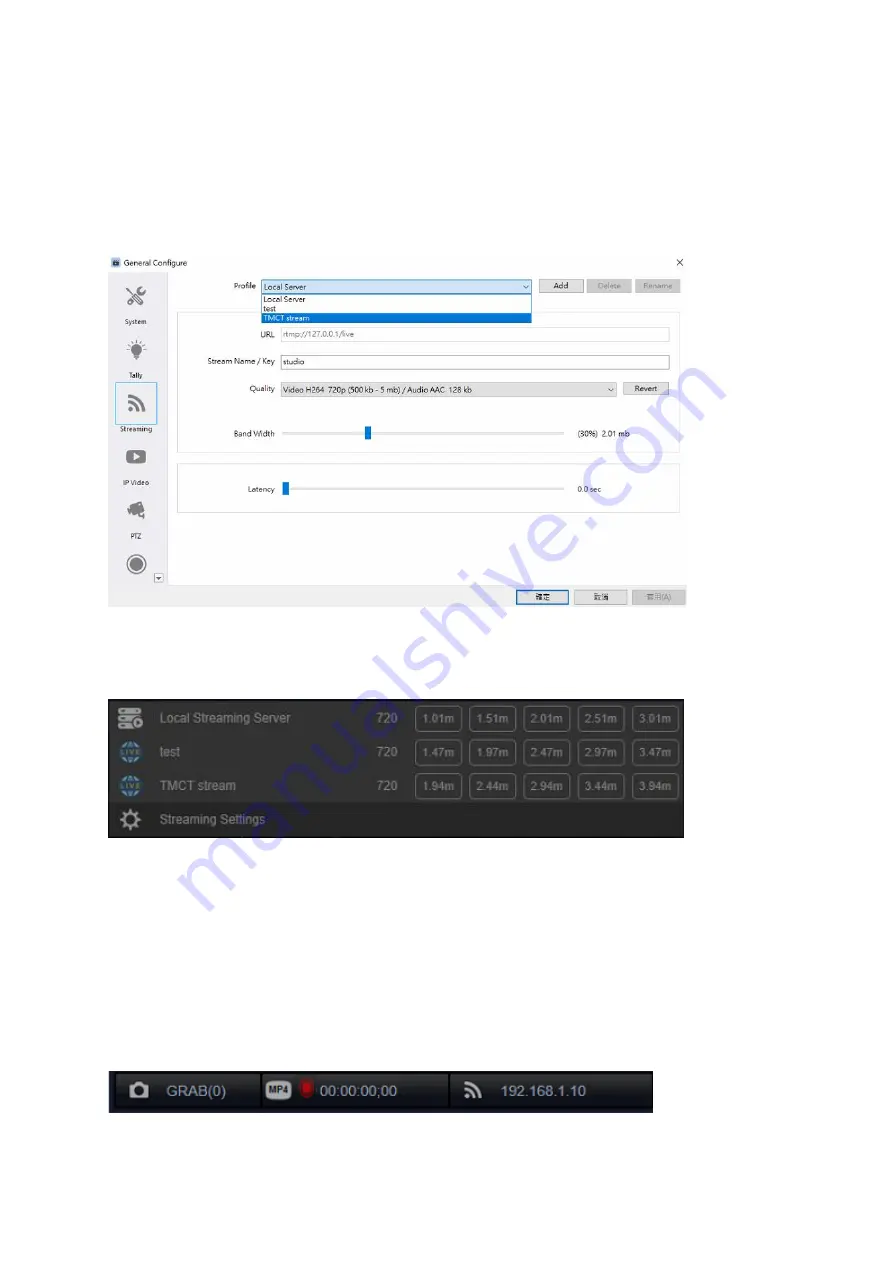
The TVS-3000 is a IP-based product with built-in streaming function and local RTMP server. It 
allows users to open the streaming settings from the drop-down menu from the control bar. 
Users can select the existed server from the drop-down menu or click the “Add” button for 
entering the URL of the new server.   


After the adding is finished, users can click the streaming icon and then the bitrates for all of 
the streaming servers will be listed.   


Please select the streaming server according to your uploading speed, it is recommended that 
the bandwidth must be at least two times of the bitrate of the streaming media.   


4.8.2 Video Recording to Local Hard Disk   
Please click the Record button for recording the pictures from the PGM channel to the local 
hard disk. The current supported file format includes .mov, .mp4, .ts and .MXF. When the 
recording is in process, the record icon will be shown in red. The recording can be stopped at 
any time by users.   


Содержание TVS-3000

Страница 1: ...TVS 3000 SYSTEM Instruction Manual ...

Страница 2: ... Normal Transition 26 4 4 GRAPHIC TEXT EDITOR FOR MAKING GRAPHIC TEXT COMBINATION 26 4 4 1 Main Interface of the Graphic Text Combination Editor 27 4 4 2 Editing for Multiple Layers Graphic and Text Combinations 31 4 4 3 Apply the CG Package Content from Channel to the BCD Windows 35 4 4 4 Create a PIP with more than 4 Live Scenes by the the Category Layer 38 4 5 DSK LAYER AND KEY LAYER 38 4 5 1 A...

Страница 3: ...tion in this manual from time to time may not be correct or may be incomplete This manual may contain typing errors omissions or incorrect information Datavideo Technologies always recommend that you double check the information in this document for accuracy before making any purchase decision or using the product Datavideo Technologies is not responsible for any omissions or errors or for any sub...

Страница 4: ...e this unit where the power cord will be walked on rolled over or otherwise stressed 9 If an extension cord must be used with this unit make sure that the total of the ampere ratings on the products plugged into the extension cord do not exceed the extension cord rating 10 Make sure that the total amperes of all the units that are plugged into a single wall outlet do not exceed 15 amperes 11 Never...

Страница 5: ...of purchase Your statutory rights are not affected Three Year Warranty All Datavideo products purchased after July 1st 2017 qualify for a free two years extension to the standard warranty providing the product is registered with Datavideo within 30 days of purchase Certain parts with limited lifetime expectancy such as LCD panels DVD drives Hard Drive Solid State Drive SD Card USB Thumb Drive Ligh...

Страница 6: ...s CE are the abbreviation of French phrase Conformité Européene which literally means European Conformity The term initially used was EC Mark and it was officially replaced by CE Marking in the Directive 93 68 EEC in 1993 CE Marking is now used in all EU official documents ...

Страница 7: ... expanded for supporting up to 8 switching signals for optional Supports up to 8 signals for high resolution ISO recording Supports H 264 Encoding for Live Streaming Supports Broadcasting Grade Image Text Editing Supports Built in software based Audio Mixer with fast motion and slow motion replay Supports NDI Format 1 2 System Requirements If you purchase Datavideo s TVS 3000 3D Tracking VR AR 4K ...

Страница 8: ...8 Chapter 2 System Diagram 1 4K Mode 2 HD Mode ...

Страница 9: ...ic setting option Users can save or open the engineering document from the File option Moreover users can set the basic PGM channel of the software modify the streaming parameters set the Multiview output format set the PTZ control parameters and open the Image Text Editor from the Options drop down menu The options in the drop down menu will be updated according to the software version update The...

Страница 10: ...w windows for switching channels for users Each switching channel can select a material source list for the corresponding source of the channel Each channel has its own Channel Matting and Adjust menu After clicking the thumbnail of the desired channel that users want to adjust the thumbnail of the selected channel will be surrounded by a white rectangular After that users can click the link icon ...

Страница 11: ...EVIEW PROGRAM windows are shown as following diagrams 3 5 Switching Buttons There are tow rows of the buttons including PGM and PWM Please press the activated PGM channel button which is shown in red and then users can select any switching channel to transfer it to the PGM channel for output If users click the PVM chnnel button which is shown in green users can select any switching channel to tran...

Страница 12: ... 3 7 The DSK Overlay layer for PGM Key Overlay Layer for a Specific Channel DSK Overlay Layer for PGM The Datavideo TVS 3000 provides three DSK Overlay layer for overlaying the characters or other layers on the surface of the output of the PGM channel The contents which are added in these three DSK layers will be overlaid on the surface of the PGM signal After loading the special effects for trans...

Страница 13: ...sers can double click the camera position or click the Take button for smooth transiton Users can also right click the camera position or click the CUT button for direct transition The virtual camera lens area is shown as following diagram 3 9 Offset Adjustment Board The Offset Adjustment Board is used for virtual camera lens adjustment object adjustment of the virtual scene location adjustment of...

Страница 14: ...sts which are located on the left side of the material lists for users to edit five sub playlists within one material category The example for the material list for the SUBTITLE category is shown as following diagram Users can open the audio mixer interface by pressing the AUDIO MIXER tag the audio situation for each corresponding switching channel will be shown on its corresponded audio mixer cha...

Страница 15: ... is changed the TVS 3000 system will remind users to reboot the TVS 3000 to apply the new setting The Channel Preset option allows users to preset the corresponding material source categories for 8 channels in advance for creating the TVS 3000 file for the first time Those presets can be changed directly from the software interface for future program production The URL port number and bit rate of ...

Страница 16: ...ls input signals for NDI agreement and capturing signal for the second display panel automatically Each time when the plus button is pressed by users the latest signal sources that can be used by users will be updated immediately So for the NDI signal and the signals for the newly installed capturing card users can press the Plus button to update the latest signals that can be used The signals whi...

Страница 17: ...an be added into the lists of the DDR 1 2 3 categories Please press the Plus button on the bottom left side of the window of the list to select multiple video files and to load them into the list of one DDR category for one time Users can scroll the wheel of the mouse to browse all of the items in the lists of the DDR1 2 3 categories Users can start the video playback by double clicking a specific...

Страница 18: ... buttons which are located on the bottom side are Plus button playback control button and sliders for playback regulations Users can press the plus button to add the capture card signal or the NDI signal Moreover users can press the Play button which is located at the center to control the start stop of the video playback The Previous Next buttons allow users to play previous or next video The but...

Страница 19: ...gories After that users can double click the material for using it Users can also right click a specific item for material management The details of the operation for the graphic and text combination and the virtual studio will be introduced in chapter 4 4 Graphic and Text Editor and chapter 4 6 Virtual Stuido SUBTITLE 1 2 The subtitle files that must be used frequently can be placed in this categ...

Страница 20: ...tching channels GRAB The GRAB button is located on the top right side of the whole interface When the GRAB button is pressed the PROGRAM picture will be captured and added into this category automatically The operation for this option is the same as the DDR The screenshots will be saved in the route which is shown as follows This PC Pictures TVS Users can right click a specific screenshot item and...

Страница 21: ...ic switching channel which is assigned to be BUFFER After that please double click your desired material which is saved in the BUFFER category and then this material will be activated to be used or played in the corresponding switching channel NET The RTMP RTSP and m3u8 signals that are input by the pull stream can be added into this category Before adding the pull stream signals into the NET cate...

Страница 22: ... pull stream URL is added into the IP Video Settings users can see the added pull stream URL from the pop up drop up menu after clicking the plus button on the bottom left side of the list for the NET category Users can add this source signal into the list of the NET category for future application after clicking the corresponding pull stream URL The pull stream source which is not added into the ...

Страница 23: ...d to double click a specific material in that category to confirm that the material in the specific category is used by the switching channel For the lists in the IMAGE SOUND DDR GFX SUBTITLE categories after the switching channel is assigned to a corresponding category this switching channel will be paired to the list of this specific category Once one of the material in the list is clicked for p...

Страница 24: ...licked the white rectangular will be moved to this switching channel and the drop down menu and the switching channel layer will be corresponded to this switching channel The above mentioned operation rule can also be used in the following sections of this user manual Note 3 The content which is added in the switching channel can be switched to the PROGRAM rapidly So in most of the cases the conte...

Страница 25: ...he preview window and is on the middle of the ZOOM and BKGND buttons for adjusting The larger the figures the faster the transition speed is Users can press the left arrow and the right arrow on the button for 0 5 times step adjustment Users can also press the figure on the middle of the button and then pull up and pull down for adjusting the figure slightly The following material types can be use...

Страница 26: ...B Users can click this button for replacing the PROGRAM channel by the black field gradually This FTB button can be used in PROGRAM Fade Out application 4 4 Graphic Text Editor for making Graphic Text Combination The TVS 3000 provides a built in full function graphic and text editor for users for creating subtitle template and graphic text combination such as the multi window animation for a varie...

Страница 27: ...he thumbnail of a specific layer Moreover users can control the overlay sequence showing and hiding of the layers by the pop up menu after right clicking a specific layer Users can also press and hold the shift button to click multiple layers to select many layers at the same time for adjusting the location and angle simultaneously a list for layers h size and color of the layer c Categories of th...

Страница 28: ...n click the Select button and then the editing window for Text will be pop up for users to set the text font to enter text directly or to import the txt rtf text file If the graphic and text combination tempate with text will not be redefined after the template is imported the content of the entered text will be displayed as the default text After the Date Clock layers are created the real time da...

Страница 29: ... buttons which is shown in the sequence of left to right is Maintain proportionality to height Maintain proportion to fit width The scaled layer area is completely filled e Multi Situation Graphic and Text Combination Users can save up to 6 situations into one graphic and text combination This allows users to record different situations including location of the layer in the combination size trans...

Страница 30: ... click the up triangle down triangle buttons for adjusting the template size of the graphic and text combination directly In order for convenient setting and adjustment users can click the auxiliary line button which is located below the template size to turn on turn off the auxiliary line h Adjustment for Layer Size and Colors For the contents in the Text Date Clock Layers users can click the col...

Страница 31: ...ng the values of Speed U and Speed V j Switching and Adjusting of the Background This allows users for previewing the effects which the graphic and text combination special effects are applying for the pictures 4 4 2 Editing for Multiple Layers Graphic and Text Combinations Take the way for making a multi window and multiple dynamic graphic and text combinations for example users can show a typica...

Страница 32: ...sers want to select Video to be the background of this CG please choose the layer for loading a video file at first After that please click the Full Screen button for adjusting the layer to be full screen size ...

Страница 33: ... drag another window for quoting the signal of other channel After that please do the same operations for creating a B window Uses can use the same operation for creating a shape and then change its name to be B After that we can use the RESET button to set its width and height ratio to be standard size and then use the mouse cursor or the arrow on the keybard to move the shape to another side ...

Страница 34: ...itle board Please click the Text button for adding text After that please drag another layer on the subtitle board After the creating of the text layer is finished please click the Select button and then please double click on the text layer for entering your desired texts Please click the File button which is located on the top right side for saving the CG and then please select the file name and...

Страница 35: ...y those contents Please assign one switching channel to GFX2 and then double click the CG package for loading Please select the 8th switching channel If the channel is surrounded by the white rectangular it means that this channel is selected After that please click the Link icon which is located on the left side of the switching channel and then please select Channel from the drop down menu The c...

Страница 36: ...to add signal to a corresponding channel In this example we will transmit the signal in the 5th channel to the Window A and then transmit the signal in the 3th channel to the Window B Users can see that the signals for the 5th channel and the 3th channel are shown in the A window and B window respectively However we can see that the signal for the 5th channel is shown to be out of shape Because th...

Страница 37: ...ter that a CG package is completed and it can be used as a new virtual camera scene Moreover users can create up to 12 layers of the graphic and text combinations for giving manay messages within a CG package for your audience Select the Cropping Mode Set offset to keep the woman to be at the center of the picture ...

Страница 38: ...he CAMERA NET playing source which the ID code is in this layer Users can also duplicate or create more category layers for assigning other real time contents for those layers 4 5 DSK Layer and KEY Layer There are two kinds of overlay layer locations for placing coner mark subtitle and text for applying them rapidly for the TVS 3000 The names for those layers are DSK Layer and KEY Layer respective...

Страница 39: ...ation is based on single content So we can use other way to achieve this operation How to choose the categories for Overlay Layer for DSK Layer KEY Layer If users move the mouse cursor to the top left corner of the DSK Layer KEY Layer there is a plus icon for users to click to selected the category of this window from the drop down menu For the DSK Layer the way for operation is easier If users ne...

Страница 40: ...drop down menu for users If users click the down arrow users can create their own transition effects for the DSK Layer KEY Layer 4 5 3 Location and Size Adjustment for DSK Layer KEY Layer The TVS 3000 allows users to adjust the location and size of the DSK Layer KEY Layer from their windows on the screen Please click the direction arrow which is located on the top left side of the DSK Layer KEY La...

Страница 41: ...n and zooming out the content Users can also drag the rotation icon for rotating the content Moreover users can click the pad icon for adjusting the aspect ratio 4 5 4 Use DSK Layer KEY Layer to add the PREVIEW PROGRAM Keyer Signals For the TVS 3000 users can add the material into the CAMERA category and then use the CG with alpha channel for the Keyer signal for the PREVIEW channel For the Keyer ...

Страница 42: ...ful virtual space by simply using a blue green plastic mat 4 6 1 Chromakey Settings At first users need to select the switching channel for applying the Chromakey Please click the Link icon which is located below the switching channel and then please select the Matting option which is shown as following diagram This area will list related parameters for Chromakey please set the Chromakey function ...

Страница 43: ...me If the gray eraser is clicked again the picture will be shown in normal mode for displaying If there is some white spots which is shown on the black background users can repeat the above mentioned steps by using the K2 K3 and K4 marks Erasing Users can use a virtual eraser for adjusting the alpha channel on some trivial sopts Please click the white eraser and then the chromakey signal will beco...

Страница 44: ...ha Channel Slightly Users can add the chromakeyed picture to another channel or use the white and black picture to check the picure after it is chromakeyed for further adjustment of the Alpha channel The opaqueness can be adjusted by users Please slide the slider to the right side for slight adjustment until the Alpha channel becomes white totally ...

Страница 45: ...r to the right side until the color picture that is seen by users has similar color with its original signal Finally if there are some extra colors that are found on the edge of the person users can slide the Soft Edge slider to the right side for adjusting the softness of the edge ...

Страница 46: ...d then users can double click the file in the GRAB category list for loading a virtual scene for the switching channel Load Content into the Virtual Scene Users can open the Channel function bar from the Link icon which is located on the left side Users can distribute the content for displaying in the A B and C channels by using the Channel Setting ...

Страница 47: ...just the aspect ratio contrast brightness and saturation of the picture for current signal source After the adjustment is finished it will achieve better incorporation with the virtual scene The way for moving the object in the virtual scene will be mentioned in following paragraphs 4 6 3 The Adjustment for Virtual Objects and Position of Virtual Camera Lens Moving and Adjusting the Virtual Object...

Страница 48: ... tracking shooting Users can click one of the six virtual camera and then the position adjustment function will be activated After that the virtual camera which is surrounded by the white rectangular can be controlled by users Please try to adjust the virtual camera position by clicking and dragging and then users can see that the virtual camera is moved in the 3D virtual space Once another camera...

Страница 49: ...s users to adjust the output volume monitoring volume and balanced analog audio input volume Please click the Audio Mixer tag on the top the material list for switching to audio control panel The audio channels are designed to be one on one for the 8 swching channels Users can monitor the audio volume for each channel and then set the regulation for it ...

Страница 50: ...only the audio for the specific channel will be output and the audio output for all other channels will be turned off The volume control slider which is located on the left side of the control panel can control the audio volume of the audio card in the TVS 3000 system Generally speaking this audio source is used for monitoring for the output audio The output volume is the main volume control of th...

Страница 51: ...lick the streaming icon and then the bitrates for all of the streaming servers will be listed Please select the streaming server according to your uploading speed it is recommended that the bandwidth must be at least two times of the bitrate of the streaming media 4 8 2 Video Recording to Local Hard Disk Please click the Record button for recording the pictures from the PGM channel to the local ha...

Страница 52: ...Safe Frames will be shown on the PGM and PVW channels for users to confirm the HD and SD outputs on the PGM and PVW windows 4 9 2 Capture Card Settings In the TVS 3000 system users can use the Blackmagic Desktop Video Utility for changing the interface settings 4 9 3 Project Files for the TVS 3000 The TVS 3000 uses File button for creating opening saving and saving as functions for all of your eng...

Страница 53: ...he General Configure settings window and the default Multiview picture will be output to the second monitor which is set to be the extended monitor for the system Users can select the User from the Multiview Layout option from the Options drop down menu ...

Страница 54: ... system if there is a PTZ camera which is connected to the same network as the TVS 3000 system or is connected to the TVS 3000 system by the RS interface users can use the touch pad which is in the TVS 3000 GUI for controlling the PTZ camera Please click the General Configure from the Options drop down menu to open the General Configure window After that please click the PTZ button to show the PTZ...

Страница 55: ...f your PTZ camera into the list The video audio signals from the PTZ camera can be input from the SDI NDI interfaces or from the RTMP RTSP channels Please make sure that those signals are added to the CAMERA or NET categories and then please right click the meida tag of the CAMERA or NET category When this camera signal is selected users can find the word PTZ from the touch pad for controlling Thi...

Страница 56: ...hich is located on the top left side of the window of the converter to select the file which is needed to be converted Please adjust the slider which is located below the left window snapshot to set the thumbnail of the animation Please adjust the slider which is located below the right window point for switching to set the end point for applying the transition After that please click the End Poin...

Страница 57: ...3000 and what version of the graphic card driver should be used Users can use the NVIDIA graphic card However the AMD graphic card is not supported It is recommended to use the graphic card with 6 GB or more graphic memory The NVIDIA related coding is used in the TVS 3000 software So it is recommended to use the graphic card driver with the version number of 430 64 or later for smooth operation 3 ...

Страница 58: ... package the above mentioned files in one ZIP file manually 5 If the Encoder Error message is shown when the software is opened how to solve this issue The main reason for this issue is that the driver version for the graphic card is too old Please upgrade the graphic card driver version to 430 64 or later 6 Where is the location of the HTC Vive Base Station in the virtrual scenes The default dire...

Страница 59: ...he Base Station How to install the Base Station The receiving range is a 120 degree cone shape which is centered on the Base Station The maximum receiving range is up to 5m The Base Station should be installed at the place which the distance is 2m or more from the floor Tilt the Base Station down to form an angle of 30 45 degrees with the wall 9 What settings must be modified after the graphic car...

Страница 60: ...5 1080i 60 50 720p 60 50 30 25 HDMI Output 2160p 60 50 30 25 1080p 60 50 30 25 720p 60 50 30 25 Audio Input Mini Phone Jack x 1 SDI audio embedded Operation Monitor DP x2 Tally Coming soon Downstream Key 3 Media 3 DDR Virtual Studio Built in 10 sets and users can download the virtual scenes unlimitedly from the website datavideovirtualset com Still Picture 1 Still Text 2 Keyer Chromakey upto 8CH R...

Страница 61: ...61 Note ...

Страница 62: ...62 Note ...

Страница 63: ...63 Note ...

Страница 64: ...Sept 11 2019 Version E1 Datavideo Technologies Co Ltd All rights reserved 2020 https www datavideo com product TVS 3000 ...

Отзывы: