background image

31 


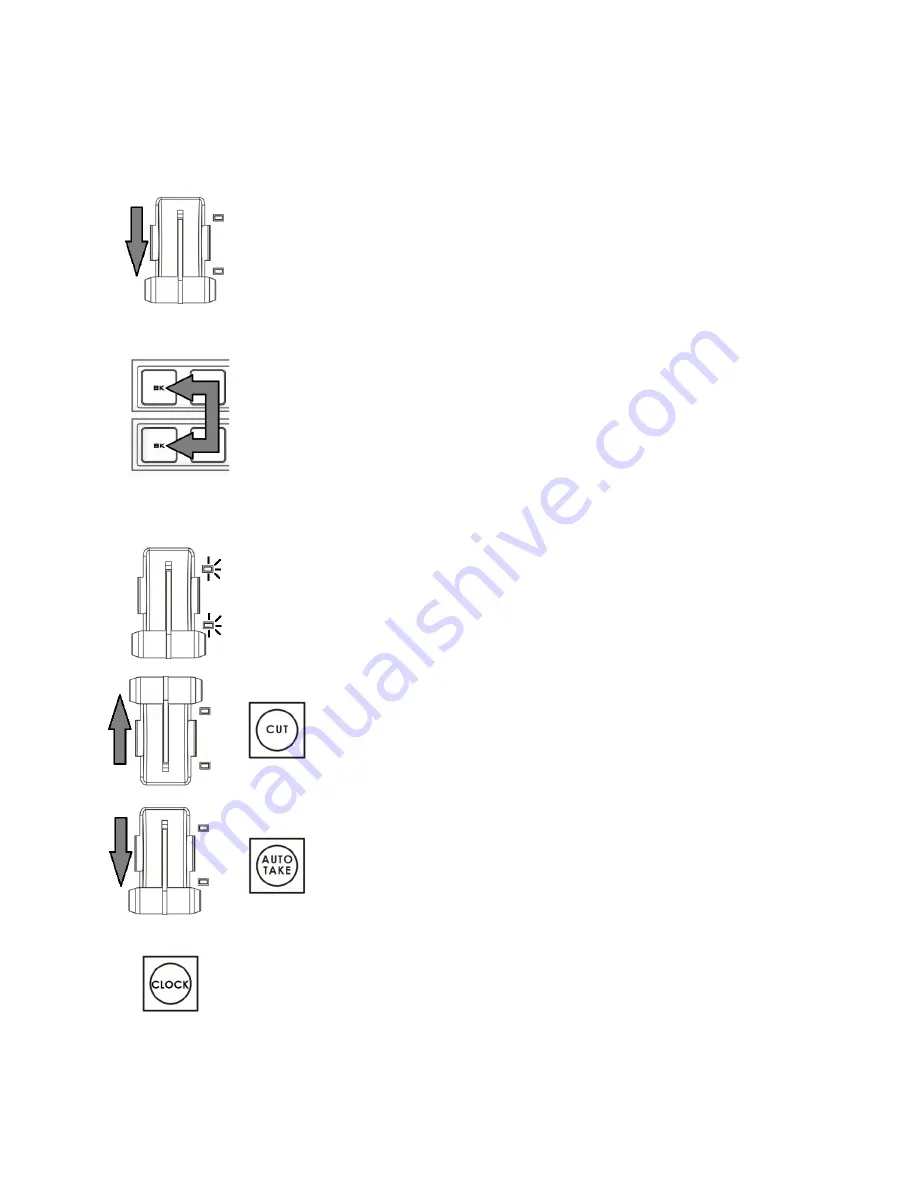
How to Re-calibrate the SE-2200 T-Bar 


After a firmware update of the switcher it will be necessary to re-calibrate the T-Bar to get it working 

correctly. 

   1. Move the 

T-Bar 

to its 

lowest position

2. 

Power OFF 

the SE-2200 switcher. 


3. Press

 and hold down BK button on both the Program and Preset rows of the switcher’s 

keyboard. 


4. 

Power  ON 

the  SE-2200  switcher  while 

still  holding  down  the  buttons 

in step 3. 


5.  The  switcher  will  start  but  the  keyboard  lights  will  remain  dead  except 

progress  LEDs.  When  these 

LEDs  flash  ON  and  OFF 

release  the  buttons  from 

step 3. 


6. Move  the  

T-Bar  to  its  top  position  

and  then  press  the  

CUT 

button


7. Move the 

T-Bar back to its lowest position 

and then press the 

AUTO TAKE

 button. 


            8. To exit the calibration procedure, press the 

CLOCK button


9. Test the T-Bar. 

If necessary change the 

T-Bar Mode 

in the 

OSD MENU options


Содержание SE-2200

Страница 1: ...SE 2200 HD SD 6 CHANNEL DIGITAL VIDEO SWITCHER Instruction manual...

Страница 2: ...22 PIPSETTINGS 22 PIP PRESET AND PIP PROGRAM 22 ASSIGNING A VIDEO SOURCE INPUT TO A PIP 22 DSK FUNCTION 24 DSKSETTINGS 24 DSK PVW AND DSK PGM 24 ASSIGNING AN INPUT TO THE DSK PVW CHANNEL FOR KEYING 2...

Страница 3: ...plete This manual may contain typing errors omissions or incorrect information Datavideo Technologies always recommend that you double check the information in this document for accuracy before making...

Страница 4: ...this unit where the power cord will be walked on rolled over or otherwise stressed 9 If an extension cord must be used with this unit make sure that the total of the ampere ratings on the products pl...

Страница 5: ...rchase Certain parts with limited lifetime expectancy such as LCD panels DVD drives Hard Drive Solid State Drive SD Card USB Thumb Drive Lighting Camera module PCIe Card are covered for 1 year The thr...

Страница 6: ...on the SE 2200 main unit has a grille for airflow cooling fans Please do not block or cover this grille as the unit may overheat This grille should also be kept free of dust The front panel can be rem...

Страница 7: ...MI 6 GPI Output Connector 14 Video Output 1 6 HD SDI 7 3pin XLR Audio Inputs 1 4 15 Input 6 HD SDI HDMI User Defined 8 3pin XLR Audio Outputs 1 2 16 Input 5 HD SDI HDMI User Defined Rear Panel Connect...

Страница 8: ...ar of the SE 2200 Main Processing unit Ethernet Port For external PC control only RS 232 RS 422 Remote This port is not active under current firmware GPI The GPI socket can be used for simple external...

Страница 9: ...CC Mini Switch 2 For firmware upgrades switch both switches to the upper position For Fast Start please select lower position Service Port This RJ45 Ethernet port is used to update the SE 2200 firmwar...

Страница 10: ...w is supplied from the HDMI connection s on the rear panel When connected to two compatible HDMI monitors a variety of multi image layouts is possible Note HDMI multi view output is 1080i Note that bo...

Страница 11: ...e live output The active channel will appear as the Program Output You can switch or CUT from one video source to another directly on the Program row You will see the multi view Program output change...

Страница 12: ...video input also connected to that same video channel How to choose live video input or Frame Store 1 First press and hold down the FS button The Preset row of input sources will light 2 While still h...

Страница 13: ...t on the Preset row 4 The input button will flash to confirm the video source is selected XPT Audio Assigning audio source channel setting depended on your selection The XPT Audio source can be quickl...

Страница 14: ...Wipe from Centre to outside edges Upper Left corner Wipe to Lower Right corner Upper Right corner Wipe to Lower Left corner Lower Left corner Wipe to Upper Right corner Lower Right corner Wipe to Upp...

Страница 15: ...the Multi view or Preview outputs as well as allowing the assigning of the key source For more detail please see the DSK Function LOGO 1 The LOGO 1 and LOGO 2 buttons are used to display pre selected...

Страница 16: ...t by the chosen Speed button MIX Pressing this button selects a basic A B Dissolve for the next transition FREEZE Freeze the program source image or return to live video of the selected program source...

Страница 17: ...annel The switcher will not automatically change to the selected Preset source at the end of the countdown How to set up the TIMER Countdown Settings 1 On the switcher s keyboard select the video sour...

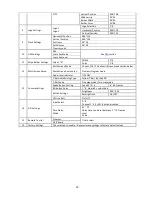
Страница 18: ...ture 0 3 Y C Delay 0 7 Set to Nominal Reset to default values Audio input adjustment Level 60 60 Set to Nominal Tick to reset Count Down Settings Count Down is on See Timer section on page 15 Count Do...

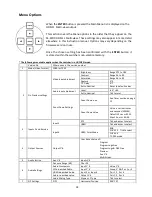
Страница 19: ...A B C See Multi Screen mode section below Multi Screen Audio setup Preview Program Audio Audio Level Indicator ON OFF 13 Console Settings T Bar Audio Mixing Type Follow T Bar By the END T Bar Mode On...

Страница 20: ...sing menu option 12 Multi Screen Setup Three Multi Screen layouts are available variant A B or C This Multi Screen output can also be assigned to any of the six SDI outputs using menu option 4 Output...

Страница 21: ...s when enabled In some setups the PIP 1 image can hide the PIP 2 image Change the position or size of the PIP 2 or PIP 1 image if required The DSK layer can occupy the whole screen If set up incorrect...

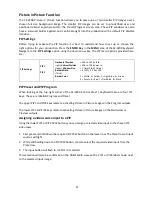
Страница 22: ...33 large Border Width 0 OFF 1 Thin to 5 Thick Border Color 1 White 2 Yellow 3 Light Blue 4 Green 5 Purple 6 Red 7 Dark Blue 8 Black PIP Preset and PIP Program When looking at the top right corner of t...

Страница 23: ...23 4 Pressing PIP PGM will take the chosen PIP1 or PIP2 to air with a fade in transition...

Страница 24: ...W and DSK PGM When looking at the top right corner of the SE 2200 Control Panel Keyboard there are two DSK buttons These are labelled Program and Preset The upper DSK PGM key relate to activating Down...

Страница 25: ...SE 2200 menu option DSK Settings and select DSK Connect the laptop running the CG 200 Windows software to HDMI input 6 via HDMI Once the software is launched the switcher may not automatically show th...

Страница 26: ...y microphones or audio sources it can then be fed back into the SE 2200 on the analogue XLR inputs The SE 2200 can then embed this externally mixed audio on to the Program SDI outputs Note For a very...

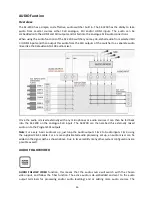
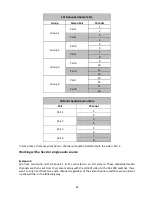
Страница 27: ...s AUDIO CROSSPOINTS INPUT 1 BUTTON 1 1 INPUT 2 BUTTON 2 1 INPUT 3 BUTTON 3 1 INPUT 4 BUTTON 4 1 INPUT 5 BUTTON 5 1 INPUT 6 BUTTON 6 1 The AUDIO FIXED function is primarily used during big concert even...

Страница 28: ...7 8 In some cases there may only be two channels of audio associated with the video Pair 1 Working with a fixed or single audio source Example 1 We have two mono mics channels 1 2 connected to an HD c...

Страница 29: ...would set up in the following way Press the ENTER key in the MENU area of the SE 2200 keyboard to display the on screen menu and then enter AUDIO CROSSPOINTS of the AUDIO SETTINGS option Change the A...

Страница 30: ...30 T Bar Audio Mixing Type Tick selection of Follow auto audio mixing type use above option By the end clean cut or immediate audio switch...

Страница 31: ...oard 4 Power ON the SE 2200 switcher while still holding down the buttons in step 3 5 The switcher will start but the keyboard lights will remain dead except progress LEDs When these LEDs flash ON and...

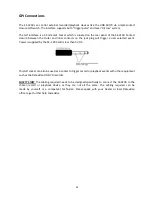
Страница 32: ...k plug will trigger a user selected event Power is supplied by the SE 2200 and is less than 5V DC This GPI socket can also be used as a socket to trigger record or playback events with other equipment...

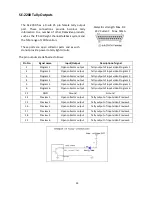
Страница 33: ...output Tally output of input video Program 2 3 Program 3 Open collector output Tally output of input video Program 3 4 Program 4 Open collector output Tally output of input video Program 4 5 Program...

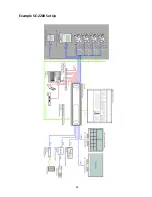
Страница 34: ...34 Example SE 2200 Set Up...

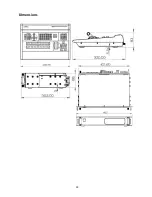
Страница 35: ...35 Dimensions...

Страница 36: ...HDMI x 2 HDMI multi view outputs format is 1080i AUX output up to 4 outputs Control Panel Connection RS 232 Tally Out YES GPI YES Software Updates via Ethernet Standards HD Format Support 1080i50 1080...

Страница 37: ...nel Compatibility Use PC via Ethernet Control panel by RS 232 Input Voltage DC12V DE embedded audio sampling 48KHz S N analog digital to analog 72dB Multi View Monitoring Number of Windows 2 6 3 layou...

Страница 38: ...usiness building Xiangtai Square No 129 Yingxiongshan Road Shizhong District Jinan City Shandong Province China Tel 86 531 8607 8813 E mail service datavideo cn China Jinan Datavideo France s a r l Ci...

Отзывы: