18
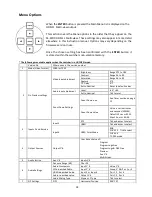
Menu Options
When the
ENTER
button is pressed the Main Menu list is displayed on the
HDMI 1 Multi-view output.
This section covers the Menu options in the order that they appear on the
SE-2200 HDMI 1 Multi-view. These settings may also appear in more detail
elsewhere in this instruction manual. Options may vary depending on the
firmware version in use.
Once the chosen setting has been confirmed with the
ENTER
button it
is stored within the switchers non-volatile memory.
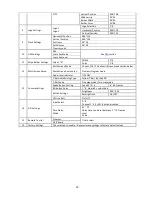
* The following menu table applies when the switcher is in HD 1080i mode.
Version No
Where xx.xx is the version number
1
Mode (Video Format)
1080i or 720P
2
On Preview settings
Video input adjustment
Brightness
Range 072 to 184
Contrast
Range 36 to 92
Saturation
Range 36 to 92
Apeture
0~3
Y-C Delay
0~7
Set to Nominal
Reset to default values
Audio input adjustment
Level
-60 ~ +60
Set to Nominal
Tick to reset
Count Down Settings
Count Down is on
See Timer section on page
15.
Count Down Value
Value is set in minutes
and seconds [MM:SS]
Default 15 sec or 00:15
Max 1 hour or 60:00
3
Inputs 5 and 6 mode
Input 5
SDI
Tick and enter to select
HDMI
Tick and enter to select
Input 6
HDMI Color Mode
RGB
YUV 422 Tick to select
YUV 444
TC-200 mode
4
Output Sources
Output 1~6
User has a choice of:
Program
Program Logo Free
Program Logo & DSK Free
Preview
Aux 1~4
Multi Screen
5
Aux Selection
Aux 1~4
Inputs 1~6
6
Audio Settings
Dynamic Range (dB)
18 or 24
Audio Crosspoints
Input 1~6
Value 1~6
SDI de-embed Audio
Input 1~6
Group 1~4 & Pair 1 or 2
HDMI de-embed Audio
Input 5 or Input 6
Pair 1, 2, 3 or 4
Audio re-embed setup
Output 1~6
Pair 1, 2, 3 or 4
Audio Mixing Type
X type or Y Type
Tick to select
7
PIP Settings
PIP 1
Horizontal Position
000~107
Содержание SE-2200
Страница 1: ...SE 2200 HD SD 6 CHANNEL DIGITAL VIDEO SWITCHER Instruction manual...
Страница 23: ...23 4 Pressing PIP PGM will take the chosen PIP1 or PIP2 to air with a fade in transition...
Страница 34: ...34 Example SE 2200 Set Up...
Страница 35: ...35 Dimensions...

