29
Press the
ENTER
key in the
MENU
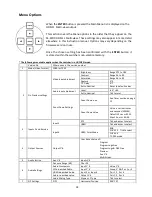
area of the SE-2200 keyboard to display the on screen menu and
then enter
AUDIO CROSSPOINTS
of the
AUDIO SETTINGS
option.
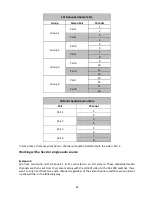
Change the de-embedded audio setup in the menu system to show a value of 1 for each video input
channel. Press the
ENTER
key to store the audio values chosen for each video input.
Change the audio (re-)embedding setup in the switcher’s menu system to show a value of Group 1.
Press the
ENTER
key to store the audio values chosen for each video input.
Now exit the menu by pressing any wipe key.
Locate the
AUDIO FIXED
button at the top left corner of the keyboard. Enable the
AUDIO FIXED
status by pressing the
AUDIO FIXED
button. Confirm that the
AUDIO FIXED
has been enabled by
checking the status area of the HDMI multi-view. The button will be backlit red.
Switching between different embedded audio sources
Example 2:
We have two mono mics with each connected to a different HD camera. These embedded audio
channels are then sent from this camera along with the HD-SDI video to the SE-2200 switcher. If we
want to hear the audio from each camera as the video channels are switched,
audio follows video
,
then we would set up in the following way.
Press the
ENTER
key in the
MENU
area of the SE-2200 keyboard to display the on screen menu and
then enter
AUDIO CROSSPOINTS
of the
AUDIO SETTINGS
option.
Change the
Audio Association
settings in the menu system to set input 1 audio source to 1, input 2
audio source to 2, input 3 audio source to 3 and etc. Press the
ENTER
key to store the audio values
chosen for each video input.
Change the
SDI Embedded Audio
setting in the switcher’s menu system to show a value of Group
1 and Pair 1. Press the
ENTER
key to store the audio values chosen for each video input.
Now exit the menu by pressing the menu key and locate the
AUDIO FIXED
button in the crosspoint
area of the keyboard.
Select the
AUDIO FOLLOW VIDEO
status with this button when looking at the status area of the
HDMI multi-view. The button will be off. The status area is located just below or near the Preview
image on the HDMI multi-view monitor.
When switching between the video sources the audio sources will also change. We can choose how
the audio will change sources, whether it is a clean cut (immediate switch) or some sort of
transitioned change (cross fade or fade out & in). To do this we would need to set up with the
following menu options.
Auto Audio Mixing Type
User choice of
X type
or
V type
Tick selection
X type = A/B cross fade
V type = Fade out A then fade in B
Содержание SE-2200
Страница 1: ...SE 2200 HD SD 6 CHANNEL DIGITAL VIDEO SWITCHER Instruction manual...
Страница 23: ...23 4 Pressing PIP PGM will take the chosen PIP1 or PIP2 to air with a fade in transition...
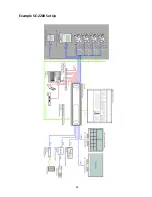
Страница 34: ...34 Example SE 2200 Set Up...
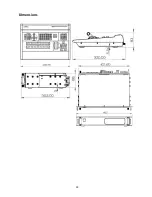
Страница 35: ...35 Dimensions...

