background image

35


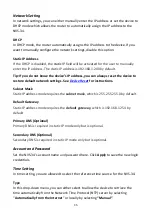
Network Setting 

In network settings, you can either manually enter the IP address or set the device to 
DHCP mode which allows the router to automatically assign the IP address to the 
NVS-34.  

DHCP 

In DHCP mode, the router automatically assigns the IP address to the device. If you 
want to manually configure the network settings, disable this option.  

Static IP Address 

If the DHCP is disabled, the 

static

 IP field will be activated for the user to manually 

enter the IP address. The static IP address is 192.168.1.200 by default.  

Tip: If you do not know the device’s IP address, you can always 

reset the device to 

restore default network settings. See 

Device Reset

 for instructions.  

Subnet Mask 

Static IP address mode requires the 

subnet mask

, which is 255.255.255.0 by default.


Default Gateway 

Static IP address mode requires the 

default gateway

, which is 192.168.1.254 by 

default.


Primary DNS (Optional) 

Primary DNS is required in static IP mode only but is optional.


Secondary DNS (Optional) 

Secondary DNS is required in static IP mode only but is optional.


Account and Password 

Set the NVS-34’s account name 

and

 password here. Click 

Apply

 to save the new login 

credentials. 

Time Setting 

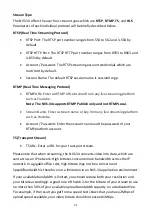
In time setting, you are allowed to select the reference time source for the NVS-34. 

Type 

In this drop-down menu, you can either select to allow the device to retrieve the 
time automatically from the Network Time Protocol (NTP) server by selecting 

Automatically from the Internet

” or locally by selecting 

“Manual”

.  

Содержание NVS-34

Страница 1: ...NVS 34...

Страница 2: ...PANEL 11 3 VIDEO STREAMING 13 3 1 STREAMING NETWORK CONNECTION AND DEVICE SEARCH 13 Connecting to a DHCP Network DHCP Mode 13 Connecting to a NON DHCP Network Static IP 14 Device Reset 14 Troubleshoot...

Страница 3: ...tavideo Technologies cannot exclude that some information in this manual from time to time may not be correct or may be incomplete This manual may contain typing errors omissions or incorrect informat...

Страница 4: ...is unit on a bed sofa rug or similar surface as the ventilation openings on the bottom of the cabinet will be blocked This unit should never be placed near or over a heat register or radiator This uni...

Страница 5: ...s may result in damage to the unit and may often require extensive work by a qualified technician to restore the unit to normal operation e When the product has been dropped or the cabinet has been da...

Страница 6: ...Drive Lighting Camera module PCIe Card are covered for 1 year The three year warranty must be registered on Datavideo s official website or with your local Datavideo office or one of its authorized d...

Страница 7: ...igh quality MP4 file to an SD card formatted to NTFS or FAT32 file system 1 1 Features Major Five Features Simultaneous H 264 video streaming and recording at multiple bitrates Supports FAT32 and NTFS...

Страница 8: ...RTMPS TS and HLS supported by the following Adobe Media Server and Wowza Media Server Video Players such as VLC Content Delivery Networks such as Youtube Live Recording Records MP4 or TS file to an S...

Страница 9: ...recording INPUT Button Press the INPUT button to select between SDI and HDMI input sources The button is always in solid white The activated input source will be indicated by the corresponding LED Gre...

Страница 10: ...e disabled RECORD Button The RECORD button activates and deactivates the RECORD Only mode follow the steps outlined below Start recording When idle the RECORD button is solid white Press and hold the...

Страница 11: ...successfully activated Stop streaming While streaming the STREAM button is solid red Press and hold the STREAM button for approximately 2 seconds When the stream function is terminating the STREAM bu...

Страница 12: ...ut HDMI Input Connect an HDMI video source SDI Input Connect an SDI video souce Network LAN The LAN port connects the device to the Internet via an Ethernet cable Power DC IN 12V DC in socket connects...

Страница 13: ...nnected NVS 34 devices Note The NVS 34 will be automatically assigned an IP address upon connection to the DHCP network 1 Connect the NVS 34 s LAN port to the network via an Ethernet cable 2 Turn on t...

Страница 14: ...system page by clicking the System tab on the home of the user interface 5 In the Network Setting pane disable the DHCP mode 6 You will then be allowed to manually enter the static IP address once the...

Страница 15: ...oblem by attempting the following Turn off the router wait for 10 seconds then turn on the router again Reset the NVS 34 to the factory defaults see the previous section for device reset If the proble...

Страница 16: ...ername as well as the password into the pop up dialogue box as shown below Username admin Password 000000 Click OK to log in Source You will see the Source page immediately after logging into the web...

Страница 17: ...t hue and saturation by dragging the corresponding sliders as shown in the diagram below After that select your audio sources You may choose to output HDMI embedded audio Embed external audio from RCA...

Страница 18: ...dio source information such as Input Information Video Source Audio Source Resolution Frame Rate Channels Bits Per Sample and Sample Frequency Note The NVS 34 web UI does not update automatically so t...

Страница 19: ...age on which the user will be allowed to customize various stream and record settings The NVS 34 offers the following operation modes Stream Record which will be discussed in detail in this section St...

Страница 20: ...open the stream and Stop Stream to end the stream To reset simply click the default button Next we will discuss the stream setting options in greater detail Encoder Source This option allows you to e...

Страница 21: ...ame or key from any live streaming platform such as Youtube Account Password Enter the account name and the password of your RTMP platform account TS Transport Stream TS URL Enter a URL for your trans...

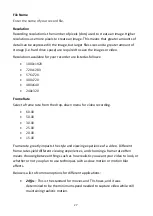
Страница 22: ...the stream Attempting too high of a resolution on too little processing power can result in degraded image quality and corrupted or interrupted streams or recordings Resolutions available for the stre...

Страница 23: ...6M 4M 2M 1M 512K 256K Encoder Mode The Encoder Mode sets the video bitrate mode for your video stream The available modes are listed as follows High 8M Medium 4M Low 2M Tip You can also switch betwee...

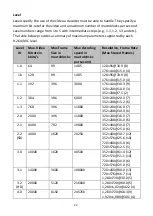
Страница 24: ...0 64 99 1485 128 96 30 9 8 176 144 15 0 4 1b 128 99 1485 128 96 30 9 8 176 144 15 0 4 1 1 192 396 3000 176 144 30 3 9 320 240 10 0 3 352 288 7 5 2 1 2 384 396 6000 320 240 20 0 7 352 288 15 2 6 1 3 76...

Страница 25: ...CABAC encoding provides a 7 10 quality improvement over CAVLC but requires an extra 10 15 CPU CABAC encoding is only available in H 264 Profiles Main High When targeting at low powered devices such as...

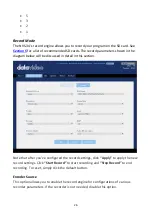
Страница 26: ...ussed in detail in this section Note that after you ve configured the record settings click Apply to apply the new record settings Click Start Record to start recording and Stop Record to end recordin...

Страница 27: ...x640 240x320 Frame Rate Select a frame rate from the drop down menu for video recording 60 00 50 00 30 00 25 00 20 00 15 00 Frame rate greatly impacts the style and viewing experience of a video Diffe...

Страница 28: ...e listed as follows 16M 12M 8M 6M 4M 2M 1M 512K 256K Recommended video bitrates 720P or lower 8 10 mbps 1080P or higher 15 mbps or higher Encoder Mode The Encoder Mode sets the video bitrate mode for...

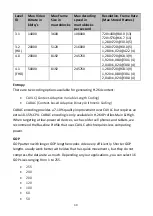
Страница 29: ...ch H 264 AVC level Level ID Max Video Bitrate in kbits s Max Frame Size in macroblocks Max decoding speed in macroblocks per second Resolution Frame Rate Max Stored Frames 1 0 64 99 1485 128 96 30 9 8...

Страница 30: ...nt CAVLC Context Adaptive Variable Length Coding CABAC Context based Adaptive Binary Arithmetic Coding CABAC encoding provides a 7 10 quality improvement over CAVLC but requires an extra 10 15 CPU CAB...

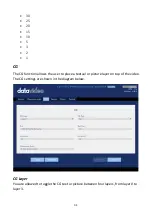
Страница 31: ...CG function allows the user to place a textual or picture layer on top of the video The CG settings are shown in the diagram below CG Layer You are allowed to toggle the CG text or picture between fou...

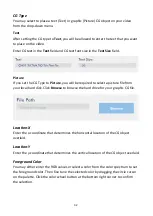
Страница 32: ...cture file from your local hard disk Click Browse to browse the hard drive for your graphic CG file Location X Enter the x coordinate that determines the horizontal location of the CG object overlaid...

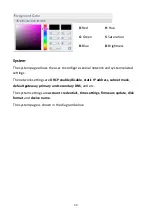
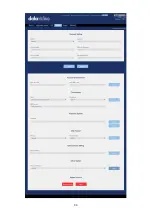
Страница 33: ...ettings are DHCP enable disable static IP address subnet mask default gateway primary and secondary DNS and etc The system settings are account credentials time settings firmware update disk format an...

Страница 34: ...34...

Страница 35: ...See Device Reset for instructions Subnet Mask Static IP address mode requires the subnet mask which is 255 255 255 0 by default Default Gateway Static IP address mode requires the default gateway whi...

Страница 36: ...e and time values A calendar will appear after the Date field is clicked Simply click a day to set the date Enter the time in the Time field Time Zone Click the drop down menu to select a time zone fo...

Страница 37: ...her Option Timeout Period This sets the timeout period for the current login See below for available options 20 Min 120 Min 1 Day 7 Day Never System Control Restore to Default Click to restore the sys...

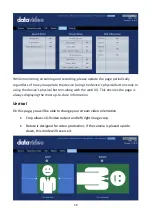
Страница 38: ...ing the device s physical buttons along with the web UI This ensures the page is always displaying the most up to date information Vertical On this page you will be able to change your stream video or...

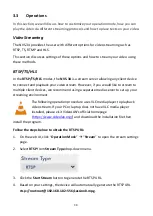
Страница 39: ...you would like to stream to multiple client devices we recommend using a separate media server to set up your streaming environment The following operation procedure uses VLC media player to playback...

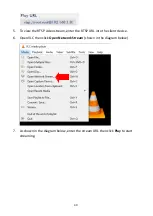
Страница 40: ...RTSP video stream enter the RTSP URL into the client device 6 Open VLC then click Open Network Stream shown in the diagram below 7 As shown in the diagram below enter the stream URL then click Play to...

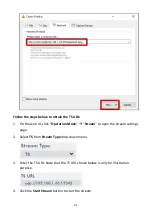
Страница 41: ...the web UI click Operation Mode Stream to open the stream settings page 2 Select TS from Stream Type drop down menu 3 Enter the TS URL Note that the TS URL shown below is only for illustration purpose...

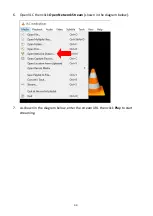
Страница 42: ...ent device to which the video stream is delivered over TS protocol 6 On the computer open VLC then click Open Network Stream shown in the diagram below 7 As shown in the diagram below enter the stream...

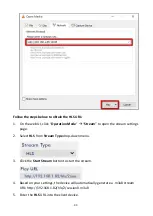
Страница 43: ...to open the stream settings page 2 Select HLS from Stream Type drop down menu 3 Click the Start Stream button to start the stream 4 Based on your settings the device will automatically generate a m3u8...

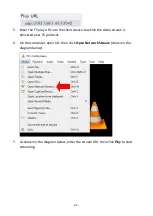
Страница 44: ...44 6 Open VLC then click Open Network Stream shown in the diagram below 7 As shown in the diagram below enter the stream URL then click Play to start streaming...

Страница 45: ...stream to one CDN or media server that supports the Real Time Messaging Protocol RTMP An example of the RTMP media server is Youtube In the following section we will show you how to set up an RTMP str...

Страница 46: ...e to find Server URL and Stream name key 5 On the NVS 34 open the Stream operation mode page 6 Select RTMP from the Stream Type drop down menu 7 Enter the Server URL rtmp a rtmp youtube com live2 obta...

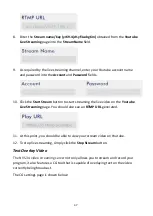
Страница 47: ...tart streaming the live video on the Youtube Live Streaming page You should also see an RTMP URL generated 11 At this point you should be able to view your stream video on Youtube 12 To stop live stre...

Страница 48: ...ordinates to set the CG object position 6 If you have selected the picture CG you will need to adjust the object s width and height as well 7 Set the foreground color 8 Click Apply button to save CG s...

Страница 49: ...source will be indicated by the LEDs above the button Green Input source activated Off Input source deactivated Note The Input button is disabled while streaming or recording is in progress Record Bu...

Страница 50: ...successfully terminated Stream Button Press the STREAM button to start stop streaming The table below summarizes the STREAM Button LED behaviors STREAM Button Solid White Stream function in idle stat...

Страница 51: ...d To exit push the the RECORD or STREAM button again Note The system will return to original settings if the BITRATE button push is not sensed The default bitrate is M Vertical Button Press the Vertic...

Страница 52: ...E VERTICAL RECORD and STREAM buttons illuminating solid white 7 The device s network settings should now be the default DHCP mode 8 Connect the device to a DHCP network and use the IP finder to scan f...

Страница 53: ...r assistance This section outlines the firmware upgrade process which should take 10 minutes to complete The existing NVS 34 settings should persist through the firmware upgrade process which should n...

Страница 54: ...licking the firmware file you will see the loading prompt as shown below indicating that the file is being uploaded to the NVS 34 5 After the file has been successfully uploaded you will see a file up...

Страница 55: ...55 Note If the device is recording or streaming you must turn them off before initiating the firmware update...

Страница 56: ...or above In this appendix you will find a list of SD cards recommended by Datavideo Recommended SD Cards No Brand Model Pictures 1 Kingston SDHC I C10 16G 2 SANDISK Extreme SDXC I C10 U3 V30 64GB 3 SO...

Страница 57: ...rds No Brand Model Pictures 5 SONY SDXC I C10 U3 64GB 6 TOSHIBA SDHC C10 16GB 7 SANDISK Extreme SDHC C10 16GB 8 ADATA Premier Pro microSDXC I UHS I U3 Class 10 with SD adapter 64GB 9 SANDISK ULTRA SDH...

Страница 58: ...58...

Страница 59: ...ns please refer to related sections and follow all suggested solutions If problem still exists please contact your distributor or the service center No Problems Solutions 1 Unable to update firmware o...

Страница 60: ...60 7 Dimensions All measurements in millimeters mm...

Страница 61: ...Mbps 1080p50 60 Stream Only Up to10Mbps 1080p50 60 Video Rate Mode CBR Audio Mode Stereo Mono Audio Bitrate Stereo 64 384 Kbps Mono 32 192 Kbps Streaming Protocols TS over TCP UDP unicast multicast RT...

Страница 62: ...62 Notes...

Страница 63: ...63 Notes...

Страница 64: ...https www datavideo com product NVS 34 Oct 30 2020 Ver E3 Datavideo Technologies Co Ltd All rights reserved 2020...

Отзывы: