background image

MATRIX 450™ QUICK REFERENCE GUIDE 


3


STEP 1 – ASSEMBLE THE READER 

 
The first step to perform is to assemble the accessories that make up the Matrix 450™ 
reader. The lens and lighting system or external illuminator must be used. This procedure 
shows an LT-03x lighting system. 


CAUTION


Matrix 450™ must be disconnected from the power supply during this 
procedure. 

 
1.  In a dust-free environment, remove the Matrix 450™ Lens Cover by unscrewing it. 


CAUTION


Do not touch the sensor aperture, lens glass or lens cover glass. These 
areas must be kept clean. Avoid any abrasive substances that might 
damage these surfaces during cleaning. 


2.  Remove the sensor protection label by pulling it off of the base. 


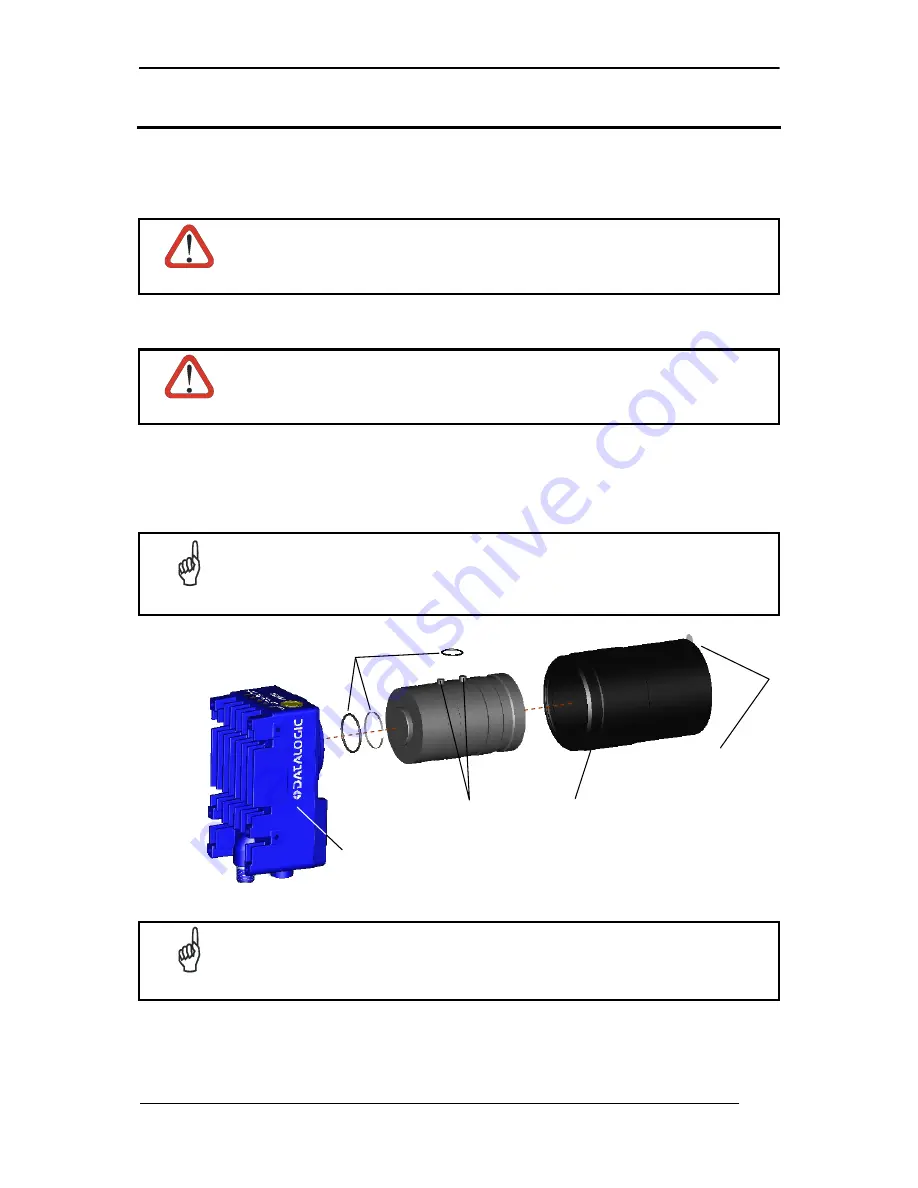
3.  Mount the LNS-12xx lens by slowly screwing it onto the base until it arrives at the 

mechanical stop. 


NOTE


The lens mount is equipped with a special slip mechanism and together 
with the LT-03x design facilitates the focusing procedure during installation, 
for example if the locking knobs on the lens are obstructed by the body of 
the illuminator. See note in Step 4 "Focusing the Reader" or Step 8. 


Figure 1 – Assembling Matrix 450™ and LNS-12xx Lens 


NOTE


The anti-vibration components are already mounted to all Datalogic 
LNS-12xx Lenses. 


4.  To keep dust and dirt off of the lens during mounting, temporarily replace the lens cover. 

Locking Knobs

Lens Cover 

anti-vibration components 

(see note below) 

Protective Film 

(remove before calibration)

Matrix 450™ Base 

Содержание Matrix 450

Страница 1: ...application For other types of installations such as ID NET and for a complete reader configuration using the VisiSet configuration program refer to the Matrix 450 Reference Manual available on the mi...

Страница 2: ...which describes specific Info Features Applications Models Accessories and specific Downloads DOWNLOAD PRODUCT LITERATURE SW UTILITIES The VisiSet utility program which allows device configuration usi...

Страница 3: ...Remove the sensor protection label by pulling it off of the base 3 Mount the LNS 12xx lens by slowly screwing it onto the base until it arrives at the mechanical stop NOTE The lens mount is equipped...

Страница 4: ...nt Lens 5MP with anti vibration components 93A400034 LT 032 ULTRA POWER LT NARROW BLUE 40 93A400032 LT 030 ULTRA POWER LT SUPERNARROW BLUE 20 93A400033 LT 031 ULTRA POWER LT SUPERNARROW WHITE 20 93ACC...

Страница 5: ...wn White wires to Vdc and Black Blue wires to GND Connect the cable shield to Earth ground Use CAB MS0x between Matrix 450 and the CBX for power serial host external trigger device photocell serial au...

Страница 6: ...ed with the LT 03x is used to supply power to the Matrix 450 from the LT 03x Matrix 450 Standalone Layout to Ethernet Host Matrix 450 LT 03x can also be used in an ID NET Master Slave configuration Se...

Страница 7: ...ce I1B External Trigger B polarity insensitive TX Auxiliary Interface TX V Power Reference External Trigger RX Auxiliary Interface RX V Power Source Inputs SGND Auxiliary Interface Reference I2A Input...

Страница 8: ...gh the reader can read a code at any tilt angle Assure at least 10 Pitch or Skew to avoid direct illuminator light reflection which will reduce performance 3 Refer to the Reading Diagrams to determine...

Страница 9: ...s function by pressing and holding the X PRESS push button until the Focus LED is on Figure 4 X PRESS Interface Focus Function 5 Release the button to enter the Focus function The Blue Diamonds and la...

Страница 10: ...e lens type is changed or if the focal distance is changed Locate 1 Enter the Focus function by pressing and holding the X PRESS push button until the Focus LED is on 2 Release the button to enter the...

Страница 11: ...X PRESS push button once Learn 8 Enter the Learn function by pressing and holding the X PRESS push button until the Learn LED is on Figure 9 X PRESS Interface Learn Function 9 Release the button to en...

Страница 12: ...ing and holding the X PRESS push button until the Setup LED is on Figure 11 X PRESS Interface Setup Function 6 Release the button to enter the Setup function The Setup LED will blink until the procedu...

Страница 13: ...ase Matrix 450 emits a long low pitched beep 10 Exit the Learn function by pressing the X PRESS push button once NOTE If you have used this procedure to configure Matrix 450 go to step 9 RESET READER...

Страница 14: ...onfiguration running Windows 98 2000 NT 4 0 SP4 or later XP Vista or 7 then insert the VisiSet Mini DVD wait for the CD to autorun and follow the installation procedure This configuration procedure as...

Страница 15: ...top Step 1 it can be rotated counterclockwise up to one full turn without loosening the lens so that the diaphragm scale and locking knobs can be easily accessed from behind the LT 03x a Remove the an...

Страница 16: ...and on the four delimiters red points in the acquired images which indicate the region in which the calibration algorithm is active See figure below Press the Positioning button again to stop positio...

Страница 17: ...the lens a little farther the Current Focus Quality Bar decreases red see middle figure c Rotate the Focusing ring in the opposite direction The Current Focus Quality Bar green increases towards the v...

Страница 18: ...a Calibration Mode choice and press the Calibrate button b Select a Code Setting Mode choice and press the Code Setting button This step performs image density calibration in order for Matrix 450 to...

Страница 19: ...t of the reader at the same reading distance then repeat step 6a and 6b 8 Select a Saving Options choice and press the Save button 9 Close the Setup Wizard NOTE If your application has been configured...

Страница 20: ...LEDs is activated and when codes are placed in the reading area FOV the Bar Graph shows the Good Read Rate In case of no read condition only the STATUS LED is on and blinks Figure 15 X PRESS Interface...

Страница 21: ...eing able to complete a detailed reader configuration The desired parameters can be defined in the various folders of the Parameter Setup window and then sent to the reader memory either Temporary or...

Страница 22: ...ding TRIGGER yellow LED indicates the status of the reading phase COM yellow LED indicates active communication on the main serial port STATUS red LED indicates a NO READ result When connected to a Fi...

Страница 23: ...1 Lighting Systems are especially effective in high speed code movement applications When defining a HW SW configuration for the Matrix 450 LT 03x assembly for conditions different from those of the r...

Страница 24: ...032 Software Parameters Exposure Time 10 s 19 25 Max code moving speed 1 8 m s 1 8 m s Gain 13 14 LT 03x Lighting Mode Very High Power Strobed or Continuous High Power Minimum Code Height mm 5 Code 1...

Страница 25: ...re Time 10 s 15 16 20 12 12 19 Max code moving speed 1 8 m s 1 8 m s 1 5 m s 2 8 m s 2 8 m s 1 8 m s Gain 7 13 16 8 16 15 LT 03x Lighting Mode Very High Power Strobed or Continuous High Power Minimum...

Страница 26: ...osure Time 10 s 12 12 18 16 16 22 Max code moving speed 2 3 m s 2 3 m s 1 5 m s 3 2 m s 3 2 m s 2 5 m s Gain 7 14 16 6 12 16 LT 03x Lighting Mode Very High Power Strobed or Continuous High Power Minim...

Страница 27: ...LT 031 Software Parameters Exposure Time 10 s 20 40 15 27 Max code moving speed 1 0 m s 0 5 m s 1 8 m s 1 0 m s Gain 22 22 18 22 LT 03x Lighting Mode Very High Power Strobed or Continuous High Power M...

Страница 28: ...2 200 7 87 179 7 05 90 3 54 9 0 35 65 2 56 30 1 18 62 2 44 50 25 27 5 1 08 34 5 1 36 55 2 17 45 1 77 9 0 35 22 5 0 89 42 5 1 67 20 0 79 20 0 79 60 2 36 Figure 18 Matrix 450 LT 03x L Bracket Overall Di...

Страница 29: ...itch 35 Tilt 0 360 Lighting System LT 03x Family Illuminators Risk 2 Group LED product to EN62471 Class 2 LED product to IEC60825 1 Laser Safety Class pointers Class 2 Laser Light to IEC60825 1 ENVIRO...

Страница 30: ...Japan Post PLANET POSTNET POSTNET BB Intelligent Mail Swedish Post Operating Mode ONE SHOT CONTINUOUS PHASE MODE Configuration Methods X PRESS Human Machine Interface Windows based SW VisiSet via seri...

Страница 31: ...and 2 this device must accept any interference received including interference which may cause undesired operation This equipment has been tested and found to comply with the limits for a Class A digi...

Страница 32: ...Place the replicate lens and illuminator serial number labels here for reference Some of this information can also be written in the Reader Information configuration parameters in the Miscellaneous f...

Отзывы: