background image


24

Elements of Card Design

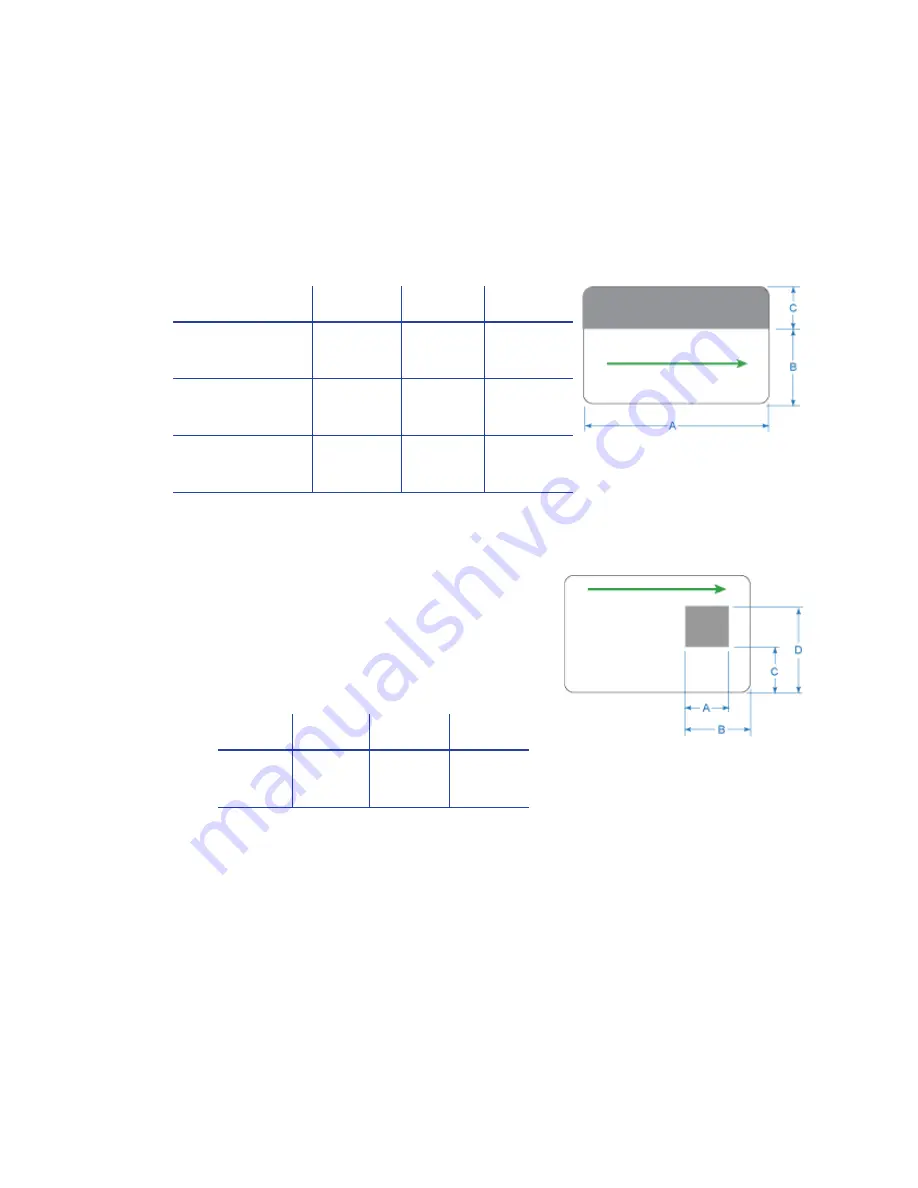
Standard Magnetic Stripe Non-Printing Area

The


3

track


magnetic


stripe


typically


is


on


the


back


of


the


card,


while


the


single

track


magnetic


stripe


is


usually


on


the


front


of


the


card.


The


green


arrow


shows


the


direction


the


card


travels


through


the


printer.


Use


the


following


dimensions


to


prevent


printing


in


the


magnetic


stripe


area.

Standard Smart Card Non-Printing Area

The


smart


card


area


typically


is


on


the


front


of


the


card.


The


green


arrow


shows


the


direction


the


card


travels


through


the


printer.


Use


the


following


dimensions


to


prevent


printing


in


the


smart


card


area.


Custom Non-Printing Areas

Use


ID


software,


a


custom


application,


or


escape


codes


to


define


custom


non

printing


areas


for


one


or


more


of


the


following:

• 

Blocking


printing


but


not


topcoat

• 

Non

standard


areas,


such


as


a


pre

printed


logo


or


a


signature


panel

• 

More


than


one


area


on


the


same


side


of


the


card

A

B

C

D

0.88 in
22.4mm

1.17 in
29.8mm

0.88 in
22.4mm

1.47 in
37.3mm


A

B

C

3-track

3.37 in
85.6mm

1.46 in
37.1mm

0.66 in
16.8mm

2-track

3.37 in
85.6mm

1.57 in
39.9mm

0.55 in
14mm

Single-track (JIS)

3.37 in
85.6mm

1.60 in
40.6mm

0.52 in
13.2mm

Содержание CD Series

Страница 1: ...Datacard SD CD Series Card Printers Installation and Administrator s Guide April 2013 Part No 527249 001 Rev C...

Страница 2: ...d reproduction is prohibited Trademark Acknowledgments Datacard is a registered trademark and service mark of DataCard Corporation in the United States and other countries SD and CD are trademarks of...

Страница 3: ...rinters Installation and Administrator s Guide Revision Date Description of Changes A June 2012 First release of this document B November 2012 Updates for XPS printer driver v 4 0 C April 2013 Updates...

Страница 4: ...iv...

Страница 5: ..._____________________________________________ 13 Use OpenCard Data Format ___________________________________________________ 13 Chapter 2 Elements of Card Design _____________________________________...

Страница 6: ...ess the Printer Manager________________________________________________ 33 Printer Manager User Access Levels_________________________________________ 35 WebUser ______________________________________...

Страница 7: ...____________________________________________________ 74 Print Ribbon Cartridge _____________________________________________________ 74 Cleaning Roller Spindle ________________________________________...

Страница 8: ...viii...

Страница 9: ...lowing A 32 or 64 bit processor running at 2GHz or faster 2GB or more memory RAM and at least 1GB free space on the hard drive One of the following supported operating systems Windows 8 32 or 64 bit W...

Страница 10: ...Ethernet cable is not supplied with the printer A PC that meets the PC Requirements described on page 1 and is connected to and communicating with the network USB Requirements You can connect up to ei...

Страница 11: ...in a clean office environment keeping paper and foreign materials off the equipment Place the printer on a sturdy level surface Printer Model Dimensions inches mm A B C D E F G SD260 10 00 254 8 80 22...

Страница 12: ...ation on using the Printer Manager web service to specify printer security settings When you use the XPS Card Printer Driver the driver uses the most secure printing protocol enabled in the printer Fo...

Страница 13: ...t on page 13 Prepare the Printer To prepare the printer to print cards remove any packing material load blank card stock into the input hopper optional load print ribbon and load a cleaning sleeve ont...

Страница 14: ...with an input hopper do the following 1 Open the input hopper 2 Load the cards into the input hopper Fan the cards before placing them in the hopper optional Insert magnetic stripe cards with the str...

Страница 15: ...abeled H1 through H6 You can load up to 100 cards into each hopper Fan the cards before placing them in the hoppers optional Insert magnetic stripe cards with the stripe down and toward the right side...

Страница 16: ...open the printer supplies access door on the optional multi card hopper 2 Open the printer cover 3 Remove the print ribbon cartridge 4 Load a full roll of print ribbon onto the spindle closest to the...

Страница 17: ...the spindle with cleaning sleeve onto the ribbon cartridge b 3 Remove the protective wrapper from the cleaning sleeve c Install the Ribbon Cartridge Install the assembled print ribbon cartridge into t...

Страница 18: ...lso can be used with an optional large output hopper that holds up to 100 cards The large output hopper kit includes two base sections and the large output hopper The two base sections are the same tu...

Страница 19: ...the opening facing the front of the printer 6 Push up to insert the four tabs in the slots and then push the base back to lock it to the printer 7 Remove the 25 card output hopper from the printer Sl...

Страница 20: ...asily removed and the 200 card hopper can be installed without using tools 1 Open the input hopper 2 Press the release tab located on the back wall of the hopper while lifting the hopper up and off th...

Страница 21: ...he receptacle with the open end toward the printer 2 Follow the instructions included with the lock to complete the installation Use the Card Printer Driver The Card Printer Driver uses Microsoft XPS...

Страница 22: ...14 Installation...

Страница 23: ...design including Basic Card Design on page 15 Printing Design on page 16 Magnetic Stripe Design on page 27 Smart Card Design on page 30 Settings for Card Design in Printer Manager on page 31 Basic Ca...

Страница 24: ...f the color area in the card design Color printing begins when the software detects a color pixel and continues for the length of the ymc panels Split Ribbon Color Printing Split ribbon color printing...

Страница 25: ...normally print with the K panel Because the printer uses the print ribbon panels in sequence YMC first then K black images can print over color graphics For the best appearance of color graphics or t...

Страница 26: ...d with the black panel Full color print ribbon also prints any monochrome or one bit per pixel graphics using the K panel Monochrome Ribbon Monochrome ribbon produces single color cards Monochrome rib...

Страница 27: ...d on the type of bar code produced Bar codes contain a series of black lines bars separated by white areas spaces Each character of encoded data is represented by a set of bars and spaces A bar code s...

Страница 28: ...arge enough to be read consistently The capabilities of the bar code reader might influence this The bar code must be tall enough to be read under normal conditions Bar Code Print Settings To achieve...

Страница 29: ...test multiple cards Card Design Changes That Affect Bar Codes If you make substantial changes to the way you produce cards review setup tasks to make sure that cards continue to have the quality you...

Страница 30: ...olor print ribbon When the preference is enabled the printer detects the 1 D 2 D and Postal bar code types shown in the following table Refer to the printer s Driver Guide for information on specifyin...

Страница 31: ...Non Printing Areas The card design can have areas where printing is not allowed Such areas include a magnetic stripe signature panel or smart card chip Card production software usually manages such n...

Страница 32: ...ow shows the direction the card travels through the printer Use the following dimensions to prevent printing in the smart card area Custom Non Printing Areas Use ID software a custom application or es...

Страница 33: ...argin of zero 0 or no margin The card on the left shows a margin of white space at the outer edge of the card The card on the right shows edge to edge printing Edge to edge printing can require fine t...

Страница 34: ...tones especially gray which can highlight the location of card features and flaws Image Placement Use the following suggestions to help you locate important images such as a photo logo or bar code Whe...

Страница 35: ...ny characters can be encoded on each track and which characters can be encoded Your cards can use the default format for each track or can use a different combination of tracks and data formats Three...

Страница 36: ...JIS Japanese Industrial Standard Type II format The maximum number of characters for the JIS format is 69 characters These characters can include spaces numeric characters uppercase alphabetic charact...

Страница 37: ...e these values are set they remain the same for all cards processed using the same design The defaults are set to standard ISO format and high coercivity Refer to MagStripeGeneral on page 51 for infor...

Страница 38: ...label includes codes that identify the type and model of the smart card module installed in the printer The following table lists the codes used on the configuration label The S1 value on the configur...

Страница 39: ...d cable for the smart card port used This cable is not needed for single wire processing A card application that is customized to work with the printer and the smart card application using the SDK or...

Страница 40: ...32 Elements of Card Design...

Страница 41: ...be viewed You can choose from three user access levels to perform a variety of basic and advanced tasks WebUser WebAdmin and WebService Access the Printer Manager The initial Printer Manager screen a...

Страница 42: ...olumn 5 In the Please Log In section select a Username that matches your job responsibility and enter a password if required Refer to Printer Manager User Access Levels on page 35 for a description of...

Страница 43: ...for printing cards Other responsibilities can include cleaning the printer ordering printer supplies or printing a daily or weekly log of card production The WebUser access level displays four menu se...

Страница 44: ...ur Internet browser to scale the image to fit the paper Use the Printer Manager The following sections describe how to use the options on the Printer Manager menus that are available to WebUser and We...

Страница 45: ...lay the mode that the printer is in the printer state how long the printer has been powered on in seconds current conditions and job status View View Supplies Display information about the print ribbo...

Страница 46: ...formation for WebService access level users only No No FrontPanel Set front panel values for the printer Change Backlight Brightness KeySenseLevel and SpeakerEnabled Values Change all Current Values P...

Страница 47: ...MagStripeCustomTrack2 Set customized magnetic stripe values for track 2 No Change all Current Values MagStripeCustomTrack3 Set customized magnetic stripe values for track 3 No Change all Current Value...

Страница 48: ...yAddress EthIPAddress and EthSubnetMask values must be set manually EthGatewayAddress The gateway address for the Ethernet network Enter the appropriate address EthIpAddress The IP address of the Ethe...

Страница 49: ...ctivity Log 3 In the FilterJobStates category select Error from the dropdown list Changes to the state of a job with this severity and higher will be written to the activity log You can select from th...

Страница 50: ...nabled 7 DPCLSecure Enabled Enabled 8 DPM Enabled Enabled 9 DPMSecure Enabled Enabled 10 FactoryRejectHopper Disabled Disabled 11 NetworkAccessControl Disabled Disabled 12 Plugin Enabled Enabled 13 Re...

Страница 51: ...ock access CPX Enable or disable CPX Select Enabled to allow access Select Disabled to block access DPCL Allow DPCL commands through the unsecure port Select Enabled to allow access Select Disabled to...

Страница 52: ...ed to block access Plugin Enable or disable the plugin feature for the printer to access installed plug ins Select Enabled to allow access Select Disabled to block access RejectHopper Enable or disabl...

Страница 53: ...lable for duplex printers Select Disabled to block access WebServerSecure Allow access to the Printer Manager web server through the secure port Select Enabled to block access Select Disabled to allow...

Страница 54: ...set to 0 cards between cleaning are not tracked LedPrintheadCyclesToCleaning Set the number of printhead cycles between cleaning The card light blinks amber when the printer reaches this value If thi...

Страница 55: ...8 2 ColorManagement sRGBColorSpace sRGBColorSpace 3 KPower 0 0 100 100 4 KPower1200DPI 0 0 100 100 5 KPower600DPI 0 0 100 100 6 KPowerDuplex 0 0 100 100 7 KWhiteShade 0 0 100 100 8 LeadTrim 0 254 0 25...

Страница 56: ...r crisp bar codes or to prevent frequent ribbon breaks when printing with the K panel KPower1200DPI Modify the print intensity of 1200 dpi for the K panel or K ribbons Increase this value to make sing...

Страница 57: ...8 dot rows Increase the value to lengthen the printed area Decrease the value to shorten the printed area TWhiteShade Modify the amount of power applied to the printhead to reduce ribbon friction with...

Страница 58: ...nformation about changing the printer s pick settings Transport Change settings as needed and then click Set Current to apply changes EjectHopperSpeed Optimize eject speed based on hopper type Select...

Страница 59: ...t Allowed Range 1 Attempts 3 3 1 5 2 Coercivity HICO HICO 3 DataFormat1 IATA IATA 4 DataFormat2 ABA ABA 5 DataFormat3 TTS TTS 6 NoDataDisableTrack Disabled Disabled 7 ReadTrack1 Enabled Enabled 8 Read...

Страница 60: ...ce The choices are HICO LOCO NTT1 NTT2 NTT3 DataFormat 1 2 3 Specify the names of the data formats used for tracks 1 2 and 3 For single track magnetic stripe encoding set DataFormat1 to JIS and DataFo...

Страница 61: ...95 63 1 255 2 CustomCharLength Track 1 6 Tracks 2 3 4 6 4 1 8 3 CustomCharLow Track 1 32 Tracks 2 3 48 32 48 1 255 4 CustomCharMask Track 1 32 Track 2 48 32 48 1 255 5 CustomCharMax Track 1 76 Track...

Страница 62: ...ata bits per inch of magnetic stripe media for the track also called bits per inch or bpi Allowed values are 75 bpi or 210 bpi CustomEndSentinel Specify the last character encoded which identifies the...

Страница 63: ...k3 Second apply the custom track using the settings on the MagStripeGeneral menu 1 To use the defined custom track A Open the MagStripeGeneral menu B Select Custom for DataFormat1 DataFormat2 or DataF...

Страница 64: ...te the WebUser SNMP read and SNMP write passwords 2 Enter the current password If the current password field is empty no entry leave this box blank 3 Enter the new password in the corresponding field...

Страница 65: ...t Job Queue State to apply the changes Field Value Description Current Password Enter the currently set password Leave the field blank if no password was previously set Next Password Enter a new passw...

Страница 66: ...reset the log reset counters and reset the printer Troubleshooting Menu Option Function WebUser WebAdmin Test Card Print test cards No Change all current values Run card Activity Log Display printer...

Страница 67: ...card with encoded magnetic stripe data Color Print the test card using the YMCK panels of the print ribbon on the front or back Monochrome Print the test card using a monochrome ribbon or the K panel...

Страница 68: ...ll panels of the print ribbon and displays the steps of each color from darkest to lightest TestPattern5 Use this test to set up the card registration of the printer Print the card to verify changes t...

Страница 69: ...t Save and send the activity log to your service provider when you request service The log provides valuable information when troubleshooting printer performance issues 1 Click Download to save the ac...

Страница 70: ...k Run to view a log of the print requests sent to the printer To reset the audit log click Run in the Reset Log field Reset Counters The Reset Counters option resets the card counter functions in the...

Страница 71: ...rent list of loaded files for the selected group To add an item to a selected group click Browse select a file path and click Add Item To remove a loaded file select a file in the list of loaded files...

Страница 72: ...d remove the ribbon cartridge If the printer has locks remove the cleaning sleeve replace the ribbon cartridge and lock the printer B Remove the blank card stock from the input hopper 3 Place the unwr...

Страница 73: ...the used cleaning card Wait a few minutes for the rollers to dry 8 Replace the supplies A Place the cards in the input hopper B Replace the cleaning sleeve with a new sleeve and remove the protective...

Страница 74: ...66 Printer Manager...

Страница 75: ...ide 67 Chapter 4 Supplies and Parts This section describes the supplies and parts for the printer It includes Print Ribbon on page 68 Cards on page 71 Cleaning Supplies on page 75 Replacement Parts on...

Страница 76: ...rt panel print ribbon when only a portion of the card design calls for color For example a card design may have a color photo on the top or left of the card and black text on the bottom of the card Th...

Страница 77: ...applies black and two topcoat panels on the same side of the card Continuous black K ribbon up to 500 images per roll Continuous black K ribbon up to 1500 images per roll Continuous dark blue up to 1...

Страница 78: ...ties of print ribbon that can be used within one year The print ribbon and card stock might require secure storage and tracking Follow your organization s policy for storing and tracking the supplies...

Страница 79: ...85 60mm long x 53 98mm wide 0 010 to 0 030 inches thick 0 508mm to 0 762mm thick Actual card thickness can vary by up to ten percent from the sizes listed Typically card bow must be less than the thi...

Страница 80: ...s when the card surface is not flat enough to print The printing surface white side of an adhesive backed card meets the material requirements for use in some printers Use the following guidelines Sto...

Страница 81: ...inted and unprinted cards Cards must be stacked so that they do not shift and rub against each other When you store cards make sure that no two cards contain images or blocks of color that come in con...

Страница 82: ...e and has a direct impact on print quality Do not touch the printing edge of the printhead in the printhead cartridge Clean the printhead following the steps in your printer s User s Guide Print Ribbo...

Страница 83: ...d the swab Large Output Hopper The printer can use a large output hopper which holds about 100 cards You can replace the small standard hopper with the large hopper without using tools 200 Card Input...

Страница 84: ...a network connection USB Cable Use a USB data cable 6 feet 2 meters long to connect the printer to the PC Be sure to use a cable rated for USB 2 0 data transmission Network Cable Use a standard Ether...

Страница 85: ...Be sure to use a cord that grounds to the facility power source The printer can use one of the following power cords USA power cord European power cord Australian power cord United Kingdom power cord...

Страница 86: ...78 Supplies and Parts...

Отзывы: