background image


150i Desktop Card Personalization System 

21 

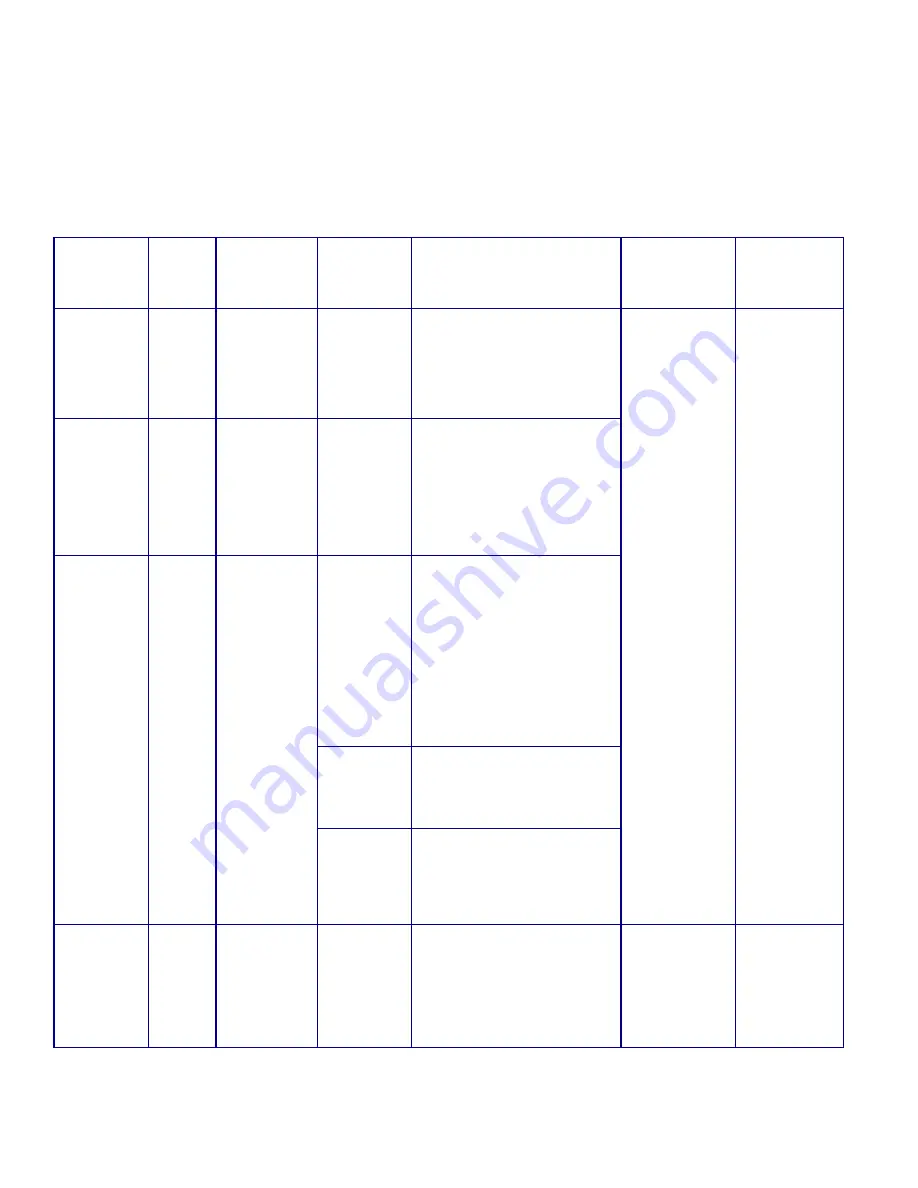
General System Errors  

When a general system error occurs, a status code is sent to the application based 
on what type of error is happening. Call for service if the specified corrective 
action does not resolve the problem. 

Error 

Message 

(LCD) 

Error 

Code 
(LCD) 

Meaning 

Possible 

Cause 

Corrective Action 

(Operator) 

Status Code 

Sent to 

Application 

Card 

Processing 

Status 

Transport 
Error 

XXYY01 

XXYY02 

XXYY03 

XXYY04 

The card 
carriage could 
not verify its 
left-to-right 
position. 

Loose card in 
system 

Open the top cover and verify no 
obstructions (such as cards) 
prevent the card carriage transport 
from moving to the right or left.  
Remove any cards that have fallen 
inside the system. Try sending the 
card again. 

Transport 
Error 


XXYY05 

XXYY06 

XXYY07 

XXYY08 

The card 
carriage could 
not verify its 
forward and 
back position. 

Loose card in 
system 

Open the top cover and verify that 
there are no obstructions to prevent 
the card carriage transport from 
moving forward or back. Remove all 
cards from the input hopper. Check 
the input hopper to determine if any 
cards are jammed or protruding 
from the back. Try sending the card 
again. 

The input 
hopper is 
jammed – 
gears out of 
synch  

Remove the weight and all cards 
from the input hopper.  

Open the output door to gain 
access to the input hopper O-ring 
belt. Lift up slightly on the bracket 
that holds the throat gap motor 
(brass colored, at the back of the 
input hopper), pull down on the O-
ring belt to move the hopper to 
home position. Release the motor 
bracket.  Reinitialize the system. Try 
sending the card data again.  

Too many 
single cards 
inserted 

Remove all cards from the input 
hopper and remove any jammed or 
protruding cards. Reinitialize the 
system. Try sending the card data 
again. 

Transport 
Error 

XXYY09 

XXYY0A 

The input 
hopper 
mechanism 
could not find 
home position. 

Feed error – 
cards stuck 
together 

Remove all cards from the input 
hopper and remove any jammed or 
protruding cards. Reinitialize the 
system. Fan the cards before 
loading them to remove the static. 
Try sending the card data again. 

B = X and Y 
Stepper Error 

Card moved to 
reject tray if 
possible 

Emboss 
Wheel Error 

XXYY0B 

XXYY0C 

The emboss 
wheel could not 
find home 
position. 

The 
embossing 
wheel could 
not verify 
home position 
before 
embossing a 
card 

Try sending the card data again. If 
the error repeats, confirm that the 
embossing wheel is not jammed 
and can spin by turning it manually.  

D = Wheel 
Stepper Error 

Card moved to 
reject tray 

Содержание 150i

Страница 1: ...Datacard 150i Desktop Card Personalization System Owner s Manual February 2008 Part No 539782 001 Rev A ...

Страница 2: ...ations and options are subject to change at the sole discretion of Datacard without notice Proprietary Notice All drawings and information herein are the property of DataCard Corporation All unauthorized use and reproduction is prohibited Trademark Acknowledgments Datacard is a registered trademark and service mark of DataCard Corporation in the US and other countries Windows is a registered trade...

Страница 3: ...______ 10 Unloading Completed Cards________________________________________________________ 11 Unloading Reject Cards_____________________________________________________________ 12 Removing or Inserting the Topper Cassette ___________________________________________ 13 Replacing the Topping Foil __________________________________________________________ 14 Replacing the Front Indent Ribbon_______...

Страница 4: ...t Operation of this equipment in a residential environment may possibly cause interference In the event of interference the users at their own expense will be required to take whatever measures are necessary to correct the problem Any changes or modifications to this device not expressly approved by the party responsible for compliance could void the user s authority to operate the equipment Notic...

Страница 5: ...ble surface table and ensure floors in work area are dry and non slip Insulated rubber floor mats are preferred Know the location of equipment branch circuit interrupters or circuit breakers and how to turn them on and off in case of emergency Know the location of fire extinguishers and how to use them Use only ABC type extinguishers on electrical fires Know local procedures for first aid and emer...

Страница 6: ...vi ...

Страница 7: ... single pass operation This manual describes the components of the 150i System and the basic operating procedures Information on troubleshooting obtaining service and ordering supplies is also included Overview of the 150i System The 150i system includes the following components Output Hopper Door Single Card Access Door Keyhole Keypad Display Indicators Top Cover Power Switch ...

Страница 8: ...e the 150i system include the following Modules Card Transport Module Embossing Module Rear Indent Printing Module Front Indent Printing Module Optional Output Tray Input Hopper Magnetic Stripe Encoding Module Reject Tray Smart Card Personalization Module Optional Topper Module ...

Страница 9: ...d Personalization System 3 Rear Components of the 150i System The following components are located on the back of the 150i system On Off Switch Communication Ports Host Service Smart Card 1 Option Power Receptacle Fan ...

Страница 10: ...ensuring that the security requirements are correctly enabled for your application Supplies Options The following table lists supplies that may be ordered Description Part Number Cassette Reusable 596666 002 Topping Foils Dark Blue 597950 001 Black 597950 002 Gold 597950 003 White 597950 004 Red 597950 006 Silver 597950 015 Indent Module Ribbons Black 596805 001 case of 10 715227 White 596805 002 ...

Страница 11: ...er cord from the wall outlet socket to the 150i system To power ON the 150i system switch the on off switch to ON 1 ON 0 OFF The 150i system will display a Ready message on Line 1 after power up Line 2 will display the current version of the internal software followed by the current total number of good cards produced If an error occurs an error code is displayed ...

Страница 12: ...he following 1 0000 5555 Old Password New Password Change Password Code Enter 1 change password code followed by the current password and then the new password For example to change the default password 0000 to 5555 enter 100005555 In this example the keystrokes to open the Top Cover again using the new password would be 05555 If you do not remember your current password use the key or contact you...

Страница 13: ...machine To open the Top Cover using a password using the keypad enter 0 unlock code followed by your 4 digit password XXXX The solenoid to open the Top Cover will be energized for 5 seconds The message OPEN COVER is displayed If the password is entered incorrectly ACCESS DENIED is displayed To reenter the correct password press 0 followed by the correct password To open the Top Cover using a key i...

Страница 14: ...ystem If you are encoding Magnetic Stripe cards place the Magnetic Stripe face down and oriented toward the rear of the 150i system If the optional front Smart Card module is being used insert the Smart Card so the chip is facing up and to the left as shown If the optional rear Smart Card Module is being used insert the Smart Card so the chip is facing down and to the right Contactless cards can b...

Страница 15: ...of cards 1 Open the Single Card Access Door 2 Place a single card on the Single Card Track with the front of the card up and the top edge of the card toward the back of the 150i system If you are encoding Magnetic Stripe cards place the Magnetic Stripe face down and toward the rear of the 150i system If the optional front Smart Card Module is being used insert the Smart Card so the chip is facing ...

Страница 16: ...ossed card while the 150i system is processing cards Do not place more than one pre embossed card in the Single Card Track Pre embossed cards must not be loaded in the Input Hopper The Input Hopper Card Weight must be present for the reliable feeding of cards 1 Open the Single Card Access Door 2 Place a pre embossed card on the Single Card Track with the front of the card up and the top edge of th...

Страница 17: ...ards Remove completed cards from the 150i system by opening the Output Door and removing the card s The Output Tray can hold up to 15 cards The 150i system will not process cards when the Output Door is open Do not open the Output Door while a card is being processed ...

Страница 18: ...d cards from the 150i system perform the following steps 1 Unlock and lift up the Top Cover 2 Remove all rejected cards from the Reject Tray 3 Close the Top Cover Keep loose objects such as jewelry or clothing away from parts inside the 150i system they may become caught The Topper Platen may be very hot ...

Страница 19: ... The Topper Platen may be very hot 1 Unlock and lift up the Top Cover 2 Lift the Topper Cassette Release Ring and pull the Topper Cassette out of the Topper Module toward the front of the 150i System 3 Lift the Topper Cassette Release Ring and insert the new Topper Cassette in the Topper Module until it is firmly in place 4 Close the Top Cover ...

Страница 20: ... Topper Cassette Feed Spool into the core of the new topping foil 6 Insert the Feed Spool with the new Topping Foil so it feeds from the top with the shiny side up and snap into place in the cassette 7 Wrap the Topping Foil with the shiny side toward the Topping Foil Roller 8 Wrap the end of the Topping Foil shiny side out around the Take up Spool and replace the Take up Pin so it holds the toppin...

Страница 21: ...ibbon perform the following steps 1 Unlock and lift the Top Cover 2 Slide the Take up Retainer off the Take up Spool and set it aside 3 Wrap the indent ribbon from the Supply Spool the Foil Motion Wheel and around the Ribbon Guide Rollers 4 Tape the edge of the ribbon dull side out to the core innermost part of the ribbon 5 Place the core on the Take up Spool as shown below and slide the Take up R...

Страница 22: ...the Take up Spool to be the Take up Core 4 Install a full Indent Ribbon Supply Spool Unwind a few inches of Ribbon from the Supply Spool and reinstall the Supply Retainer Be sure to maintain tension on the Ribbon during the threading process 5 Carefully thread the Indent Ribbon with the shiny side contacting the Ribbon Guide rollers and the Ribbon Foil Motion as shown below When threading the Inde...

Страница 23: ...150i Desktop Card Personalization System 17 ...

Страница 24: ...18 Owner s Manual ...

Страница 25: ...ed Error Indicator When the Error Indicator is illuminated an error has occurred and an Error Code is displayed Refer to Error Codes to identify the correct action to remedy the error see error information on the following pages When the Error indicator is not illuminated the 150i system is functioning correctly Service Indicator When the Service Indicator is illuminated an error requiring service...

Страница 26: ... listed in separate tables The 150i system continually returns codes to the host application indicating the status of card processing The messages displayed by the host application are not as specific as the error codes displayed on the LCD Recording of the error code displayed on the LCD of the 150i system by the operator provides the most accurate representation of system malfunction when it occ...

Страница 27: ... sending the card again The input hopper is jammed gears out of synch Remove the weight and all cards from the input hopper Open the output door to gain access to the input hopper O ring belt Lift up slightly on the bracket that holds the throat gap motor brass colored at the back of the input hopper pull down on the O ring belt to move the hopper to home position Release the motor bracket Reiniti...

Страница 28: ... cover is closed properly and that the interlock switch bracket is not bent M Interlock open Card processing stops No cards loaded Load cards Card Supply Empty XXYY17 Card supply sensor did not transition as expected Card weight not installed Install weight Z Input hopper empty No card processed No cards in input hopper card weight installed backwards Remove and reload cards Install card weight co...

Страница 29: ... as expected The topper platen did not return to home position Open the top cover and verify no obstructions around or in Topper or platen sensor Check Topping foil for correct routing Reinitialize the system N Topper Jam Card jammed in topper module Operator intervention required Card Not Stacked XXYY2B Registration sensor transitioned unexpectedly The card did not stack properly Remove cards fro...

Страница 30: ...d broken indent ribbon onto take up spool None XXYY32 XXYY33 Indent solenoid failure Electrical failure Call for service Wrong cable between system Host port and SC port Ensure that a straight through serial cable is connected between the host port and the SC port Smart Card Comm Error XXYY34 Smart Card application is not responding Coupler configuration incorrect Configuration menu Smart Card HW ...

Страница 31: ...er record INVALID_CHARACTER MS 0913 Incorrect character in customer record Encoding data incorrect Send card data again Try a different customer record INVALID_DATA_LENGT H MS 0914 Too many characters in customer record Encoding data incorrect Send card data again Try a different customer record Incorrect coercivity setting in configuration menu Send card data again Confirm that the coercivity con...

Страница 32: ...gnetic stripe on card Inspect card magnetic stripes for visible flaws Replace bad card stock Communication Errors When a data format error occurs the code of U is sent to the Card Wizard Application and no card is processed Error Message Error Code Cause Corrective Action Error is displayed during initial communication with some host Applications e g Card Wizard and defaults to Ready after several...

Страница 33: ...rom the Card Transport Module Remove the cards and attempt to resume printing Do not pull cards from the carriage Remove cards in the transport Module carriage by either by o Reinitializing the system OR o Turning the Y short spiral leadscrew counterclockwise to move the carriage to the rear and open the card grippers OR o Pushing on the gripper release lever under the card carriage Always move th...

Страница 34: ... to resume printing If a card is jammed in the Smart Card Module Remove any jammed cards from the Smart Card Module Attempt to resume printing Service Required Errors When the Service indicator is illuminated an error requiring service has occurred Note the Error Code and message from the 150i system LCD display and contact your Datacard Service Representative to perform the repair Do not attempt ...

Страница 35: ...nd support for your needs when and where you need them FOR THE DATACARD 150i DESKTOP CARD PERSONALIZATION SYSTEM Feature Key Benefits System matched Supplies Assurance of Datacard engineering tested and proven supplies performance with the 150i systems for maximum system uptime reliability and optimal quality results Environmentally Friendly compliant Supplies are free of hazardous materials meeti...

Страница 36: ...quest Indent Ribbons Item Number Description Yield Roll approx 596805 301 Black indent ribbon Recommended usage Direct to PVC and security signature panels small to large character fonts for multi application use 1 800 596805 203 White indent ribbon Recommended usage Direct to PVC and security signature panels small to large character fonts for multi application use 1 550 Indent ribbon yields are ...

Отзывы: