


PAGE 6
Diagram 23
reveal all settings (see diagram 20).
- Repeat this process for all other times and their chosen MODES
Duplicate a DAy TyPE:
- Choose the DAY TYPE you wish to duplicate (turns blue when button is pressed).
- Press the ‘Duplicate’ button at bottom of screen. New screen appears prompting you to
‘Enter name’. Over type if you do not wish that to be the name. Maximum 30 characters
with NO spaces. Press ‘OK’
Delete a DAy TyPE:
- Choose the DAY TYPE you wish to delete (turns blue when button is pressed).
- Prompt appears ‘Delete Standard Day’ with a warning: ‘
Deleting this Day Type will
also delete any Exceptions and Weekdays that use it. This action cannot be
undone.’
Press ‘OK or Cancel’
Rename a DAy TyPE:
- Choose the DAY TYPE you wish to rename (turns blue when button is pressed).
- Press the ‘Rename’ button at bottom of screen. New screen appears prompting you
to ‘Rename (chosen name of DAY TYPE)’. Over type if you do not wish that to be the
name. Maximum 30 characters with NO spaces. Press ‘OK’
Weekly Schedule
Defines which Day Types are assigned to different days of the week. See Diagram 21.
- Launch App to display ‘ControlZAPP’ home page. Press ‘Scheduler’ button.
- Press ‘Weekly Schedule’ button. If creating a Weekly Schedule for the first time each
day will be allocated ‘Standard Day’ which will contain Default Mode Settings.
- If additional DAY TYPES have been created you can change the DAY TYPES allocated
to any day of the week by pressing the relevant ‘Standard Day’ button.
- New screen appears with a SELECT DAY TYPE and the list of all DAY TYPES you have
created for the PROFILE you are working in. You can while in this screen Edit DAY
TYPES by pressing the ‘Edit day Types’ button. See
Scheduling different Modes in
your Day Types
above for Editing DAY TYPES.
- Select your preferred DAY TYPE then the screen reverts to the WEEKLY SCHEDULE
screen. Repeat for any other days of the week you wish to change.
Schedule Exceptions
Defines exceptions to your Schedule, eg. Special events, Bank Holidays. See diagram 22.
- Launch App to display ‘ControlZAPP’ home page. Press ‘Scheduler’ button.
- Press ‘Schedule Exceptions’ button. If creating an ‘Exception’ for the first time press
the NEW button top right of screen.
- New screen appears with the current date and ‘Standard Day’. To edit, press this button
and a new screen appears ‘EDIT EXCEPTION’
- New screen appears SELECT DAY TYPE. Select the Day Type you wish to apply to the
‘Exception’ (if you have not created an appropriate DAY TYPE you will have to go back
and create it). You can while in this screen Edit DAY TYPES by pressing the ‘Edit Day
Types’ button. See
Scheduling different Modes in your Day Types
above for Editing
DAY TYPES.
- Select dates on which you wish a ‘Schedule Exception’ by pressing the ‘Starting’ or
‘Ending’ buttons to reveal a new screen with days, months and years, sweep up or
down to allocate correct date between the blue lines. Press ‘Set’ when complete.
- Repeat this process to add additional ‘Schedule Exceptions’.
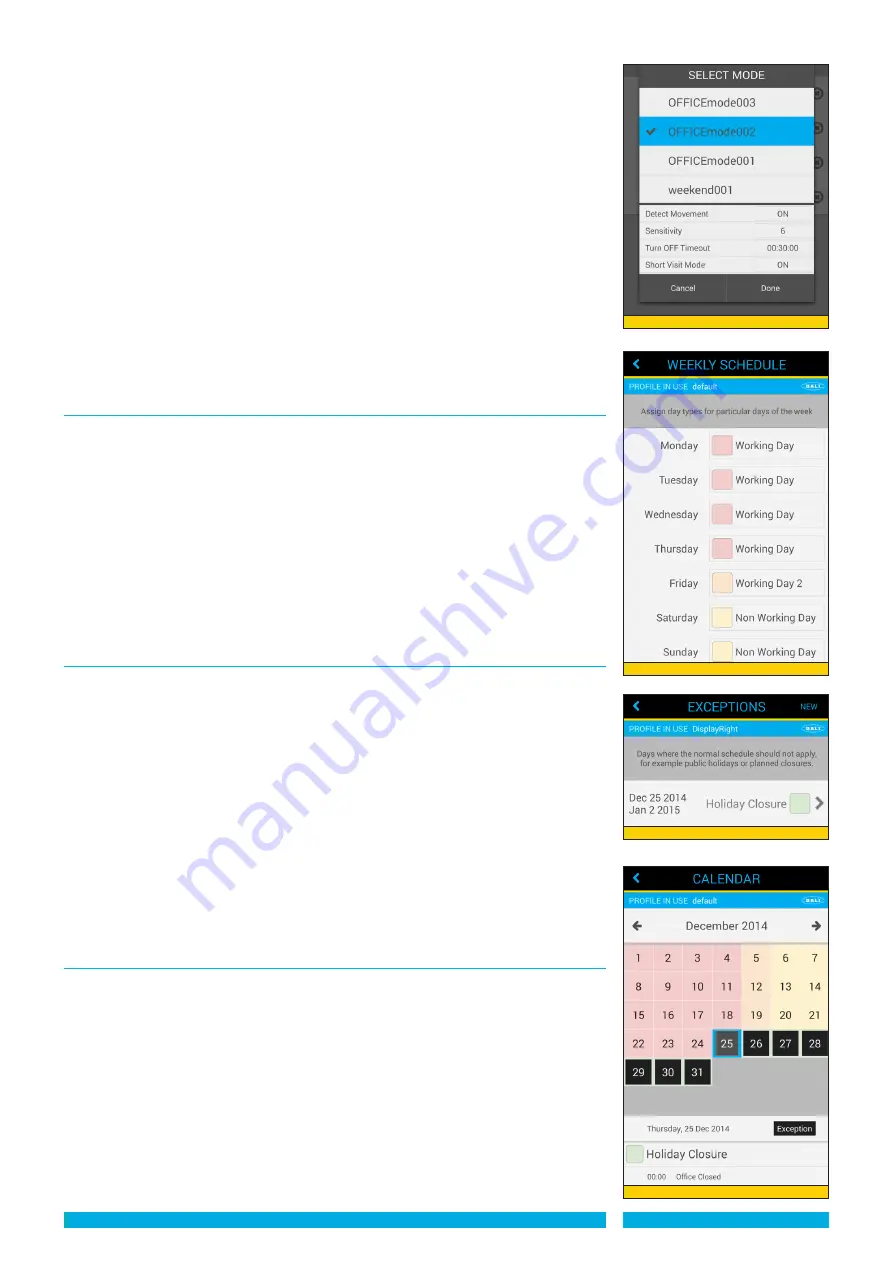
View on Calendar
Colour coded Calendar showing what MODES and DAY TYPES and SCHEDULE
EXCEPTIONS are scheduled on any chosen week or day.
- Launch App to display ‘ControlZAPP’ home page. Press ‘Scheduler’ button.
- Press ‘View on Calendar’ button to reveal the current month schedule.
- If using the initial default settings, all dates will be set as ‘Standard Day’ with the
overview of preset modes showing: 00.00 Default Mode. See diagram 23.
- To view the forthcoming months settings, press the arrow button top right, to view the
preceding months press the arrow button top left.
- If you have created different ‘Day Types’ in your Weekly Schedule or ‘Schedule
Exceptions’ they can be viewed on this screen by pressing the day you wish to view on
the calendar - the appropriate Modes and their timings will be shown in a table on the
bottom of the screen.
Diagram 21
Diagram 22
Diagram 20


