


SCHEDULER
IMPORTANT: yOU MUST ENABLE ThE DEVICE CLOCk BATTERy (SEE PRODUCT
INSTRUCTIONS) FOR ThE ACCURATE SChEDULING OF EVENTS.
Day Types
Defines the Days and Times via a real time clock that a MODE or MODES can be
scheduled. Unless other MODES are added the default MODE will be the only MODE to be
available on a chosen DAY TYPE.
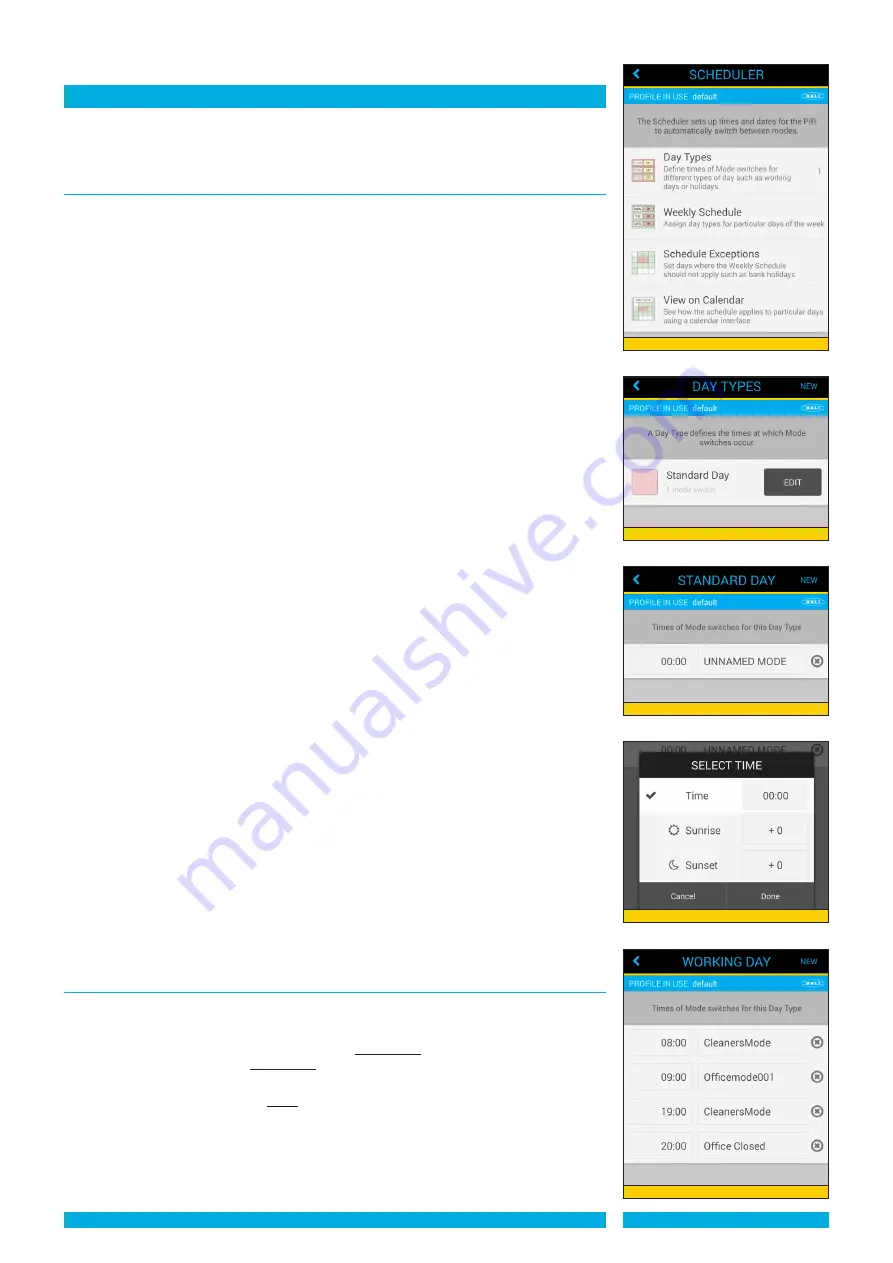
- Launch App to display ‘ControlZAPP’ home page. Press ‘Scheduler’ button (see
diagram 15).
- Press ‘Day Types’ button. If creating a Day Types for the first time, one ‘Day Type’ will
be available to edit that can be renamed and duplicated (see diagram 16). New DAY
TYPES can be added by pressing the NEW button on top right of screen.
- Press EDIT. New screen appears with a clock button set to 00.00 and MODE option
button (see diagram 17). To assign the timing of your chosen MODE press the clock
button. There are 3 options to choose from: TIME, SUNRISE and SUNSET (see diagram
18). Only one of these three options can be in use with each MODE allocated in the
SCHEDULE.
‘TIME’ -
A real time 24 hour clock automatically starts MODES of switching at specific
times of the day.
- To set ‘Time’ press clock button - Press clock to reveal 24 hour rolling clock, sweep
up or down to allocate correct start time between the blue lines. Press ‘Set’ when
complete.
‘SUNRISE’
- ControlZAPP has Sunrise / Sunset prediction that can adjust your timings to
take into account the time at which Sunrise and Sunset occurs from anywhere in the world
providing your mobile or tablet has GPS enabled and that your location is defined in the
settings (see page 9).
- MODE switches to occur before or after the predicted SUNRISE time as automatically
identified by the in built GPS. MODES times can be offset before or after the predicted
‘SUNRISE’ time by altering the timer to the desired setting.
- To set ‘Offset from Sunrise’ press ’Sunrise’ button - Press timer ‘+0’ to reveal 24 hour
rolling clock, sweep up or down to allocate correct start time between the blue lines.
Press ‘Set’ when complete
‘SUNSET’
- MODE switches to occur before or after the predicted SUNSET time as
automatically identified by the in built GPS. MODES times can be offset before or after the
predicted ‘SUNSET’ time by altering the timer to the desired setting.
- To set ‘Offset from Sunset’ press ’Sunset’ button - Press timer ‘+0’ to reveal 24 hour
rolling clock, sweep up or down to allocate correct start time between the blue lines.
Press ‘Set’ when complete.
Creating additional Day Types
- Launch App to display ‘ControlZAPP’ home page. Press ‘Scheduler’ button.
- Press ‘Day Types’ button. New DAY TYPES can be added by pressing the NEW button
on top right of screen.
- New screen appears with a prompt to ‘ Enter name’ flashing cursor. Type your preferred
name (Maximum 30 characters with NO spaces) then press ‘OK’. The additional Day
Types will appear under any original Day Types.
Scheduling different Modes into your Day Types
- Launch App to display ‘ControlZAPP’ home page. Press ‘Scheduler’ button.
- Press ‘Day Types’ button. Press ‘Edit’ button of DAY TYPE you wish to edit.
- New screen appears. The clock indicates the
Start Time
of the chosen Mode. Press
the clock button to select a
Start Time
for your Mode (see ‘Time’ ‘Sunset’ and ‘Sunrise’
above).
- Choose the Mode you wish to
Start
at the chosen time. You cannot choose the same
time for multiple modes (see diagram 19).
- To select a different MODE press the ‘Mode’ button a new screen appears prompting ‘
SELECT MODE’ from the list of any MODES you may have saved (see diagram 20).
- The settings of the selected MODE are listed in a table in the lower half of the screen
to check that you have the correct MODE. The table may have to be scrolled down to
PAGE 5
DIAGRAM 18
DIAGRAM 17
DIAGRAM 16
Diagram 19
DIAGRAM 15


