


PAGE 8
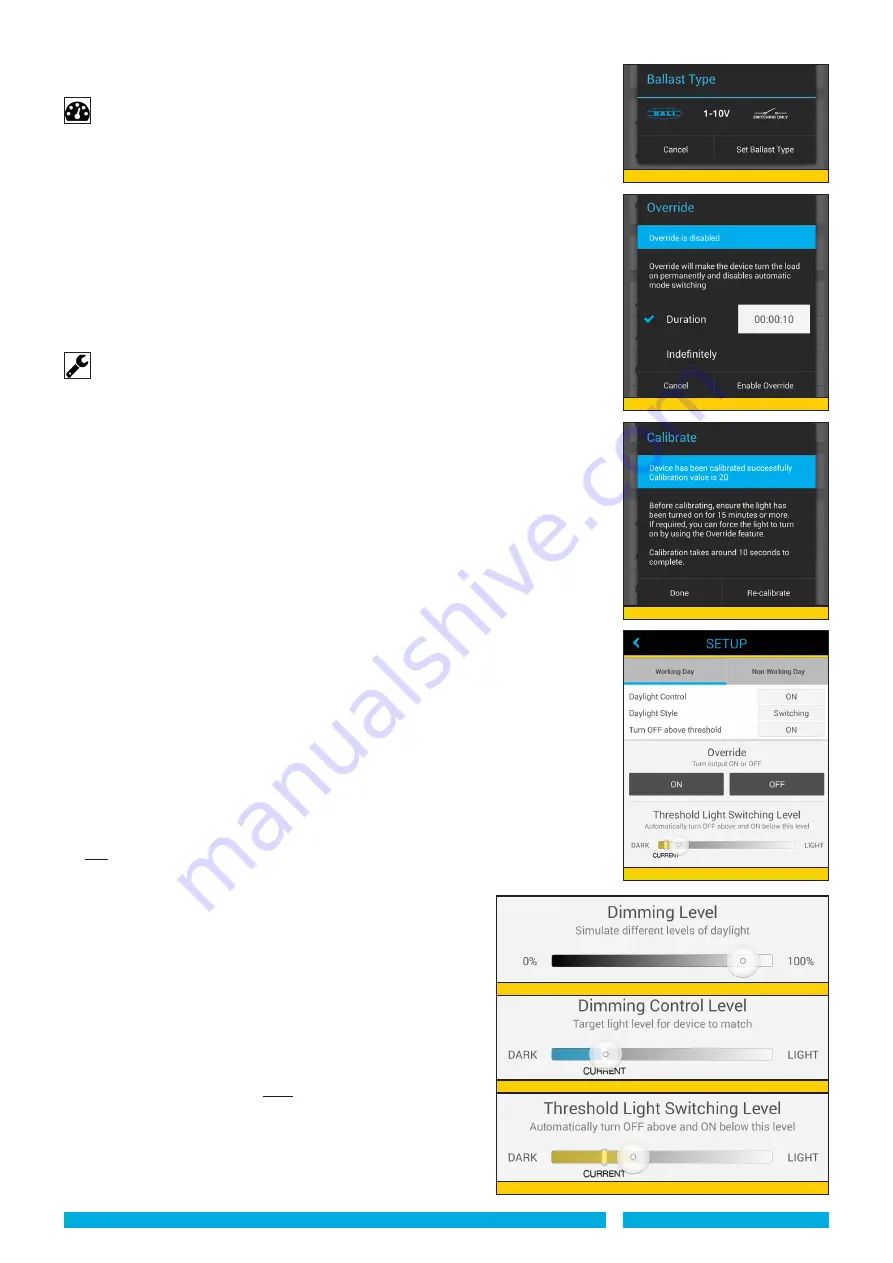
- Press ‘Override’. New screen appears ‘Override’. Select a timed duration (10sec to
23hrs 59min 59sec) for the override or ‘Indefinitely’ (see diagram 30).
Calibrate
The photocell calibration process removes the site specific addition of artificial light from
any decision to switch the lights on/off. Calibration is recommended to take place when
ambient light levels are low (preferably at night or with daylight excluded as far as possible,
from the calibration measurement).
-
Prior to Calibration, ensure the lighting load and other surrounding artificial lighting
has been turned ON for 15 minutes or more to allow the load to stabilise. If required,
the lighting load can be forced ON by activating the OVERRIDE feature within the
ControlZAPP DEVICE OPTIONS menu.
-
Press ‘Calibrate’. New screen appears ‘Calibrate’. Press ‘Start Calibration’. (or ‘Cancel’)
The calibration process takes approximately 10 seconds.
-
When complete the information in the blue box should inform you that the device is
successfully Calibrated with a calibration value. (See Diagram 31).
-
If the device has been previously calibrated you will be promted to ‘Recalibrate’.
Setup
SWITChING ONLy:
Allows you to set the threshold switching level used for the ‘Daylight
Control’ feature and can only be activated once the device is Calibrated. It is essential that
some natural daylight is available for this feature to work. If no natural daylight is available
disable the ‘Respond to Daylight’ option in the PROFILE’S Modes.
- Press ‘Setup’. New screen appears with each of the MODES within the downloaded
PROFILE shown along the top. The MODE in use is indicated with a blue line
underneath. For each MODE listed it will show if the ‘Daylight Control’ feature is ON or
OFF and also if the ‘Turn OFF above threshold’ feature is ON or OFF.
-
If the selected MODE has ‘Daylight Control’ ON
, an adjustment slider is available
to set the threshold value - left (dark) and right (light) (See diagram 32). The slider also
shows the current light level as read from the device. When the adjuster is slid to the left
it lowers the light level at which the lighting load will switch ON. When the adjuster is slid
to the RIGHT it raises the light level at which the lighting load will switch ON.
- If the control light level is too low (not enough natural light) a red warning box is shown
warning you to resite the device where it is seeing more natural daylight (recalibrate and
setup) OR increase control light level ie. slide adjuster to the right.
- The Override switch option will turn the load ON or OFF as required.
-
If MODE has ‘Daylight Control’ OFF
, the threshold adjustment slider is not available.
- If the device’s ‘Always turn off when above threshold’ value is ENABLED: Progress bar
is GREEN if threshold light level plus calibration value is less than or equal to 1000.
Progress bar is RED if threshold light level plus calibration value more than 1000.
- If the device’s ‘Always turn off when above threshold’ value is DISABLED: Progress bar
GREEN if threshold light level less than or equal to 1000. Progress bar RED if threshold
light level more than 1000.
- For an individual MODE: Press ‘Save’ button to upload the new threshold light level
value to the device for that mode.
- Press ‘Apply to all’ button to upload the threshold switching light level to the device for
ALL MODES in that Profile.
DIMMING WITh DALI BALLAST OR 1-10V BALLAST:
Allows you to set the threshold Daylight Linked Dimming level used
for the ‘Daylight Control’ feature and can only be activated once
the device is Calibrated. It is essential that some natural daylight is
available for this feature to work. If no natural daylight is available
disable the ‘Respond to Daylight’ option in the PROFILE’S Modes.
- Press ‘Setup’. New screen appears with each of the MODES within
the downloaded PROFILE shown along the top. The MODE in use
is indicated with a blue line underneath. For each MODE listed it
will show if the Daylight Control’ feature is ON or OFF and also if
the ‘Turn OFF above threshold’ feature is ON or OFF.
DIMMING WITh DALI BALLAST
-
If the selected MODE has ‘Daylight Control’ ON, and the
dimming feature is selected
three adjustment sliders are
available to set the threshold values.
-
The upper slider
(see diagram 33a) dims the connected lighting
load to the the lux level which you wish to maintain. This is done is
real time, allowing a short period for the lighting load to stabilise.
NOTE: If a precise LUX reading is required (e.g. 500 lux) then a
calibrated lux meter at the working plane is required.
Diagram 32
Diagram 31
Diagram 29
Diagram 30
Diagram 33a
Diagram 33b
Diagram 33c


