Page
93
of
108
M-AP-001-EN Rev. N
Installation
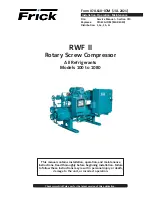
Care must be exercised at all times when rigging or handling the compressor to protect
it from damage. Two eyebolts (one at each end) are provided for compressor rigging. A
spreader bar should be used to safely position the compressor into its final location (see
Figure 20-1).
1. If mounting the compressor with the DTC mounting kit, refer to Appendix B Mounting
Kit Instructions; if not, install four isolation pads in accordance with the footprint
dimensions given in Figure 20-2.
2. Mount the compressor onto the isolation pads. Ensure the compressor mounting rails
are properly isolated from the base frame once the attaching hardware is secured; for
example, the screw should not extend from the compressor mounting rails to the base
frame (see Figure 20-3 and Figure 20-4).
3. Check that the compressor mounting rails are level ± 5mm (3/16") in the lateral and
longitudinal planes.
The compressor should be carefully inspected for visible signs of damage. Check for loose
bolts and damage to covers or outer casing. Damage should first be reported to the carrier,
not DTC. DTC Customer Support and Service can be contacted to assist in determining the
extent of damage or if compressor should be returned to DTC. Damage should be specified
on the Bill of Lading or transportation/freight forwarder documentation. Open all containers
and verify all parts against the packing list. Report any shortages to DTC. Contact DTC to
conduct report actions via the Incident Report form.
20.2 Rigging
Requirements
20.3 Unit Placement
20.1 Unpacking and
Inspection
Figure 20-1 - Rigging Set-up
20 Installation
THIS PAGE INTENTIONALLY LEFT BLANK
Содержание TG230 Series
Страница 2: ...Page 2 of 108 M AP 001 EN Rev N THIS PAGE INTENTIONALLY LEFT BLANK ...
Страница 8: ...Page 8 of 108 M AP 001 EN Rev N THIS PAGE INTENTIONALLY LEFT BLANK ...
Страница 18: ...Page 18 of 108 M AP 001 EN Rev N THIS PAGE INTENTIONALLY LEFT BLANK ...
Страница 32: ...Page 32 of 108 M AP 001 EN Rev N THIS PAGE INTENTIONALLY LEFT BLANK ...
Страница 36: ...Page 36 of 108 M AP 001 EN Rev N THIS PAGE INTENTIONALLY LEFT BLANK ...
Страница 44: ...Page 44 of 108 M AP 001 EN Rev N THIS PAGE INTENTIONALLY LEFT BLANK ...
Страница 50: ...Page 50 of 108 M AP 001 EN Rev N THIS PAGE INTENTIONALLY LEFT BLANK ...
Страница 52: ...Page 52 of 108 M AP 001 EN Rev N THIS PAGE INTENTIONALLY LEFT BLANK ...
Страница 54: ...Page 54 of 108 M AP 001 EN Rev N THIS PAGE INTENTIONALLY LEFT BLANK ...
Страница 56: ...Page 56 of 108 M AP 001 EN Rev N THIS PAGE INTENTIONALLY LEFT BLANK ...
Страница 58: ...Page 58 of 108 M AP 001 EN Rev N THIS PAGE INTENTIONALLY LEFT BLANK ...
Страница 70: ...Page 70 of 108 M AP 001 EN Rev N THIS PAGE INTENTIONALLY LEFT BLANK ...
Страница 74: ...Page 74 of 108 M AP 001 EN Rev N THIS PAGE INTENTIONALLY LEFT BLANK ...
Страница 77: ...Page 77 of 108 M AP 001 EN Rev N Physical Data 16 2 Center of Gravity Figure 16 4a Center of Gravity ...
Страница 81: ...Page 81 of 108 M AP 001 EN Rev N Physical Data Figure 16 8 Discharge Port Detail TT700 and TG520 Gas Flow ...
Страница 82: ...Page 82 of 108 M AP 001 EN Rev N Physical Data Figure 16 9 Suction Port All Models ...
Страница 88: ...Page 88 of 108 M AP 001 EN Rev N THIS PAGE INTENTIONALLY LEFT BLANK ...
Страница 90: ...Page 90 of 108 M AP 001 EN Rev N THIS PAGE INTENTIONALLY LEFT BLANK ...
Страница 92: ...Page 92 of 108 M AP 001 EN Rev N THIS PAGE INTENTIONALLY LEFT BLANK ...
Страница 104: ...Page 104 of 108 M AP 001 EN Rev N Appendix A Power Line Accessories Installation Figure A 1 Line Reactor Connections ...