background image


The Piranha XL Camera   

  51 

CLHS 8b/10b 
Receive Error Count 
selector 


Data 2 Receive Error 
Count 


Control/Data1 
Receive Error Count 

clhsErrorCountSelector 

Selects the error count that the 
following three features apply to 

1.00 
Guru 

DFNC 

CLHS 8b/10b 
Receive Error Count 

clhsError Count 

CLHS error count value for the selected 
data/control lanes (RO) 

1.00 
Guru 

DFNC 

Refresh CLHS 
8b/10b Receive Error 
Count 

clhsError CountRefresh 

When pressed, the error count is 
updated 

1.00 
Guru 

DFNC 

Reset Receive Error 
Count 

clhsErrorCountReset 

When pressed, the error count is rest 
to zero 

1.00 
Guru 

DFNC 

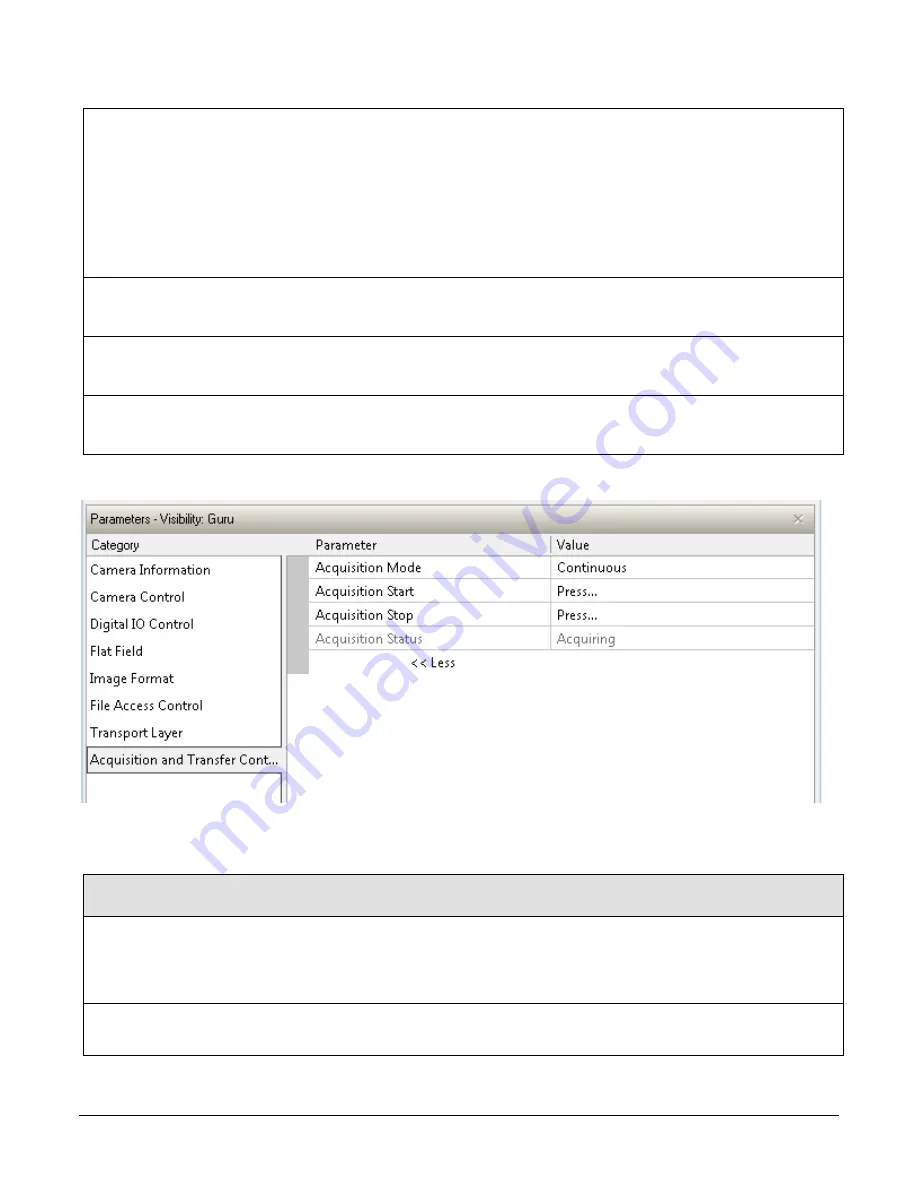
Acquisition and Transfer Control Category 


Figure 18: Acquisition & Transfer Control Panel 

Acquisition and Transfer Control Feature Descriptions 

Display Name 

Feature 

Description 

Device Version 
& View 

Acquisition Mode 


Continuous 

AquisitionMode 

The device acquisition mode defines the number of frames to 
capture during an acquisition and the way it stops 

Only continuous mode is currently available 

1.00 
Beginner 
DFNC 

Acquisition Start 

AquisitionStart 

Starts the acquisition of image data. The number of frames 
captured in defined by the Acquisition Mode. (WO) 

1.00 
Beginner 
DFNC 

Содержание Piranha XL PX-HM-16K12B-00-R

Страница 1: ...Piranha XL Camera User s Manual PX HM 16K12B 00 R and PX HM 16K06B 00 R sensors cameras frame grabbers processors software vision solutions 03 032 20216 03 www teledynedalsa com...

Страница 2: ...August 24 2015 Document Number 03 032 20216 03 About Teledyne DALSA Teledyne DALSA is an international high performance semiconductor and Electronics Company that designs develops manufactures and ma...

Страница 3: ...Lens Selection Setup 17 Establishing Camera Communications 18 Establishing Data Integrity 19 Review of Camera Performance and Features 19 SYNCHRONIZING TO OBJECT MOTION 19 External Trigger Mode 19 In...

Страница 4: ...criptions 43 Digital I O Control Feature Descriptions 44 Flat Field Category 45 Flat Field Control Feature Description 45 Image Format Control Category 47 Image Format Control Feature Description 48 T...

Страница 5: ...when Changing Direction 60 Optical Misalignment Issues 60 Image Will Not Focus Well over the Entire FOV 60 Image Will Not Focus at Edges of Field of View 61 Image Will Focus Well on One Side but Not...

Страница 6: ...ransmission distances and cable flexing requirements Teledyne DALSA s Piranha XL camera and XTIUM Camera Link HS frame grabber combine to offer a complete solution for the next generation of Automatic...

Страница 7: ...n Number Camera firmware Embedded within camera GenICam support XML camera description file Embedded within camera Sapera LT including CamExpert GUI application and GenICam for Camera Link imaging dri...

Страница 8: ...Performance Notes Four Rows Eight Rows Twelve Rows Random Noise 6 4 DN rms 9 DN rms 11 DN rms Peak Responsivity 733 DN nJ cm 2 1467 DN nJ cm 2 2200 DN nJ cm 2 625 nm Gain 0 67x to 2 5x 0 67x to 5x 1x...

Страница 9: ...s is spaced 5 m apart to accommodate pixel interface circuitry 16 pixels at each edge of the array are reserved for special use by the camera resulting in 16 352 pixels being available to the user By...

Страница 10: ...nicate over the Camera Link HS command lane For more information see www genicam org Camera Link HS The Piranha XL camera is Camera Link HS version 1 0 compliant Camera Link HS is the next generation...

Страница 11: ...k Camera Link HS Transmission Characteristics The camera s data distribution supports two cables with single CLHS ROI capability The single CLHS ROI is determined from the 1 to 4 areas of interest AOI...

Страница 12: ...10 The Piranha XL Camera Responsivity QE Plots...

Страница 13: ...The Piranha XL Camera 11 Mechanical Drawings...

Страница 14: ...they can damage the surface finish Further cleaning instructions are below Though this camera supports hot plugging it is recommended that you power down and disconnect power to the camera before you...

Страница 15: ...or context sensitive help click on the button and then click on a camera configuration parameter A short description of the configuration parameter will be shown in a popup Click on the button to open...

Страница 16: ...Expert Panes CamExpert first instance select Camera Link HS Mono using the Device drop down menu Figure 3 CamExpert Frame Grabber Control Window CamExpert second instance select PX_HM_16k12A_00_R usin...

Страница 17: ...ameters pane Allows the viewing or changing of all acquisition parameters supported by the acquisition device CamExpert displays parameters only if those parameters are supported by the installed devi...

Страница 18: ...ready to start operating the camera in order to acquire images set camera functions and save settings Setting Up for Imaging Powering the Camera WARNING When setting up the camera s power supply foll...

Страница 19: ...or a list of qualified vendors and part numbers If you want to fabricate your own cables please refer to the Camera Link HS Specification Version1 0 for printout details and design guidelines Each dat...

Страница 20: ...ifications Adjust the camera squarely to the object surface with the Object Surface to Camera Face distance equal to the value determined above The lens setup should now be good enough to use during c...

Страница 21: ...upports two trigger modes internal and external Internal was used in the previous sections where synchronization to image motion was not required External Trigger Mode See the section Digital I O Cont...

Страница 22: ...or a few lines Internal Trigger Mode See the section Camera Control Category in Appendix A for GenICam features associated with this section and how to use them Relevant Feature Internal Line Rate The...

Страница 23: ...ne 12 Rows 100kHz 74kHz 18kHz 87kHz 50kHz 12kHz 50kHz 50kHz 18kHz 50kHz 50kHz 12kHz 7 Lanes 4 lanes 1 Lane Effect of Exposure Time on Maximum Line Rate When 4 and 8 rows are selected only certain expo...

Страница 24: ...ut of focus as can be seen in the following figure Image scanned in direction where the TDI rows track the object motion Figure 5 Image with proper scan direction Image scanned in direction where the...

Страница 25: ...cluding the lines that are not valid as a result of the direction change This will ensure that valid data will be generated on the return path as the camera field of view reaches the area to be inspec...

Страница 26: ...rol See the section Camera Control Category in Appendix A for GenICam features associated with this section and how to use them Relevant Features Exposure Time Source Exposure Time Selector Exposure T...

Страница 27: ...necessary to adjust the responsivity to achieve the desired output from the camera The camera has a row selector feature and a gain feature that can be used to make the necessary adjustment to the re...

Страница 28: ...etup Configurations section Whenever a different number of rows are selected the camera setup will default to the factory settings The user must select and load the associated user set for the number...

Страница 29: ...irt or texture that has bright characteristics will appear as dark vertical lines One way to minimize this affect is for the white target to be moving during the calibration process This has the affec...

Страница 30: ...as selected by the Binning feature When selecting binning the current exposure time is retained so no change in light level is required As every other encoder pulse is dropped with 2x vertical binning...

Страница 31: ...s 7 Repeat for each AOI in turn 8 Start acquisition The Rules for Setting Areas of Interest Notes The rules are dictated by how image data is organized for transmission over the available CLHS data la...

Страница 32: ...data is as follows 8bit_gamma 255 0 RGB_12bit_linear 4095 0 1 0 gamma where gamma 1 0 to 3 0 When the LUT is enabled there is no change in maximum line rate or amount of data output from the camera Th...

Страница 33: ...e 9 USAF 1951 Positive Ensure that the lens aperture is fully open Select the cameras 12 row mode Select the low gain range and 1x gain Select a slow internal line rate of 5 kHz Set exposure time to 1...

Страница 34: ...in the scan direction to perform the desired alignment Select the CamExpert line profile analysis tool Continue using the camera setup in 12 row mode and continuous imaging Align the camera such that...

Страница 35: ...ents Start with 12 rows to get close and then move to 8 and then 4 rows Ensure 4 and 8 rows are also Flat Fielded to the same target as 12 rows DN Pixel 200 100 16352 Pixel 200 100 16352 DN Pixel 200...

Страница 36: ...his section and how to use them Relevant Features Next CLHS Devise Configuration Each Camera Link HS cable includes 8 lanes One lane is used to send command data from the frame grabber to the camera S...

Страница 37: ...Set1 thru UserSet8 User Set Selector Power on User Set Current User Set An inspection system may require several different illumination resolution and responsivity configurations in order to cover the...

Страница 38: ...they can be restored next time you power up the camera or to protect against losing them in the case of power loss you must save the current settings using the user set save parameter Once saved the...

Страница 39: ...feature tables describe these parameters along with their view attributes and in which version of the device the feature was introduced Additionally the Device Version column will indicate which para...

Страница 40: ...rmware version etc are read to uniquely identify the connected Piranha XL camera These features are typically read only The Camera Information Category groups information specific to the individual ca...

Страница 41: ...set to load and make active on camera power up or reset The camera configuration sets are stored in camera non volatile memory RW 1 00 Beginner Factory Setting Default Load factory default feature set...

Страница 42: ...rSet8 UserSet8 Select the User defined Configuration space UserSet8 to save to or load from features settings previously saved by the user Power on User Set UserSetDefaultSelector Allows the user to s...

Страница 43: ...bove the Power On Status is showing the 23 status flags where 1 is signaling an issue When there are no issues the Power On status will indicated Good Details of the Built in Self Test BIST codes can...

Страница 44: ...e factory configuration select Factory Setting and click Load To save a current camera configuration select User Set 1 to 8 and click Save Select a saved user set and click Load to restore a saved con...

Страница 45: ...xposureTime Sets the exposure time in microseconds when the Exposure Mode feature is set to Timed 1 00 Beginner Measured Exposure Time measureExposureTime Specifies the exposure time provided to the c...

Страница 46: ...Control category is used to determine the source of the line sync generator The line synchronization can be internally generated by the camera or from the frame grabber over the CLHS cable CamExpert...

Страница 47: ...e 1 00 Off Off FPN and flat field coefficients disabled Beginner On On FPN and flat field coefficients enabled DFNC Clear Coefficents Initialize Reset all FPN to 0 and all flat field coefficients to 1...

Страница 48: ...flatfieldCalibrationROIWidth Sets the width of the region on interest where a flat field calibration will be performed 1 00 Beginner DFNC Calibrate FPN flatfieldCalibrationFPN Initiates the FPN calib...

Страница 49: ...e Format Control Category The Piranha XL Image Format controls as shown by CamExpert groups parameters used to configure camera pixel format image cropping binning and test pattern generation features...

Страница 50: ...nningHorizontal Number of horizontally adjacent pixels to sum together This increases the intensity of the pixels and reduces the horizontal resolution of the image 1 00 Beginner SFNC AOI Count multip...

Страница 51: ...49 10 Bits Pixel 12 Bits Pixel 16 Bits Pixel Bpp10 Bpp12 Bpp 16 Senor input data path is 8 12 or 16 bits per pixel Transport Layer Control Category Note All features shown in Guru visibility Figure 17...

Страница 52: ...y returns that it fails read this feature to get the actual reason for the failure Returns the last error Reading this feature clears it 1 00 Beginner DFNC CLHS Discovery Discovery Disabled Discovery...

Страница 53: ...Reset Receive Error Count clhsErrorCountReset When pressed the error count is rest to zero 1 00 Guru DFNC Acquisition and Transfer Control Category Figure 18 Acquisition Transfer Control Panel Acquisi...

Страница 54: ...files can be improved by stopping image acquisition during the transfer Figure 19 File Access Control Panel File Access Control Feature Descriptions Display Name Feature Description View File Selecto...

Страница 55: ...uffer FileAccessBuffe r Defines the intermediate access buffer that allows the exchange of data between the device file storage and the application 1 00 Guru File Access Offset FileAccessOffse t Contr...

Страница 56: ...work location 6 Click the Upload button to execute the file transfer to the camera 7 Note that firmware changes require that the camera be powered down and then back up Additionally CamExpert should b...

Страница 57: ...patterns give the user the ability to detect bit errors using an appropriate host application This error detection would be difficult if not impossible using normal image data There are five test pat...

Страница 58: ...actory NO_USER_PRNU 0x00002000 The user has yet to save any PRNU calibration data to a User Set Note Default values should have been set by the factory CLHS_TXRDY_RETRY 0x00004000 The camera cannot es...

Страница 59: ...ce to be Internal Line Trigger and the Internal Line Trigger frequency to the maximum that will be used 5 The trigger source is now being generated by the frame grabber and the LVAL status should be g...

Страница 60: ...nes that interfere with defect detection and need to be corrected Repeating the flat field calibration with a white reference may not be practical with the camera installed in the system The camera ha...

Страница 61: ...nored resulting in the occasional compressed image The over speeding may be due to inertia and or backlash in the mechanical drive mechanism causing variations around the target speed The greater the...

Страница 62: ...ulated output The camera will output a number of invalid rows immediately after a direction change as follows Number of Rows Selected Number of Invalid Rows After Direction Change 4 7 8 15 12 23 That...

Страница 63: ...en this will cause a parallax issue at the edges of the field of view resulting in a component of image motion traveling in the long axis of the sensing array Object Motion Camera Not Perpendicular to...

Страница 64: ...sensor Good Focus Good Focus Good Focus Worse Focus Worse Focus Worse Focus Worse Focus Figure 23 Effects of Camera Tilt In the Long Sensor Axis A mechanical means to adjust this angle may need to be...

Страница 65: ...era will also protect against the accidental application of a reverse input supply up to a maximum of 30 V Beyond this voltage the camera may be damaged Causes for Overheating Power Shut Down For reli...

Страница 66: ...64 The Piranha XL Camera Declaration Of Conformity...

Отзывы: