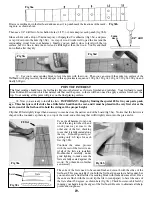


_____14. Now you can open the sealed bag and begin working on
the soundboard. First thing is to outline the inside of the frame on the
inside face of the soundboard so you know how to trim the braces.
We have marked the location of most of the braces in pencil, but
there are a few things you need to draw. Begin with making a line 4”
from the sound hole and perpendicular to the center line, as shown
in fig 14a.
Center the frame of the guitar on the centerline of the soundboard,
lining up the heel end with your pencil mark (fig 14b).
Then draw a pencil line around the inside of the frame to show where
the kerfing touches the soundboard (fig 14c).
Fig 14a
draw line to mark
heel end of frame
Fig 14b
Fig 14c
WRONG
RIGHT
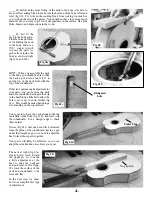
_____15. Find the two X braces and connect them together in the middle. Note that there is a wrong orientation for these
braces (fig 15a). When properly oriented, the X will match the outline on the soundboard, as shown in fig 15b. Center the X
on the soundboard and mark where the ends of the braces cross your outline of the frame.
POINT OF INTEREST
Some purists will leave these
braces long enough to fit into
“pockets” that they cut into the
kerfing. This is difficult to do
well, but helps prevent a brace
from breaking free at one end
due to future abuse. We pro-
vide bracing long enough to al-
low you to choose this method
if you wish, but it will increase
your working time a bit.
Fig 15a
Fig 15b
8.
PREPARING THE SOUNDBOARD
Содержание PARLOR
Страница 36: ......