background image

Installation manual

5

R REMQ10~16P8 + REMHQ12P8Y1B

VRVIII System air conditioner

4PW48463-1A

6.

R

EFRIGERANT


PIPING

6.1.

Installation tools

Make sure to use installation tools (gauge manifold charge hose,
etc.) that are exclusively used for R410A installations to withstand the
pressure and to prevent foreign materials (e.g. mineral oils such as
SUNISO and moisture) from mixing into the system.
(The screw specifications differ for R410A and R407C.)

Use a 2-stage vacuum pump with a non-return valve which can
evacuate to –100.7 kPa (5 Torr, –755 mm Hg).

6.2.

Selection of piping material

1.

Foreign materials inside pipes (including oils for fabrication)
must be 30 mg/10 m or less.

2.

Use the following material specification for refrigerant piping:

Size: determine the proper size referring to chapter

"6.6. Example of connection" on page 9

.

Construction material: phosphoric acid deoxidized seamless
copper for refrigerant.

Temper grade: use piping with temper grade in function of the
pipe diameter as listed in the table below.

The pipe thickness of the refrigerant piping should comply
with relevant local and national regulations. The minimal pipe
thickness for R410A piping must be in accordance with the
table below.

3.

Make sure to use the particular branches of piping that have
been selected referring to chapter 

"6.6. Example of connection"

on page 9

.

4.

In case the required pipe sizes (inch sizes) are not available, it is
also allowed to use other diameters (mm sizes), taken the
following into account:

select the pipe size nearest to the required size.

use the suitable adapters for the change-over from inch to
mm pipes (field supply).

6.3.

Pipe connection

Be sure to perform a nitrogen blow when brazing and to read the
paragraph 

"Caution to be taken when brazing refrigerant piping" on

page 5

 first.

Do not insert fingers, rods or other objects into the air
inlet or outlet. When the fan is rotating at high speed, it
will cause injury.

Use R410A to add refrigerant.

All field piping must be installed by a licensed refrigeration
technician and must comply with relevant local and
national regulations.

Caution to be taken when brazing refrigerant piping

Do not use flux when brazing copper-to-copper refrigerant
piping. (Particularly for the HFC refrigerant piping)
Therefore, use the phosphor copper brazing filler metal
(BCuP) which does not require flux.

Flux has extremely harmful influence on refrigerant piping
systems. For instance, if the chlorine based flux is used, it
will cause pipe corrosion or, in particular, if the flux
contains fluorine, it will damage the refrigerant oil.

Be sure to perform a nitrogen blow when brazing. Brazing
without releasing nitrogen into the piping will create large
quantities of oxidized film on the inside of the pipes,
adversely affecting valves and compressors in the
refrigerating system and preventing normal operation.

After completing the installation work, check that the
refrigerant gas does not leak.

Do not open stop valves until all field wiring is according to
the specifications (refer to 

"8. Field wiring" on page 12

),

the checking of the unit has been completed and all
installation conditions are fulfilled (refer to 

"10. Checking of

unit and installation conditions" on page 17

).

Toxic gas may be produced if the refrigerant gas leaks into
the room and comes in contact with a source of fire.

Ventilate the area immediately in the event of a leak.

In the event of a leak, do not touch the leaked refrigerant
directly. Frostbite may be caused.

NOTE

Make sure the pump oil does not flow oppositely into
the system while the pump is not working.
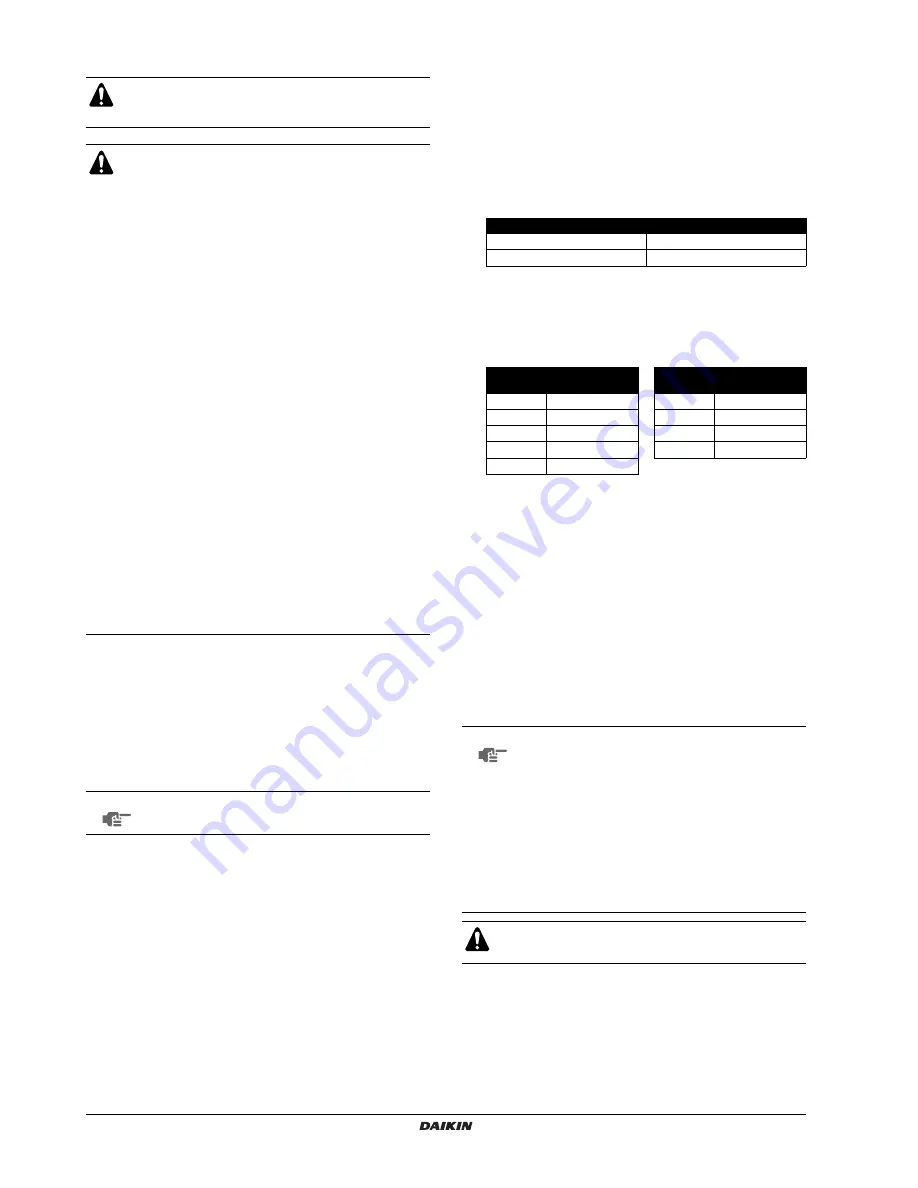
Pipe Ø 

Temper grade of piping material

15.9

O

19.1

1/2H

 O = Annealed
 1/2H = Half hard

Pipe Ø

Minimal thickness 

t (mm)

Pipe Ø 

Minimal thickness 

t (mm)

6.4

0.80

22.2

0.80

9.5

0.80

28.6

0.99

12.7

0.80

34.9

1.21

15.9

0.99

41.3

1.43

19.1

0.80

NOTE

The pressure regulator for the nitrogen released when
doing the brazing should be set to 0.02 MPa or less.

(See figure 10)

Do not use anti-oxidants when brazing the pipe joints.

Residue can clog pipes and break equipment.

1

Refrigerant piping

2

Location to be brazed

3

Nitrogen

4

Taping

5

Manual valve

6

Regulator

7

Nitrogen

Содержание REMQ8P9Y1B

Страница 1: ...INSTALLATION MANUAL REMQ8P9Y1B REMQ10P8Y1B REM H Q12P8Y1B REMQ14P8Y1B REMQ16P8Y1B System air conditioner...

Страница 2: ...mm d 500 mm a 50 mm b 100 mm c 50 mm d 500 mm a 200 mm b 300 mm a 10 mm b 300 mm c 10 mm d 500 mm e 20 mm a 50 mm b 100 mm c 50 mm d 500 mm e 100 mm a 200 mm b 300 mm e 400 mm a 10 mm b 300 mm c 10 mm...

Страница 3: ...500 mm 1 1 1 A B 2 2 2 4 5 3 8 F1 F2 F1 F2 Q1 Q2 F1 F1 F2 F2 Q1Q2 7 TOIN DUNIT TOOUT DUNIT TOMULTIUNIT A1P Q1 Q2 A1P Q1 Q2 A1P 1 2 2 3 4 5 6 8 10 10 9 9 REMQ8 12 REMQ14 16 REMHQ12 1 2 3 4 1 5 6 7 8 F...

Страница 4: ...uz uvjet da se oni koriste u skladu s na im uputama 16 megfelelnek az al bbi szabv ny ok nak vagy egy b ir nyad dokumentum ok nak ha azokat el r s szerint haszn lj k 17 spe niaj wymogi nast puj cych...

Страница 5: ...ll stysl mp tila M C Kylm aine N Varmuuspainelaitteen asetus P bar Valmistusnumero ja valmistusvuosi katso mallin nimikilpi 14 Maxim ln p pustn tlak PS K bar Minim ln maxim ln p pustn teplota TS TSmin...

Страница 6: ...75 kW For changing the refrigerant flow to indoor units the REYQ P system can be combined with BS units of the types BSVQ100P BSVQ160P and BSVQ250P only Other BS unit types will cause malfunctions whe...

Страница 7: ...REYQ48 REMQ16 REMQ16 REMQ16 600 1560 Standard combinations of outdoor units Total capacity of indoor units REYHQ16 REMQ8 REMQ8 200 520 REYHQ20 REMQ8 REMHQ12 250 650 REYHQ22 REMQ10 REMHQ12 275 715 REY...

Страница 8: ...owable safety limits in the event of a refrigerant leak 11 To prevent dripping water to form a puddle underneath the unit install a drain pan available as option kit 12 The equipment is not intended f...

Страница 9: ...The height of the foundation must at least be 150 mm from the floor The unit must be installed on a solid longitudinal foundation steelbeam frame or concrete and make sure the base under the unit is...

Страница 10: ...piping must be installed by a licensed refrigeration technician and must comply with relevant local and national regulations Caution to be taken when brazing refrigerant piping Do not use flux when b...

Страница 11: ...lves are fully closed 2 Connect a charge hose to service ports of all stop valves 3 Recover gas and oil from the pinched piping by using a recovery unit 4 When all gas and oil is recovered from the pi...

Страница 12: ...ns The piping between the outdoor units must be routed level or slightly upward to avoid the risk of oil retention into the piping side Pattern 1 Pattern 2 Prohibited patterns change to pattern 1 or 2...

Страница 13: ...ation may lead to malfunction of the outdoor unit 5 Piping length restrictions Make sure to perform the piping installation within the range of the maximum allowable pipe length allowable level differ...

Страница 14: ...40 m Outdoor unit multi connection piping kit and refrigerant branch kit selection How to select the refnet joint When using refnet joints at the first branch counted from the outdoor unit side choose...

Страница 15: ...of the connected outdoor unit Suction gas pipe Liquid pipe 20 25 32 40 50 12 7 6 4 Outdoor unit capacity type Hp Piping outer diameter size mm 63 80 100 125 15 9 9 5 Suction gas pipe HP LP gas pipe Li...

Страница 16: ...ncreased to 90 m Size up of the main suction gas pipe may affect a good oil return to the outdoor unit due to influence of the HP LP gas pipe indoor unit 8 b c d e f g p 90 m increase the pipe size of...

Страница 17: ...fan PS Switching power supply A1P A3P Q1DI Earth leakage breaker field supply Q1RP Phase reversal detection circuit R1T Thermistor air A1P fin A3P R3T R9T Thermistor H E gas H E de icer sub cool H E g...

Страница 18: ...for connection wiring to indoor outdoor transmission F1 F2 outdoor outdoor transmission F1 F2 outdoor multi transmission Q1 Q2 and on how to use BS1 BS5 and DS1 DS2 switch Do not operate the unit by s...

Страница 19: ...eans that an earth leakage breaker capable of handling high frequency electrical noise must be used in order to prevent malfunctioning of the earth leakage breaker itself Earth leakage breakers that a...

Страница 20: ...he back of the electric box lid 2 Power wiring and ground wiring between outdoor units inside conduit When the wiring is routed out through the lateral panel 3 Transmission wiring 4 Pipe opening 5 Con...

Страница 21: ...nsmission wiring between outdoor units 1 Liquid pipe 2 HP LP gas pipe 3 Finishing tape 4 Suction gas pipe 5 Transmission wiring 6 Insulation material 1 Power supply 380 415 V 3N 50 Hz 2 Earth leakage...

Страница 22: ...igerant follow the procedure as described in this chapter 11 1 Important information regarding the refrigerant used This product contains fluorinated greenhouse gases covered by the Kyoto Protocol Do...

Страница 23: ...its that are active can be read from the LED display in the Monitor Mode procedure below NOTE National implementation of EU regulation on certain fluorinated greenhouse gases may require to provide th...

Страница 24: ...button to return to step 1 setting mode 1 H1P x OFF Adding refrigerant using the automatic refrigerant charging function is recommended When charging a system charging over the permissible quantity ca...

Страница 25: ...BS unit indoor unit 13 Stop valve 14 Service port 15 Field piping 16 Refrigerant flow when pre charging through the liquid stop valve service port refer to step 3 on page 19 17 Refrigerant flow when...

Страница 26: ...to confirm that charging is completed Record the amount that was added on the additional refrigerant charge label provided with the unit and attach it on the back side of the front panel Perform the p...

Страница 27: ...c x x w x x x x w Slave unit 1 a c x x x x x x x c Slave unit 2 a c x x x x x x x x Error code P8 recharge operation Close valve A immediately and press the TEST OPERATION button once The operation w...

Страница 28: ...rocedure from step 2 onwards Make sure to open the stop valves after charging the refrigerant Operating with the stop valves closed will damage the compressor BS1 MODE BS1 MODE WARNING ELECTRIC SHOCK...

Страница 29: ...tch which is located on the outdoor unit PCB A1P The figure shows state of the LED indications when the unit is shipped from the factory Check operation procedure 1 Turn the power on for the outdoor u...

Страница 30: ...state x normal w abnormal c under preparation or under test operation 2 Indication of low noise operation state x standard operation factory setting w operation 3 Indication of power consumption limi...

Страница 31: ...arts During the test operation the refrigerant running sound or the magnetic sound of a solenoid valve may become loud and the LED display may change but these are not mal functions During the test op...

Страница 32: ...gerant charge hose to the refrigerant charging port for additionaly charging 4 When the unit is not operating push the button until the additional refrigerant charging operation function A in setting...

Страница 33: ...heavier than air Procedure for checking maximum concentration Check the maximum concentration level in accordance with steps 1 to 4 below and take whatever action is necessary to comply 1 Calculate th...

Страница 34: ...P8 REMHQ12P8Y1B VRVIII System air conditioner 4PW48463 1A 16 DISPOSAL REQUIREMENTS Dismantling of the unit treatment of the refrigerant of oil and of other parts must be done in accordance with releva...

Страница 35: ...3 2 6 6 6 6 23 18 9 8 1 2 4 3 5 13 14 15 10 7 12 19 2 1 24 6 11 16 17 15 6 5 10 11 12 7 4 9 16 17 18 3 8 13 14 2 2 1 1 9 6 6 6 6 6 6 6 6 6 6 6 6 6 6 6 6 6 6 6 6 6 6 6 6 6 6 6 6 6 6 6 6 6 6 6 6 6 6 6 6...

Страница 36: ...4PW48463 1A Copyright Daikin...

Отзывы: