background image

EDUS391000-C

Control Devices

Controls

51

2.6.3

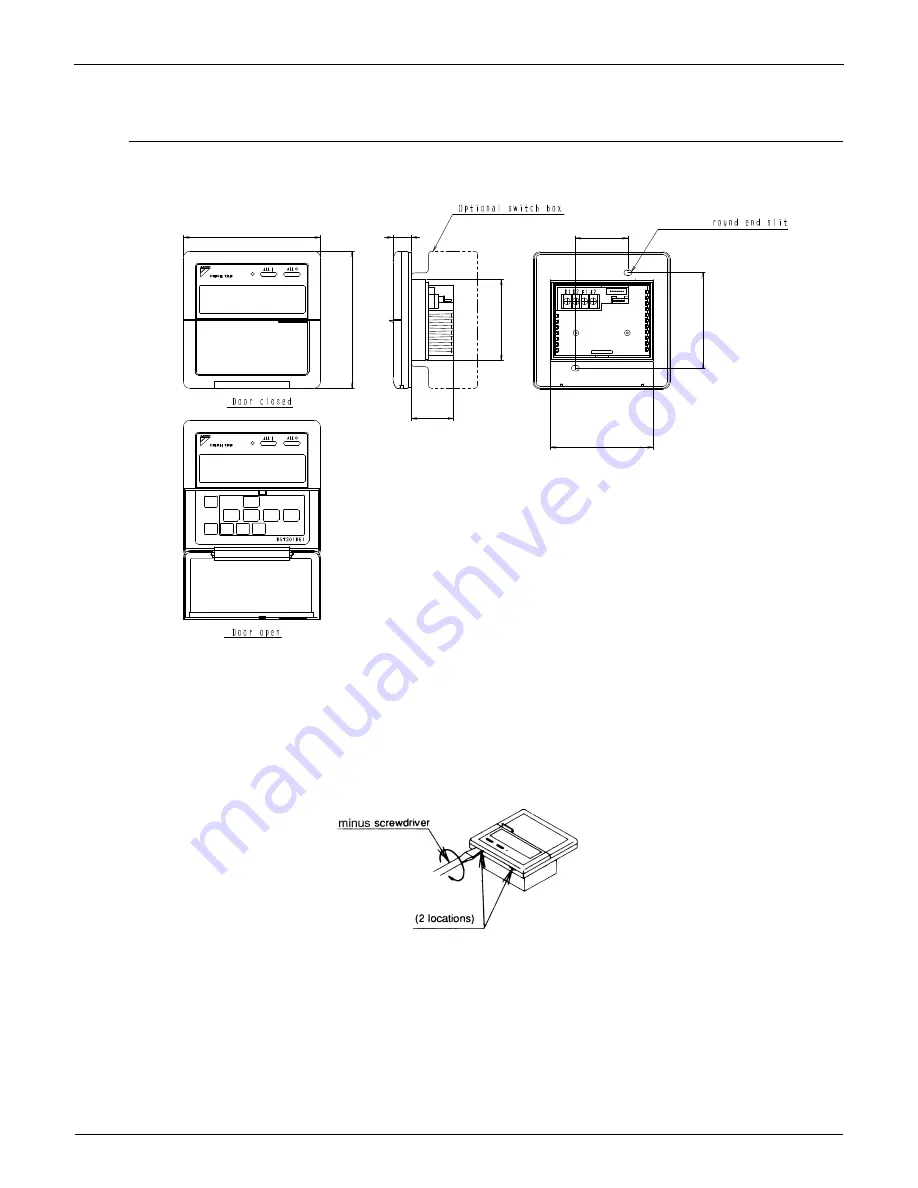
Dimension

Schedule Timer

DST301BA61

C:3D049544

2.6.4

Installation and Initial Setting

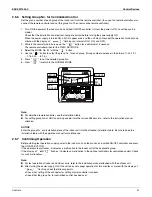
1. Remove the upper part of the remote controller.

Insert a minus screwdriver (2 locations) into the recess between the upper part and the lower part of the remote 
controller and twist the screwdriver lightly.
(The PC board is attached with the upper part of the remote controller. Do not damage electric parts with a 
screwdriver, etc.)

2 3/16 × 1/4

Unit (in)

4 3/4

1 7/16

5/8

1 3/4

3 1/2

4 3/4

2 13/16

3 5/16

Содержание FXAQ-MVJU

Страница 1: ...EDUS 391000 C AMERICAS AMERICAS Controls ...

Страница 2: ...e Controller 17 2 5 DCS301C71 Unified ON OFF Controller 40 2 6 DST301BA61 Schedule Timer 48 2 7 DCS601C71 intelligent Touch Controller 55 3 Adapter 67 3 1 KRCS01 1B 4B Remote Sensor 67 3 2 DTA104A53 61 62 External Control Adapter for Outdoor Unit Must be Installed on Indoor Units 70 3 3 DTA109A51 DIII NET Expander Adapter 73 3 4 KRP1C74 75 Wiring Adapter 76 3 5 KRP4A71 72 73 74 Group Control Adapt...

Страница 3: ...74 KRP1C74 KRP1C74 KRP1C74 KRC1C75 11 Group Control Adapter KRP4A73 KRP4A74 KRP4A71 KRP4A71 KRP4A72 KRP4A71 KRP4A71 KRP4A74 C 3D043022F C 3D068551 C 3D068222A C 3TW30729 6 Part name Model No Function intelligent Touch Controller Basic Hardware intelligent Touch Controller DCS601C71 Air Conditioning management system that can be controlled by a compact all in one unit Option DIII Net Plus Adapter D...

Страница 4: ...Simple Operation Simple operation used with arrow keys and menu driven method Multilingual Display Available for selection of 3 languages Other Features Wide variety of functions to meet customer needs such as schedule setting Clear Display Dot matrix display A combination of fine dots enables texts and icons to be displayed smoothly and makes the display of a wide variety of text and illustration...

Страница 5: ...cture of button allocation for each function the number of buttons has been decreased from 15 to 9 Can intuitively handle frequently performed basic operations 1 Large text display 2 Large buttons 3 Backlight 4 No cover design 1 2 3 1 Mode button 3 Menu OK button 6 9 Arrow Keys 5 Cancel button 4 On Off button 2 Fan Speed button ...

Страница 6: ...operation with arrow keys and menu driven system Available for simple operation with arrow keys and menu driven system Press Menu OK button to change the screen and then the main menu appears Select the item you wish to set with direction keys and press Menu OK button at the item you wish to set and the setting entry screen appears ...

Страница 7: ...6 Controls Available for simple operation with arrow keys and menu driven system Guide on display The item you wish to set can be changed with up or down button The display gives an explanation of each setting for easier operation ...

Страница 8: ...391000 C Control Devices Controls 7 Multilingual Display Available for display in 3 different languages Always available for switching display by selecting from main menu 3 languages English French Spanish ...

Страница 9: ...Control Devices EDUS391000 C 8 Controls Other Features ...

Страница 10: ...door unit with 2 remote controllers the remote controller operated first turns the backlight on When controlling 2 remote controllers the following functions cannot be set with the sub remote controller 1 Schedule function and Setback temperature function 2 Auto Changeover function by the remote controller Restriction for VRV only Adaptor for wiring KRP1C or power supply adaptor for indoor unit PC...

Страница 11: ...Touch Controller DCS601C71 intelligent Manager DAM602A71 72 BACnet Gateway DMS502B71 Central remote controller DCS302C71 Unified ON OFF controller DCS301C71 Schedule timer DST301BA61 Residential central remote controller DCS303A71 Wiring adaptor for electrical appendices KRP2A5 6 DMS IF DMS504C71 2 1 3 Specifications New Remote Controller BRC1E71 Dimension in H W D 4 3 4 4 3 4 3 4 LCD Display size...

Страница 12: ...e Models Applicable Models 3D065275 Unit in IF THE HOLE SIZE IS TOO LARGE OR THE LOCATION NOT PROPER THE WIRE MAY COME OUT OF THE HOLE IN THE REMOTE CONTROLLER Applicable Indoor unit VRV All models that can be connected BRC1D71 SkyAir All models that can be connected BRC1D71 ...

Страница 13: ...Controls 2 2 BRC4C 7C 7E Wireless Remote Controller Receiver BRC7C812 BRC4C82 C 3D005912D 2 7 16 11 16 6 3 16 Unit in C 3D007898B 2 7 16 11 16 2 3 4 2 3 16 3 8 11 16 1 3 8 1 15 16 3 9 16 1 32 6 3 16 4 3 4 2 13 16 3 5 16 4 3 16 Unit in ...

Страница 14: ...EDUS391000 C Control Devices Controls 13 BRC7E83 BRC7E818 3D049336 Unit in C 3D034905B 2 7 16 11 16 6 3 16 Unit in ...

Страница 15: ...ng operation DISPLAY OPERATION MODE This display shows current OPERATION MODE is not available with outdoor units specially designed for cooling only is reserved only for outdoor units capable of heat recovery DISPLAY DEFROST HOT START Indicates that defrost or hot start during which the fan is stopped till the temperature of air supply rises enough at the start of a heating operation is in progre...

Страница 16: ... the mounting surface Be careful not to distort the shape of the lower part of remote controller by over tightening the mounting screws For the electric parts box to be procured in the field use optional accessories KJB111A NOTES 1 The electric parts box and wiring for connection are not included 2 When wiring run the wiring away the power supply wiring in order to avoid receiving electric noise e...

Страница 17: ...tly touch the PC board with your hand NOTES 2If controlling with one remote controller be sure to set it to MAIN 2Set the remote controller before turning power supply on is displayed for about one minute when the power supply is turned on and the remote controller cannot be operated in some cases 3P146205 2 3D047341 Unit in ...

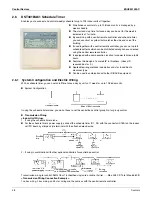
Страница 18: ...le within 1 system Up to 4 units in case of the double central control mode Executes zone control for up to 64 zones and is designed for operation efficiency Error contents are displayed in code maintenance and inspections can be quickly carried out 1 schedule timer and up to 4 unified on off controllers can be connected to a single unit and you can freely extend the central control system accordi...

Страница 19: ... unit The number of indoor units in one group is up to 16 units Zone control The zone means the indoor units connected by the same control wiring for central remote controller connected to terminal F1 and F2 and all the unit in zone have the same setting The zone control of the indoor unit is operated by the central remote controller From 1 up to 64 zones can be controlled by the central remote co...

Страница 20: ...d ON OFF controllers can be connected 8 controllers 2 locations One schedule timer can be connected Notes 1 Electrical power should be supplied to each central remote controller Single phase 100 240V 2 When you control by 2 central remote controllers be sure to set SS3 by the initial setting When you control by 2 central remote controllers Last command priority Notes The following setting cannot b...

Страница 21: ...Operation on the local side cannot be carried out during forced OFF input No voltage normal open contact Micro current contact capable of handling 16VDC and approx 10mA Max 492 ft cable length Power supply for schedule timer Power can be supplied to schedule timer Max 1 unit Operating ambient temperature humidity condition 5 40 C 95 RH or less no condensation Size width height depth 7 1 8 4 3 4 2 ...

Страница 22: ...ich have stopped due to an error DISPLAY TIME TO CLEAN AIR CLEANER ELEMENT TIME TO CLEAN AIR FILTER Displayed to notify the user it is time to clean the air filter or air cleaner element of the group displayed DISPLAY REFRIGERANT SYSTEM DISPLAY This indication in the square is lit while the refrigerant system is being displayed DISPLAY OPERATION MODE Displays operating state DISPLAY PRESET TEMPERA...

Страница 23: ...oup is registered in each respective zone If you can simply register the several groups in the same zone by switch so that you can have simultaneous operation of the units in that zone immediately The operation of temperature setting and etc is also controlled by zone simultaneously Zone setting By adding the zone setting function Zone 0 from the central remote controller you can set the same sett...

Страница 24: ...the selection eligibility for cool heat 1 Preparation When turning on the power first time CHANGEOVER UNDER CONTROL sign blinks When you set Branch Selector unit Heat Recovery series Indoor unit Continue to push Operation switch for about 4 seconds sign blinks on all the indoor units connected to the outdoor unit or Branch Selector unit Push Operation switch of the remote controller which you want...

Страница 25: ...ling temperature setting 75 F However the display of zone setting of the master remote controller remains at heating temperature setting at 80 F Cautions Operation code cannot be set by the sub central remote controller Combined zone operation can only be set by zone registration of the main central remote controller Both main and sub central remote controller are operated by a last priority comma...

Страница 26: ...red using the ZONE NUMBER button Keeping the button pressed down will move it rapidly 3 to the group you wish to register using the arrow keys Keeping the button pressed down will move it rapidly 4 Press the SELECT button to register that group to the zone The display lights up on all the selected units Pressing the RESET button removes the group from that zone and goes off Repeat steps 3 and 4 un...

Страница 27: ...will be displayed for a period of another approximately two seconds Monitor in zone unit Operating and monitoring the system even in group or zone unit has become enabled from the DCS302C71 Monitoring in zone unit is conducted taking an indoor unit with a lower address within the zone as the Main Indoor Unit For monitoring the zone settings The following screens are displayed If the system is oper...

Страница 28: ...ADJUSTMENT button This sets fixed or swing for the fan direction Press the FAN STRENGTH ADJUSTMENT button Pressing this button scrolls through and Depending on the indoor unit only and may be available The functions included in the indoor units may vary Pressing a button for a function which is not available will cause NOT AVAILABLE to be displayed Timer Number Setting Only when used with the sche...

Страница 29: ...one registered units Call up the zones which you wish to set in the zone screen and set the timer numbers Since the timer number will be set to after press priority the timer number in the last screen set will be valid for the connected units Example 1 Setting timer number 1 for unit 1 00 to 1 and timer number 2 to 2 in the individual screen and then setting timer number 1 to 3 and timer number 2 ...

Страница 30: ...the sub branches from the branch line 3 Star method Up to 16 branches is possible Never diverge the sub branches from the branch line Specifications of Transmission Wiring Be sure to use either 2 core sheathed vinyl cord or cable as mentioned below The size of wire should be selected in the range of AWG 18 or AWG 16 Length of control wiring Between central remote controller and air conditioner Max...

Страница 31: ...seconds The remote controller will enter the FIELD SET MODE 3 Select the MODE No 00 with the button 4 Use the button to select the group No for each group Group numbers increase in the order of 1 00 1 01 1 15 2 00 4 15 5 Press to set the selected group No 6 Press to return to the NORMAL MODE Simplified remote controller Group No setting by simplified remote controller 1 Remove the cover of remote ...

Страница 32: ...ral remote controller Except when connected to the central monitoring panel Description of Control Mode The following 5 operation control modes and 20 modes combined with temperature and operation mode setting by the remote controller are set and display by the control mode of 0 through 19 Remote Control Rejection For when you want to turn on off using central remote controller only On off cannot ...

Страница 33: ...xample Rejection Acceptance 0 Rejection 10 Acceptance Example Acceptance example 1 example Rejection 11 Remote controller off only accepted Acceptance Rejection Acceptance 2 Rejection 12 Acceptance Acceptance 3 Rejection 13 Central priority Acceptance Rejection Acceptance 4 Rejection 14 Acceptance Acceptance 5 Rejection 15 Individual priority Last command priority Acceptance Rejection Acceptance 6...

Страница 34: ...dual priority Last command priority Code No 6 7 16 17 OFF ON ON OFF OFF OFF OFF Off OFF ON ON ON ON On Off On Acceptance Rejection ON DCS302C71 Command Schedule Timer Operation by Central Remote Controller OFF Time ON Time Remote Controller Command Indoor Units Status Operation by Central Remote Controller OFF OFF ON ON OFF ON OFF ON Off On Off On Acceptance Rejection Schedule Timer Operation by C...

Страница 35: ...d It switches to the cord of Remote Controller Permission Timer Remote Controller Permission Timer Last command priority Acceptance Rejection On Off OFF ON ON ON OFF OFF Time OFF Time ON Time ON OFF ON OFF ON ON ON ON OFF ON Time Schedule Schedule OFF OFF Schedule Timer Operation by Central Remote Controller DCS302C71 Command Remote Controller Command Indoor Units Status ...

Страница 36: ...ge setting switch SS3 This setting is required when up to 128 groups of indoor units are controlled by two central remote controller 3 Main Sub changeover switch Setting is required for central control from 2 locations This is required when you have a central control of the same indoor unit s from different places by using 2 4 central remote controllers Either 1 or 2 of the central control equipme...

Страница 37: ...more to set the system to FIELD SETTING mode 2 Use the TEMPERATURE ADJUSTMENT button to select a desired Mode No Press to increase the Mode No Press to decrease the Mode No 3 Press the CONTROL MODE CODE No button to select a Switch Setting No 4 Press the SET button to determine the content of the setting changed Upon determination the blinking the Switch Setting No will turn ON 5 Press the INSPECT...

Страница 38: ...ntral Remote Controller 3 indoor units registered into the zone 1 are operated by 68 F of heating Because priority is given to zone setting even if it sets up 2 02 with 77 F of heating on an individual screen from Central Remote Controller 2 02 is operated at 68 F When there are two or more indoor units in a zone Because an operating mode depends on the outdoor unit the operating mode of each indo...

Страница 39: ...triction items from sub central remote controller while in double central control function While in double central control function no settings of zone interlock and operation code can be made from the sub central remote controller In order to disable the refresh function from the sub central remote controller set the No of Switch Setting to 0 Setting of area designation for forced OFF In order to...

Страница 40: ...4 16 NOTE Suitable length of the electric wire is about 6 1 4 from electric parts box If it is difficult to contain a long wiring strip the sheathed part of the wiring screwdriver 2 locations PC board is attached with both the upper and lower part of remote controller Do not damage the board with the screwdriver Power supply wire Installation screws 4 Do not contain the strong current electric wir...

Страница 41: ...d ON OFF Controller cannot be used in conjunction with the optional Group Control Adapter For a maximum of 16 groups of indoor units max 128 units unified operation stop or individual operation stop can be performed with this optional accessory Also allows you check operation error display at a glance By combining with a central remote controller and schedule timer you can construct a system that ...

Страница 42: ...e grounded in compliance with the applicable local and national codes Fit the power supply wiring with a fuse and a switch After wiring work check power to the equipment shuts OFF when switch is shut OFF Wiring Outline Wiring Specification Notes 1 The size of power supply wiring must comply with the applicable national and local codes 2 Allowable length of transmission wiring is as follows Max 328...

Страница 43: ... Type Wiring Can be branched up to 16 branches Example of 3 branches 3 Star Type Wiring Can be branched up to 16 branches Example of 3 branches Note 1 No branching is allowed after branching 2 Use a relay terminal board field supplied to branch more than 3 control wires from the same terminal board ...

Страница 44: ...nal strip If connected by mistake it may damage or burn electrical parts of optional controllers for centralized control and indoor unit It may result in serious danger Be sure to check wirings before turning the power ON 2 5 3 Dimension Unified ON OFF Controller DCS301C71 2 3 4 3 1 4 4 3 4 4 3 4 5 8 1 3 4 3 1 2 2 1 8 Unit in 2 3 16 1 4 C 3D043640 ...

Страница 45: ...y set When using 1 unified ON OFF controller do not disconnect the connector for setting master controller Use the unit with the connector in the state in which it was delivered When using multiple unified ON OFF controllers or using the unified ON OFF controller in conjunction with other optional controllers for centralized control makes settings as indicated in the right table Note For instructi...

Страница 46: ...erent locations In this kind of set up it is necessary to set the MAIN SUB changeover switch One of the two unified ON OFF controllers 1 2 is set to MAIN while the other is set to SUB 4 Setting of the Sequential Operation Function The unified ON OFF controller is equipped with a sequential operation function that sequentially turns indoor units on in 2 second intervals during unified operation Seq...

Страница 47: ...wer OFF For normal operation set the switch to the normal side Control Mode Individual Centralized Timer Operation Possible by Remote Controller ON OFF Control Impossible by Remote Controller Content Operation stop is controlled by both unified ON OFF controller and remote controller After operated by unified ON OFF controller operation stop is freely controlled by remote controller until stopped ...

Страница 48: ...mplified remote controller see the installation table For setting group No of HRV and wiring adaptor for other air conditioners etc refer to the instruction manual attached NOTICE Enter the group No and installation place of the indoor unit into the attached installation table Be sure to keep the installation table with the operation manual for maintenance 2 5 7 Confirming Operation Before startin...

Страница 49: ... wiring for control AWG 18 or 16 sheathed vinyl cord or cable 2 wire Max 3280 ft Total Max 6560 ft Transmission Wiring Connection Example 1 series wiring 2 bus wiring and 3 star wiring are the same as with the central remote controller Simultaneous control of up to 128 indoor units is managed by a week schedule The start and stop time for twice a day can be set for the week in increments of 1 minu...

Страница 50: ...EDUS391000 C Control Devices Controls 49 2 6 2 Names and Functions DST301BA61 3P124623 5C 1 2 3 6 4 9 7 8 10 11 5 DST301BA61 Fig 1 17 15 14 12 13 18 19 20 16 DST301BA61 Fig 2 ...

Страница 51: ...E Displays the present day of the week and time 10 DISPLAY PROGRAMMED TIME OF SYSTEM START Displays the time programmed to start 11 DISPLAY PROGRAMMED TIME OF SYSTEM OFF Displays the time programmed to stop 12 TIME NO BUTTON 13 CLOCK ADJUSTING BUTTON Press this button to set the present time 14 PROGRAMMING START BUTTON Press this button to set or check the No of programmed time Press it again afte...

Страница 52: ... remote controller Insert a minus screwdriver 2 locations into the recess between the upper part and the lower part of the remote controller and twist the screwdriver lightly The PC board is attached with the upper part of the remote controller Do not damage electric parts with a screwdriver etc 2 3 16 1 4 Unit in 4 3 4 1 7 16 5 8 1 3 4 3 1 2 4 3 4 2 13 16 3 5 16 ...

Страница 53: ...ge the factory setting 2 Control mode selector SS2 Set for individual use only By changing the switch setting mode of individual and centralized operation is available Note When used with other optional controllers control mode of central remote controller and unified ON OFF controller have the priority 3 Setting of the sequential operation function The schedule timer is equipped with a sequential...

Страница 54: ...grammed operation of the indoor units set the address for central control by local remote controller 3 Transmission Wiring In case of individual use of schedule timer Connect terminals of the schedule timer F1 F2 with terminals of the indoor unit F1 F2 Connect terminals of the schedule timer D1 D2 and the connector on the indoor unit PC board using the attached electric wire and crimp style termin...

Страница 55: ...t Check the contents of the display for the problem indicators and contact your DAIKIN dealer to report the source of the problem F1 F2 D1 D2 Wiring Sheathed wire 2 wire Sheathed wire 2 wire Gauge AWG 18 16 AWG 18 16 Length Max 3280 ft Max 492 ft Operation Lamp Malfunction Error Code Contents of Malfunction Error Turn Off M1 Failure of PC board of schedule timer Turn On or Off M8 Malfunction of tr...

Страница 56: ...ted Setting Operations Up to 128 groups can be controlled with the intelligent Touch Controller More than one group can be consolidated into a zone which can be registered to allow the following settings by the zone This eliminates the need for repeating the same setting operation for each group Function to allow collective setting for all groups is also available Start stop Temperature setting Sw...

Страница 57: ...itoring of air conditioner with personal computer by the Controller with the optional DCS004A71 A group of indoor units include Zone control with the intelligent Touch Controller Zone control which allows collective settings for more than one group is available with the intelligent Touch Controller which facilitates the setting operations 1 One indoor unit without a remote control 3 Up to 16 indoo...

Страница 58: ...contact the vendor you purchased the product from Central monitoring panel Collective start stop and error monitoring with contact Monitoring from PC is possible by Web E mail functions Optional intelligent Touch Controller Web Software is necessary Unification adaptor for computerized control CN2 LAN F1 F2 F1 F2 F1 F2 F1 F2 Outdoor unit The number of connectable indoor units is up to 64 units max...

Страница 59: ...ct the dealer you purchased the product from Front and Side View NOTE Terminals on the Back of intelligent Touch Controller LINE COM L0 Dil Pi3 COM Pi2 Pi1 F2 F1 24 VAC COM 24 VAC PHONE RS 232C LAN Modem connector for AIRNET When using AIRNET service connect it to the telephone line AIRNET service is not free but a contract for this service and an optional inner type modem are required separately ...

Страница 60: ... System Condition Displayed Domain Domain displaying system condition Compulsory Stop etc DisplayforCollectiveMonitoringofAir ConditionersConnectedtointelligentTouchController When operation is normal and any air conditioner is in operation Red Normal When operation is normal and all air conditioners are in stoppage Green Normal When there is any air conditioner generating an error Yellow Abnormal...

Страница 61: ...and any air conditioner is in operation Red Normal When operation is normal and all air conditioners are in stoppage Green Normal When there is any air conditioner generating an error Yellow Abnormal When there is any air conditioner with communication error Blue Abnormal Change in color of Start Stop is possible by Iconcolor Settings in System Settings Start All Button Button to collectively star...

Страница 62: ...age Green Normal When there is any air conditioner generating an error Yellow Abnormal When there is any air conditioner with communication error Blue Abnormal Change in color of Start Stop is possible by Iconcolor Settings in System Settings Start All Button Button to collectively start all the air conditioners connected to intelligent Touch Controller Stop All Button Button to collectively stop ...

Страница 63: ...Control Devices EDUS391000 C 62 Controls 2 7 7 Electric Wiring Connection ground wire to ground terminal ...

Страница 64: ...EDUS391000 C Control Devices Controls 63 ...

Страница 65: ...Control Devices EDUS391000 C 64 Controls ...

Страница 66: ...EDUS391000 C Control Devices Controls 65 1P167242A ...

Страница 67: ...ns Privileges Given to Each Login Name There are two categories of login users General User who can perform basic operations via the web interface and Administrator who can setup the system and change system settings Start Stop Operation You can start or stop all the devices in a group a zone or multiple zones at a time Advanced Settings for Air Conditioners You can set temperature operation modes...

Страница 68: ...EDUS391000 C Adapter Controls 67 3 Adapter 3 1 KRCS01 1B 4B Remote Sensor 39ft 4 1 2in 4 3 4 C 3K019189B FXMQ PVJU AHU type FXTQ PAVJU part 2 locations and remove the cover pushing up the nail to where ...

Страница 69: ...9B 1 1 4 1 1 4 2 3 4 2 3 4 1 8 M4 7 8 1 5 8 4 3 4 1 8 M4 1 5 8 Break open the knockout hole in the sensor with wire cutters Pass the extension wires through the hold and fasten the wires to the terminals with screws metal plate on site unit in ...

Страница 70: ...EDUS391000 C Adapter Controls 69 C 3K019189B ...

Страница 71: ...apter EDUS391000 C 70 Controls 3 2 DTA104A53 61 62 External Control Adapter for Outdoor Unit Must be Installed on Indoor Units FXHQ KRP1C93 FXMQ P KRP4A96 FXFQ KRP1C98 FXZQ FXDQ FXTQ KRP1B101 C 1PA63164E ...

Страница 72: ...EDUS391000 C Adapter Controls 71 C 1PA63164E To adaptor power supply connector on indoor unit or Branch Selector unit ...

Страница 73: ...ed cassette type Compact multi flow Ceiling mounted AHU type FXDQ FXZQ FXTQ C 1PA63164E DTA104A62 Option KRP1C98 Option KRP1C98 FXMQ M DTA104A61 DTA104A61 DTA104A61 If installing on a Branch Selector unit install the adaptor insie the control box of the Branch Selector unit ...

Страница 74: ...EDUS391000 C Adapter Controls 73 3 3 DTA109A51 DIII NET Expander Adapter 1P013360 ...

Страница 75: ...Adapter EDUS391000 C 74 Controls 1P013360 ...

Страница 76: ...EDUS391000 C Adapter Controls 75 1P013360 ...

Страница 77: ...Adapter EDUS391000 C 76 Controls 3 4 KRP1C74 75 Wiring Adapter C 2P263038A ...

Страница 78: ...EDUS391000 C Adapter Controls 77 C 2P263038A ...

Страница 79: ...Adapter EDUS391000 C 78 Controls C 2P263038A KRP1C74 Compact multi flow ...

Страница 80: ...EDUS391000 C Adapter Controls 79 3 5 KRP4A71 72 73 74 Group Control Adapter BRC1E71 BRC1E71 BRC1E71 FXHQ KRP1C93 FXMQ P KRP4A96 FXFQ KRP1C98 FXZQ FXDQ FXTQ KRP1B101 FXAQ KRP4A93 ...

Страница 81: ...Adapter EDUS391000 C 80 Controls C 1P161220 Ceiling mounted duct type Ceiling mounted cassette type Compact multi flow Ceiling mounted AHU type FXDQ FXZQ FXTQ C FXMQ M KRP4A71 KRP4A71 ...

Страница 82: ...EDUS391000 C Adapter Controls 81 ...

Страница 83: ...Adapter EDUS391000 C 82 Controls ...

Страница 84: ...EDUS391000 C Adapter Controls 83 C 1P161221 ...

Страница 85: ...ptor for Computerized Control 3 6 1 Function When connected to the central remote controller this kit enables unified display operation malfunction and unified control operation stop 1 Unified Display 2 Unified Control 3 6 2 Names of Parts and Function C 1P127045 ...

Страница 86: ...oor unit and remote controller Finally check operation is normal For details refer to the installation manuals for the indoor and outdoor units Next wire between the indoor unit and the central remote controller Then wire the central remote controller to the power supply source and make the necessary settings Finally check operation is normal For details refer to the installation manuals for the c...

Страница 87: ... wire Max length 490ft 1 Control Input Unified Operation Stop Wire as explained here following depending on whether input carries a voltage VOLT or not NON VOLT 1 Input with Voltage 2 Input with Non Voltage C 1P127045 Set the CHANGEOVER SWITCH SS1 to VOLT Factory set VOLT Set the CHANGEOVER SWITCH to NONVOLT Factory set VOLT CHANGEOVER ...

Страница 88: ...peration display W1 and W2 and malfunction display W3 and W4 signals The allowable current per contact is 10 mA 3A Output conditions are indicated as below C 1P127045 Position Input A 2 OFF ON Unified Operation ON OFF Unified Stop Position Input A Input B 3 On Unified Operation ON Unified Stop When Ry1 and Ry2 are OFF When only Ry1 is ON When only Ry2 is ON All indoor units are stopped No error ha...

Страница 89: ...Adapter EDUS391000 C 88 Controls ...

Страница 90: ...r this product conforms tot he applicable standards and is suitable for use in the region where the product will be used This statement does not purport to exclude restrict or modify the application of any local legislation Ask a qualified installer or contractor to install this product Do not try to install the product yourself Improper installation can result in water or refrigerant leakage elec...

Отзывы: