User's Manual
195
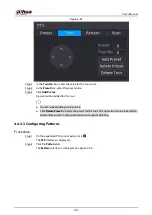
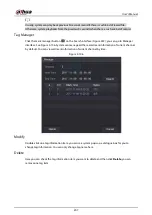
Figure 4-94
Step 3
In the
Pattern
box, enter the value for pattern.
Step 4
Click
Start
to perform the directions operations. You can also go to the PTZ Control Panel
to perform the operations of adjusting zoom, focus, iris, and directions.
Step 5
On the
PTZ
interface, click
End
to complete the settings.
4.4.3.4 Configuring AutoScan
Procedure
Step 1
On the expanded PTZ control panel, click
.
The
PTZ
interface is displayed.
Step 2
Click the
Scan
tab.
The
Scan
interface is displayed. See Figure 4-95.
Содержание NVR52-16P-4KS2 Series
Страница 1: ...Dahua Network Video Recorder User s Manual ZHEJIANG DAHUA VISION TECHNOLOGY CO LTD V1 1 0 ...
Страница 74: ...User s Manual 58 Figure 2 79 Alarm input port Figure 2 80 Alarm input port ...
Страница 101: ...User s Manual 85 Figure 3 41 Step 9 Secure the HDD bracket and put the top cover back ...
Страница 114: ...User s Manual 98 3 6 15 NVR616 4KS2 Series The following figure is for reference only Figure 3 58 ...
Страница 132: ...User s Manual 116 Figure 4 19 Modify IP Step 3 Set parameters See Table 4 5 ...
Страница 147: ...User s Manual 131 Figure 4 29 Period Step 3 Set record type See Figure 4 30 ...
Страница 319: ...User s Manual 303 The Exception interface is displayed See Figure 4 190 Figure 4 190 Figure 4 191 Figure 4 192 ...
Страница 420: ...User s Manual 404 Figure 4 290 File management Step 2 Click Add The Add interface is displayed See Figure 4 291 ...
Страница 452: ...User s Manual ...


