41
You need to have proper rights to implement the following operations. Please make sure the HDD
has been properly installed.
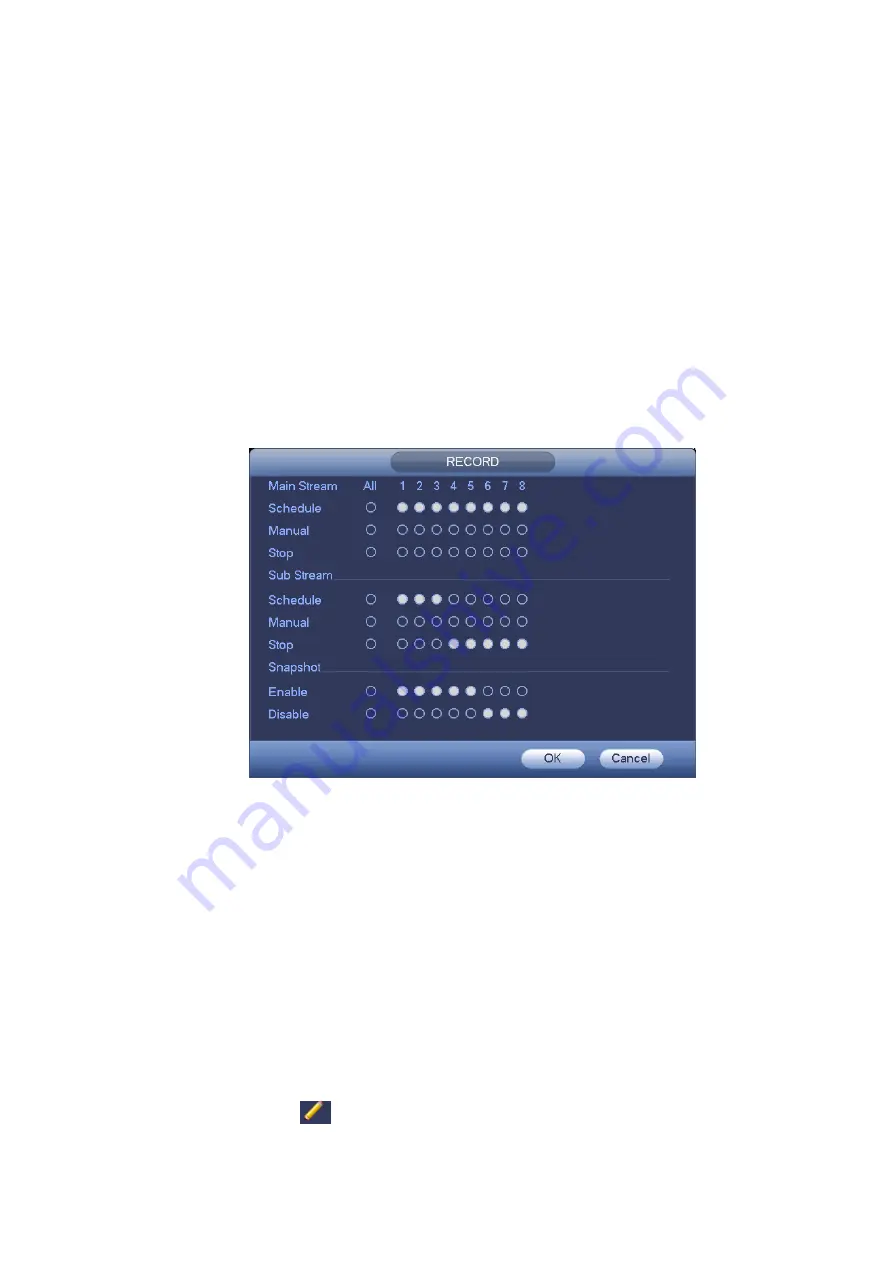
There are two ways for you to go to manual record menu.
Right click mouse or in the main menu, Advanced->Manual Record.
In live viewing mode, click record button in the front panel or record button in the remote control.
Manual record menu is shown as in Figure 4-31.
There are two modes: main stream and extra stream. There are three statuses:
schedule/manual/stop. Please highlight icon
“○”
to select corresponding channel.
Manual: The highest priority. After manual setup, all selected channels will begin ordinary recording.
Schedule: Channel records as you have set in recording setup (Main Menu->Setting->Schedule)
Stop: The channel stop recording.
For snapshot function, there are two statuses: enable/disable.
Tips
You can check All button after the corresponding status to enable/disable all-channel
schedule/manual/stop function.
Figure 4-31
4.7
Remote Device
Click the remote device item, system goes to go to the corresponding interface.
The remote device interface is shown as in Figure 4-32.
Device search: Click it to search IP address.
Add: Click it to connect to the selected device and add it to the Added device list. Support Batch add.
Show filter: You can use it to display the specified devices from the added device.
Delete: Please select one device in the Added device list and then click it to remove.
Manual add: Click it to add the IPC manually. The default port number is 37777 if the manufacture is
Private. The default user name is
admin
and password is
admin
.
Edit
:
Click Edit button
you can go to Figure 4-33. Here you can change channel information.
Please note this function is for IP from private manufacturer.
Содержание DVR0X04AH-VD-E
Страница 1: ...ATM DVR Series User s Manual Version 1 1 0 ...
Страница 24: ...15 Drag mouse Select motion detection zone Select privacy mask zone ...
Страница 60: ...51 Figure 4 44 Figure 4 45 Figure 4 46 ...
Страница 61: ...52 Figure 4 47 Figure 4 48 Figure 4 49 ...
Страница 79: ...70 Figure 5 13 Figure 5 14 Figure 5 15 ...
Страница 101: ...92 Figure 5 44 Figure 5 45 ...
Страница 103: ...94 Figure 5 47 Figure 5 48 ...
Страница 123: ...114 Switch user you can use another account to log in Figure 5 78 ...
Страница 149: ...140 Figure 6 39 Figure 6 40 Figure 6 41 Please refer to the following sheet for detailed information ...
Страница 156: ...147 Figure 6 51 Figure 6 52 Figure 6 53 Figure 6 54 ...
Страница 175: ...166 Figure 6 85 Figure 6 86 ...
Страница 176: ...167 Figure 6 87 Figure 6 88 Figure 6 89 Please refer to the following sheet for log parameter information ...
Страница 200: ...191 Maxtor DiamondMax 20 STM3250820AS 250G SATA ...


