7
WLAN
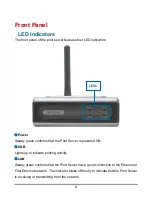
Steady green indicates a proper wireless network connection. The indicator blinks
off briefly to indicate that the Print Server is receiving or transmitting from the
network.
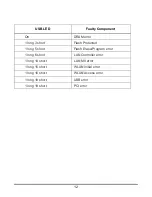
These four indicators are also used by the Print Server’s Power-ON Self Test (POST)
to indicate any hardware failures.
Wireless Basics
D-Link wireless products are based on industry standards to provide easy-to-use
and compatible high-speed wireless connectivity within your home, business or
public access wireless networks. D-Link wireless products allow you to access the
data you want, when and where you want. You will be able to enjoy the freedom that
wireless networking brings.
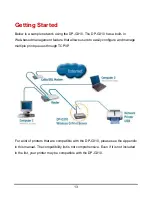
A wireless LAN (WLAN) is a cellular computer network that transmits and receives
data with radio signals instead of wires. WLANs are used increasingly in both home
and office environments, and public areas such as airports, coffee shops and
universities. Innovative ways to utilize WLAN technology are helping people to work
and communicate more efficiently. Increased mobility and the absence of cabling
and other fixed infrastructure have proven to be beneficial for many users.
Wireless users can use the same applications they use on a wired network.
Wireless adapter cards used on laptop and desktop systems support the same
protocols as Ethernet adapter cards.
Содержание AirPlus DP-G310
Страница 1: ...1 D Link DP G310 Wireless G Print Server Manual Rev 01 February 2008 ...
Страница 44: ...39 If yes then click Finish button to exit the installation window and now you may start your printing tasks ...
Страница 59: ...54 ...
Страница 62: ...57 HELP The Help screen provides you brief information about the print server for your reference ...
Страница 63: ...58 Reboot If you want to reset the print server you may just click the Reboot for restarting ...
Страница 64: ...59 Refresh Printer Status Click Printer to refresh printer status ...
Страница 65: ...60 TCP IP Printing for Windows Vista Go to Start Î Control Panel Î Printers ...
Страница 66: ...61 Click Add a printer Select the first option Add a local printer and then click Next ...
Страница 69: ...64 Select Custom and click Settings ...
Страница 71: ...66 ...
Страница 73: ...68 Click Next to start installing the printer ...
Страница 74: ...69 After clicked Print a test page a small dialogue box will show up as below Click Close ...
Страница 75: ...70 Click Finish The printer is now ready for printing with Windows Vista on your network ...
Страница 77: ...72 Select the first option Local printer attached to this computer and click Next ...
Страница 79: ...74 Click Next ...
Страница 81: ...76 Select Custom and click Settings ...
Страница 83: ...78 ...
Страница 84: ...79 Click Next ...
Страница 85: ...80 Click Finish ...
Страница 87: ...82 At this screen you can input a name for the printer and then click Next ...
Страница 88: ...83 Select Yes to print a test page click Next ...
Страница 89: ...84 Click Finish The printer is now ready for printing with Windows XP on your network ...
Страница 91: ...86 Select the first option Local printer attached to this computer and click Next ...
Страница 93: ...88 Click Next ...
Страница 95: ...90 Select Custom and click Settings ...
Страница 97: ...92 ...
Страница 98: ...93 Click Next ...
Страница 99: ...94 Click Finish ...
Страница 101: ...96 At this screen you can input a name for the printer and then click Next ...
Страница 102: ...97 Select the first option Do not share this printer and click Next ...
Страница 103: ...98 Select Yes to print a test page click Next ...
Страница 104: ...99 Click Finish The printer is now ready for printing with Windows 2000 on your network ...
Страница 107: ...102 2 Double click on the folder lpr 3 Highlight lpr inf 4 Click OK Click OK to accept the location of the file ...
Страница 108: ...103 You should now be back to the Network Properties Page Highlight LPR for TCP IP Printing and click Properties ...
Страница 109: ...104 Click Add Port ...
Страница 111: ...106 ...
Страница 113: ...108 Click OK Windows will ask for a restart Click Yes ...
Страница 128: ...123 5 The Add a new print queue menu appears click Forward to continue ...
Страница 130: ...125 8 Select the printer model ...
Страница 146: ...141 When the Installable Options pop up window shows up as below click Continue button ...

