120
Printing from Solaris
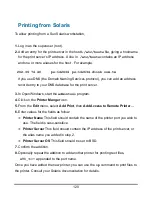
To allow printing from a Sun Solaris workstation,
1.
Log in as the superuser (root).
2.
Add an entry for the print server in the host’s
/etc/hosts
file, giving a hostname
for the print server’s IP address. A line in
/etc/hosts
contains an IP address
and one or more aliases for the host . For example:
202.39.74.40 ps-142634 ps-142634.dlink.com.tw
If you use DNS (the Domain Naming Services protocol), you can add an address
record entry to your DNS database for the print server.
3.
In OpenWindows, start the
admintool
program.
4.
Click on the
Printer Manger
icon.
5.
From the
Edit
menu, select
Add Print
, then
Add Access to Remote Printer…
6.
Enter values for the fields as follow:
◊
Printer Name
This field should contain the name of the printer port you wish to
use. The field is case-sensitive.
◊
Printer Server
This field should contain the IP address of the print server, or
the alias name you added in step 2.
◊
Printer Server OS
This field should be set to BSD.
7.
Confirm the addition.
8.
Optionally repeat the addition to add another printer for printing text files,
with
_TEXT
appended to the port name.
Once you have added the new printer, you can use the
lp
command to print files to
the printer. Consult your Solaris documentation for details.
Содержание AirPlus DP-G310
Страница 1: ...1 D Link DP G310 Wireless G Print Server Manual Rev 01 February 2008 ...
Страница 44: ...39 If yes then click Finish button to exit the installation window and now you may start your printing tasks ...
Страница 59: ...54 ...
Страница 62: ...57 HELP The Help screen provides you brief information about the print server for your reference ...
Страница 63: ...58 Reboot If you want to reset the print server you may just click the Reboot for restarting ...
Страница 64: ...59 Refresh Printer Status Click Printer to refresh printer status ...
Страница 65: ...60 TCP IP Printing for Windows Vista Go to Start Î Control Panel Î Printers ...
Страница 66: ...61 Click Add a printer Select the first option Add a local printer and then click Next ...
Страница 69: ...64 Select Custom and click Settings ...
Страница 71: ...66 ...
Страница 73: ...68 Click Next to start installing the printer ...
Страница 74: ...69 After clicked Print a test page a small dialogue box will show up as below Click Close ...
Страница 75: ...70 Click Finish The printer is now ready for printing with Windows Vista on your network ...
Страница 77: ...72 Select the first option Local printer attached to this computer and click Next ...
Страница 79: ...74 Click Next ...
Страница 81: ...76 Select Custom and click Settings ...
Страница 83: ...78 ...
Страница 84: ...79 Click Next ...
Страница 85: ...80 Click Finish ...
Страница 87: ...82 At this screen you can input a name for the printer and then click Next ...
Страница 88: ...83 Select Yes to print a test page click Next ...
Страница 89: ...84 Click Finish The printer is now ready for printing with Windows XP on your network ...
Страница 91: ...86 Select the first option Local printer attached to this computer and click Next ...
Страница 93: ...88 Click Next ...
Страница 95: ...90 Select Custom and click Settings ...
Страница 97: ...92 ...
Страница 98: ...93 Click Next ...
Страница 99: ...94 Click Finish ...
Страница 101: ...96 At this screen you can input a name for the printer and then click Next ...
Страница 102: ...97 Select the first option Do not share this printer and click Next ...
Страница 103: ...98 Select Yes to print a test page click Next ...
Страница 104: ...99 Click Finish The printer is now ready for printing with Windows 2000 on your network ...
Страница 107: ...102 2 Double click on the folder lpr 3 Highlight lpr inf 4 Click OK Click OK to accept the location of the file ...
Страница 108: ...103 You should now be back to the Network Properties Page Highlight LPR for TCP IP Printing and click Properties ...
Страница 109: ...104 Click Add Port ...
Страница 111: ...106 ...
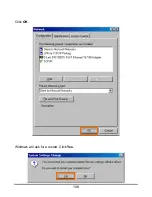
Страница 113: ...108 Click OK Windows will ask for a restart Click Yes ...
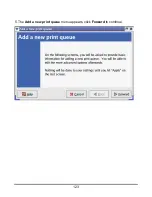
Страница 128: ...123 5 The Add a new print queue menu appears click Forward to continue ...
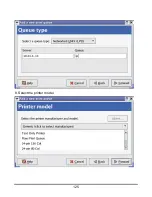
Страница 130: ...125 8 Select the printer model ...
Страница 146: ...141 When the Installable Options pop up window shows up as below click Continue button ...


