background image

Locking/
Unlocking a
Database

The XP Administrator provides a lock feature for the security of your database. A
locked database can only be edited through the XP Administrator. An unlocked
system can be altered through the XPDU as well. To lock your database, click on
the closed lock icon in your Menu/Icon Bar. The lock status display on the Status
Bar at the bottom of the main menu will change to reflect your selection. To unlock
the database, simply click on the open lock icon.

24

Using Auto
Configure for
Large Systems

If you have a large number or users or servers in your system, you may want to use
the Auto Configure feature. Auto Configure allows you to quickly set up a number
of users or servers with identical configurations.

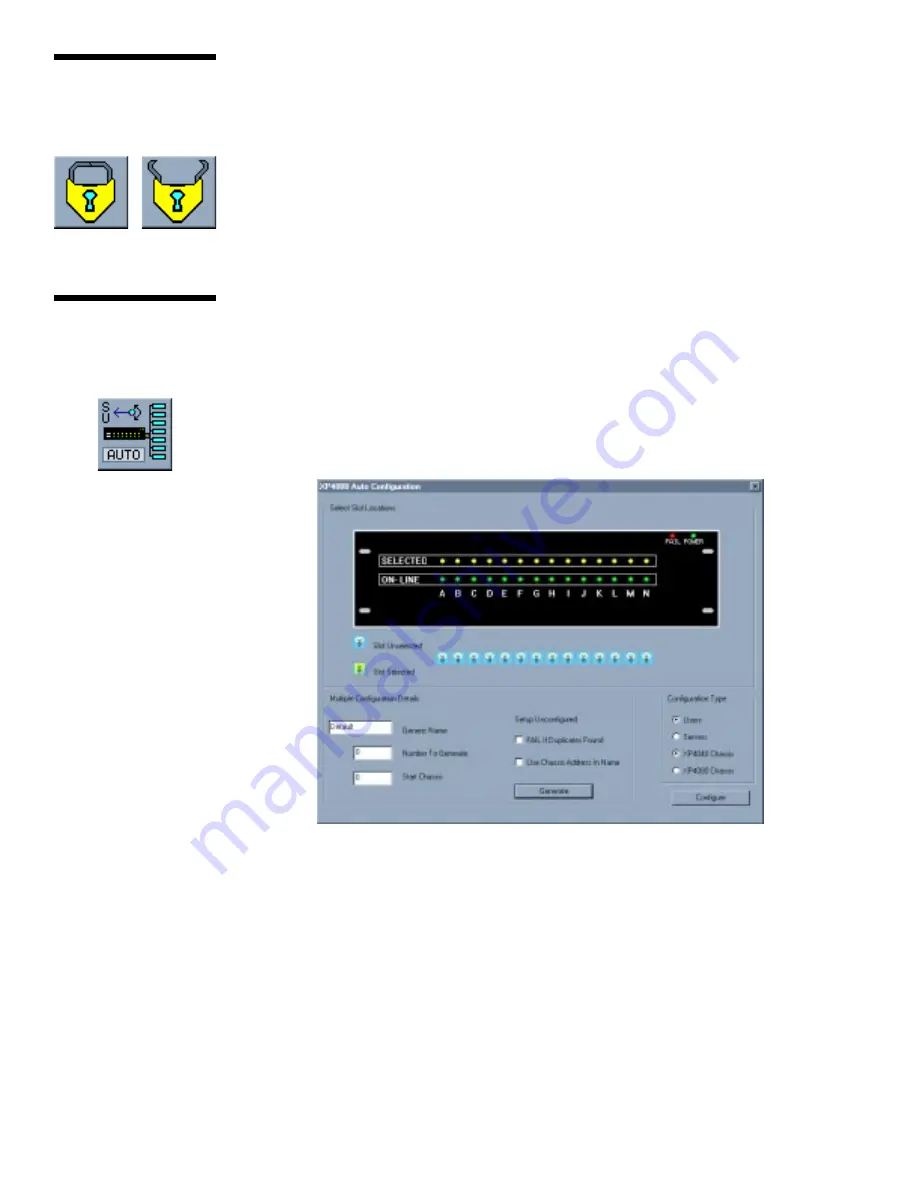
Click on the Auto Configure icon to bring up the Auto Configuration window as
shown below.

You may generate user or server lists from this menu.

Auto Configuring Servers

To automatically configure a server list, follow the steps below:

1. Using your mouse, click on the light bulbs under the channel letters in the

sample XP4000 Series unit. Click to green each slot in your chassis configuration
that contains a computer interface card. Click to blue each slot that does not
contain a computer interface card.

2. Enter a base, generic name for your servers in the Generic Name field.

3. Enter the number of servers you are adding to this auto configured list in the

Number to Generate field.

Содержание XP Administrator

Страница 1: ...aller User Guide XP A XP A XP A XP A XP ADMINISTRATOR DMINISTRATOR DMINISTRATOR DMINISTRATOR DMINISTRATOR 4991 Corporate Drive Huntsville Alabama 35805 6201 USA 256 430 4000 Fax 256 430 4030 www cybex...

Страница 2: ......

Страница 3: ...ered trademarks of Cybex Computer Products Corporation All other products are trademarks or registered trademarks of their respective owners XP Administrator Installer User Guide Cybex Computer Produc...

Страница 4: ......

Страница 5: ...w Overview 1 System Requirements 1 Chapter 3 Importing and Exporting Configurations Importing from the XPDU 9 Exporting to the XPDU 12 Chapter 4 Operations Overview 13 Adding Servers 14 Adding Users 1...

Страница 6: ......

Страница 7: ...be edited at the user consoles by a user with administrative privileges 1 Product Overview 1 Overview System Requirements The XP Administrator has the following system requirements Hardware PC with Wi...

Страница 8: ...grading the XPDU on page 5 for more details If you plan to upload a database from an existing XPDU A null modem cross over cable to attach between the PC and your XPDU The XP4000 Series OSD Configurat...

Страница 9: ...m your web browser enter the following Cybex website address ftp ftp cybex com pub product upgrades XP4000 XP_Admin 2 Once the site loads double click on file XPADMIN EXE 3 A File Download window will...

Страница 10: ...E file that you downloaded from the Cybex FTP Website Be sure to include the correct path to your XPADMIN file example C XP Administrator XPADMIN EXE The following files will be downloaded to your sys...

Страница 11: ...Chassis ID for the XPDU from the XP4000 Series Installer User Guide If a valid Chassis ID exists then proceed to the section Installing Configuring the XPIA If the FLASH revision is below B 00 you wi...

Страница 12: ...ystem Management Tools Enter your selection 5 From the System Management Tools Main Menu select option 6 to set the date and time Update these settings appropriately Optional Configuration Options Opt...

Страница 13: ...u wish to use as the security log host The default setting in brackets is the IP address of the telnet client currently connected to the XPIA If this is your log host server simply press Enter New Log...

Страница 14: ...your XPIA module Enter admin or root as the username and the password that you configured when you installed the card Note that the password is case sensitive 4 Select OK You will receive a message Va...

Страница 15: ...tabase From an XP4000 system computer 1 Log in to your XPDU as the administrator 2 Press Alt tab twice to reach the Administrator Controls menu Highlight and select Configuration Control 3 Highlight t...

Страница 16: ...et Transfer Port 4 Enter the com port setting that corresponds with the port you are using for communication between the XPDU and the PC Leave the remaining options at their default values 5 Click on...

Страница 17: ...r this configuration to the XP Administrator PC In the XP Administrator 1 Launch the XP Administrator by double clicking on the XP4000 System Admin icon on your PC 2 Select Import OSD File from the Fi...

Страница 18: ...the XPIA s 3 Select the IP addresses of the XPIA s in the system and click OK This will allow you to download the database to the XPIA s you choose You will be prompted by a message that asks you if y...

Страница 19: ...in the system Server and user groups are configured here as well for easy system management C The Information Panel contains current information on the selected server user or group No editing is done...

Страница 20: ...this server Information on configuring settings from the XP4000 Series Installer User Guide Click OK when finished Enter all servers that are part of your XP4000 system When completed your server lis...

Страница 21: ...erver list in this window contains all of the servers that you have added to your system Using the control and or shift keys in conjunction with your mouse click on each server that you want this user...

Страница 22: ...ing access for this user click OK to save these settings Your XP Administrator main window will now show all of your system users Clicking on a user will bring up that user s information and access pr...

Страница 23: ...l appear on screen Enter a name and description for this group of servers Click on the servers you wish to add to this group As you select servers the red x will change to a green check mark to indica...

Страница 24: ...mizing Access later in this chapter To create a server group click on the Create Server Group icon The following window will appear on screen Enter the group name and description for this user group T...

Страница 25: ...tion of the user group as well as the member users servers this group can access and access rights for each server To edit a user group double click on the group icon in the Root User List 19 When you...

Страница 26: ...ess to a server group drag the server group s icon and drop it on top of the user name in the main user list Do not drop onto a user group as this will not be recognized by the XP Administrator Click...

Страница 27: ...the main user list Click on the appropriate access when the access rights window appears You also may double click on the user name in the main user list This brings up the Add Edit User menu Click on...

Страница 28: ...The XP Administrator main window will become active again The Information Panel to the right will now contain the new server as well 22...

Страница 29: ...ve Click on the Search button and the Add Edit Server window will appear on screen To search by user name click on the appropriate XP Administrator icon Enter the name of the user you are searching fo...

Страница 30: ...Auto Configure feature Auto Configure allows you to quickly set up a number of users or servers with identical configurations Click on the Auto Configure icon to bring up the Auto Configuration window...

Страница 31: ...any duplicate server addresses leaving any previously configured servers unchanged leave this box unchecked 6 Click the Use Chassis Address in Name box if you would like for your auto configured serv...

Страница 32: ...name for your users in the Generic Name field 2 Check the FAIL if Duplicates Found box if you want the entire auto created user list to fail if a duplicate user profile is found in the system If you...

Страница 33: ...is list of users 9 Configure the options you choose for this user list and click OK when you have finished making selections 10 Your auto configured user list will appear in the XP Administrator Root...

Страница 34: ...28...

Страница 35: ...may encounter with the XP Administrator If a problem should develop and you are unable to find a resolution document the problem as thoroughly as possible Contact Cybex Technical Support for assistanc...

Страница 36: ......

Страница 37: ...VER INCLUDING IMPLIED WARRANTIES OF MERCHANTABILITY FITNESS FOR A PARTICULAR OR INTENDED PURPOSE NON INFRINGEMENT AND TITLE TO THE MAXIMUM EXTENT ALLOWED BY LAW CYBEX SHALL NOT BE LIABLE FOR ANY DIREC...

Страница 38: ...le Alabama 35805 6201 USA Tel 800 932 9239 Fax 256 430 4031 E Mail techsupport cybex com Cybex Canada 20 Mural Street Unit 5 Richmond Hill Ontario Canada L4B 1K3 Tel 1 877 992 9239 Fax 1 877 524 2985...

Отзывы: