background image

Advanced Playback Functions

Playback

14

Press the

In/Out key repeatedly to choose a

magnification level (2X, 3X, 4X,1/2,1/3 and 1/4)

ZOOM

Use the ZOOM function to magnify or shrink the image
on screen during playback or when paused.

When the ZOOM In function is first activated,
directional arrows will appear on screen. During this
time, you can use the

/

and

/

keys on the

remote control to move around the image in order to
view the area that is currently off screen. When the
arrows disappear from the screen, this function will
no longer work.

5 6

3 4

Press the

key repeatedly to choose ZOOM

OFF to return to normal viewing.

ZOOM

ZOOM Playback

1

2

3

During playback, press the

key to “jump”

forward at 30 second intervals.

CM SKIP

1

The

key lets you “jump” forward at 30 second

intervals.

CM SKIP

CM (Commercial) Skip

Most discs with multi-angle will display an indicator,
or angle mark, that alerts the viewer that multiple
angles are available for the current scene. When
this mark appears on-screen, press the
button to select an angle to view.

ANGLE

1

Some DVD discs are recorded with multiple viewing
angles for certain scenes. When you are viewing a disc
that supports this feature, you can choose among the
available angles on the disc with the

key.

ANGLE

Multi-Angle Function

During playback, press the

button to access

the AUDIO MENU.

AUDIO

1

2

Press the audio key repeatedly to select an audio
track.

Most DVD discs are recorded with multiple audio tracks.
These can contain multiple languages and different
audio formats, such as 5.1Channel, 2 Channel and other
languages..

Changing the Audio Track

During playback, press the

key to

access the SUBTITLE MENU.

SUBTITLE

1

2

Most DVD discs include at least one subtitle track in one
language. Subtitles are useful viewing movies in a
foreign language or for hearing-impaired viewers.

Press the

key repeatedly to select an

available language. The corresponding subtitle
language will appear on-screen.

SUBTITLE

3

To turn off Subtitles, press the

key

repeatedly to find the Subtitle Menu “Off” icon as
displayed below.

SUBTITLE

Subtitles

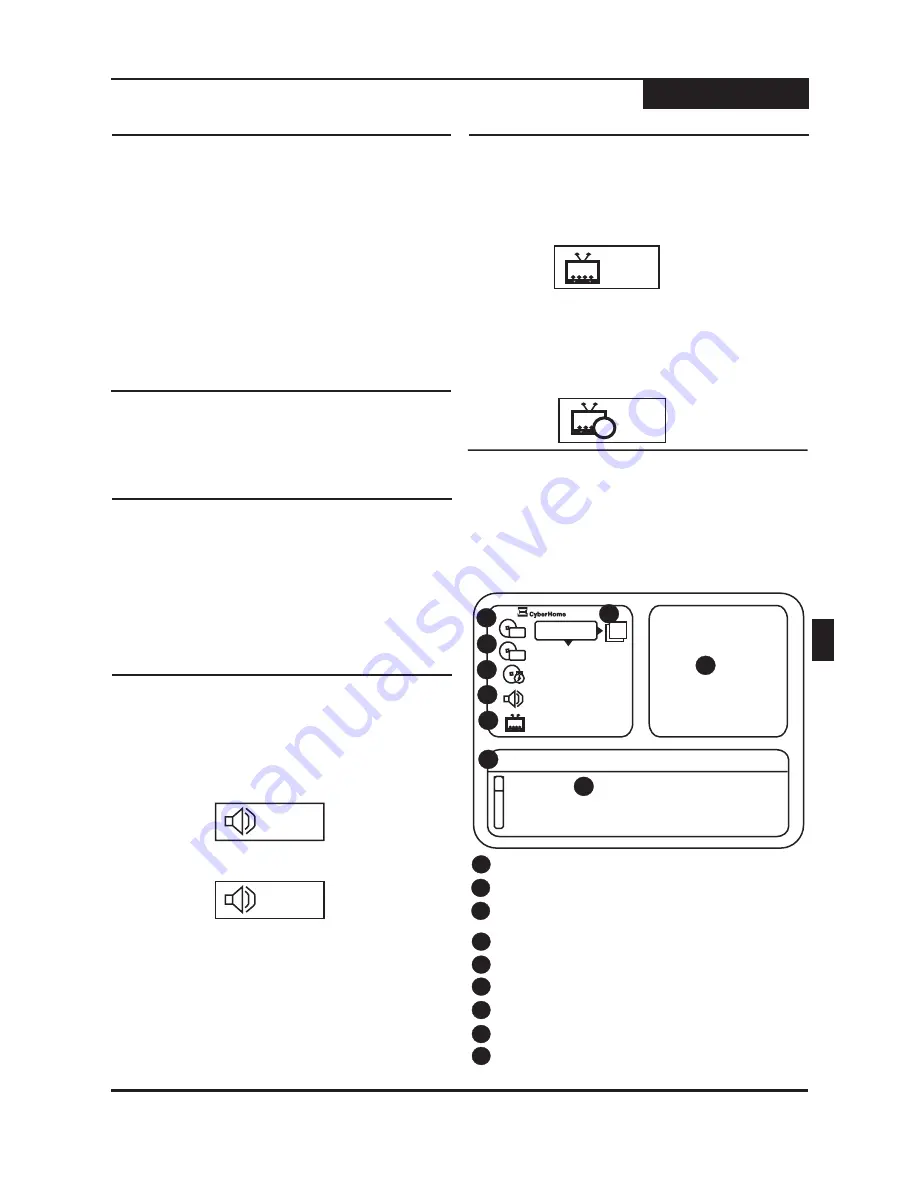
When playing a DVD, Video CDs or Audio CDs you can
display the current title, chapter/track, elapsed playback
time and other useful information with the

key.

DISPLAY

During playback, press the

key to view

available information. Use the

keys to

navigate and make selections within this menu.
Press

to close this menu at anytime.

DISPLAY

ARROW

DISPLAY

1

4

1

Displays the current title and total titles of disc.

2

Displays the current chapter and total chapters.

3

Displays the elapsed time of title or chapter that is
currently being played.
Audio Track selected.

Displaying Playback Session Information

1/3

2/3

1 / 2

Off

9

TT

CH

TT

01 / 18

012 / 28

1 : 18 : 28

English

English

?

Title

01

Title

02

Title

03

Title

04

Press ENTER to select the title

1

2

3

4

5

6

7

8

6

5

Subtitle language selected.

To access the Help menu, press the

4

key.

8

7

Preview and Help menu screen.

Description of below information

9

List of options to select for each section.

EN

Содержание CH-DVR 1600MU

Страница 1: ...Video Playback VIDEO DVD R W RECORD STAND BY L AUDIO R VIDEO IN 2 DV IN DVR 1600 DVD RECORDER WITH PROGRESSIVE SCAN PLAYBACK TM TM Operation Guide TM DVD Recorder Player DVR 1600 With Operation Guide TM TM JPG JPG EN ES ...

Страница 2: ...ping Repeat Playback Bookmark 15 Jumping to a Time Point Repeating a Disc Title or Chapter Repeating a Segment You Define Bookmark Viewing JPEG Play MP3 WMA 16 JPEG Images Slideshows MP3 WMA Playback 17 Selecting and Input Source Front Input Connections 18 Controlling a DV Camcorder Making a Recording 18 Recording TV Programs Stopping a Recording Pausing CM SKIP and Resume Recording Specifying the...

Страница 3: ...ing lightning storms or when unused for long periods of time Refer all servicing to qualified service personnel Servicing is required when the apparatus has been damaged in any way such as when the power supply cord or plug is damaged liquid has been spilled objects have fallen into the apparatus the apparatus has been exposed to rain or moisture or when the unit does not operate normally or has b...

Страница 4: ...switch the connection to the Standard Definition output If there are questions regarding our TV set compatibility with this model 525p DVD player please contact our customer service center Live and Timer Recording Functions Multiple Recording Modes HQ SP LP EP SLP Up to 6 Hours Recording on one DVD R RW Disc On Screen Disc Title Navigator gives you quick easy access to your Recordings Built In TV ...

Страница 5: ...reful not to scratch or damage the disc surface To prevent discs from becoming bent or deformed they should be vertically kept in the disc storage case To prevent damage avoid leaving discs in your car where they may be subject to direct sunlight and high temperature Do not use any disc accessory to improve the audio quality disc protective solutions or lens cleaner These products may damage the d...

Страница 6: ...ctions SETUP BOOKMARK GOTO ZOOM PLAY PAUSE FAST FORWARD STOP SLOW NEXT A B REPEAT REPEAT 1 ALL CM SKIP EDIT SOURCE Accesses the on screen Setup Menu for settings adjustment Press to access the Bookmark menu a current point on the disc can be accessed quickly without searching Press to jump to a user specified Time on the disc Press to magnify the screen with DVD and JPG discs Plays a disc chapter ...

Страница 7: ...ab Pull 6 Remote Control Battery Holder Handle Release Clip Battery Replace the battery check for the correct polarity of the battery in the battery holder Slide the battery holder back into the remote 3 15 Functions Front Display Panel AUDIO 1 2 3 4 5 6 8 VIDEO DVD R W TIMER RECORD PHOTO 7 AUDIO VIDEO DVD R W PHOTO Displays during playback of an Audio CD MP3 etc Glows during playback of a DVD Vid...

Страница 8: ... 3 9 6 4 7 8 11 5 10 Pr Cr AUDIO VIDEO OUTPUT INPUT 1 OUT IN AUDIO AUDIO OUTPUT POWER CORD SOCKET ANTENNA IN OUT VIDEO INPUT 1 S VIDEO INPUT STEREO AUDIO INPUTS COMPOSITE VIDEO OUTPUT S VIDEO OUTPUT COMPONENT PROGRESSIVE SCAN VIDEO OUTPUT STEREO AUDIO OUTPUT COAXIAL DIGITAL AUDIO OUTPUT Plug the matching end of the power cord into the unit before connecting the other end to the wall socket For Ant...

Страница 9: ...l or front panel STANDBY ON 2 Your TV must be equipped with AV inputs like those pictured to the right in order to connect this unit If your TV does not have AV inputs you will need a RF Modulator to connect the recorder to your TV s antenna cable input as shown below RF Modulators are available at major electronics retailers i RF Modulator Older TV with coaxial antenna cable connector DVD Recorde...

Страница 10: ...o input it s recommended that you use this type of connection for better picture quality First obtain a special S Video cable Connect the S Video output from the unit to the corresponding input on your TV 1 On your TV select the S Video input This is normally done by selecting Video 2 or AV2 with the remote control On some TVs this is done by using the channel selector Refer to your TV manual for ...

Страница 11: ...S decoding capability These outputs require special cables not included COAXIAL Audio Output Connections 11 The Recorder Stereo audio amplifier or receiver AUDIO CABLE NOT INCLUDED 1 You can connect the coaxial output from the recorder to the coaxial digital input on an AV amplifier or receiver First obtain a special audio cable Connect the analog stereo output from the unit to the corresponding i...

Страница 12: ...ss use the keys to select General press Select TV Signal press Choose the signal type available to you unit Air or Cable Press SETUP ENTER ENTER ENTER 5 6 2 Select Automatic Search Press The unit scans for channels automatically When complete press to exit the Setup menu ENTER SETUP 3 Restore Defaults This is the easiest way to fill your channel list with those channels available in your area The ...

Страница 13: ...ng a Disc Using Disc Menus 2 1 4 Starting Stopping and Pausing Playback 13 PLAY MOVIE 1 Chapter One 2 Chapter Two 3 Chapter Three 4 Chapter Four With SVCD discs press Playback Control to enable or disable the PBC function The PBC function enables a MENU on SVCD discs that support this feature Select the corresponding number for the Chapter you wish to play with the keys PBC NUMBER 5 Fast Forward R...

Страница 14: ... DVD discs are recorded with multiple audio tracks These can contain multiple languages and different audio formats such as 5 1Channel 2 Channel and other languages Changing the Audio Track During playback press the key to access the SUBTITLE MENU SUBTITLE 1 2 Most DVD discs include at least one subtitle track in one language Subtitles are useful viewing movies in a foreign language or for hearing...

Страница 15: ...d of the segment you want to repeat press the button again The icon is now displayed on screen The segment will now begin repeating REPEAT A B REPEAT A B To cancel repeat and resume normal playback press again The repeat icon on screen changes to REPEAT A B REPEAT OFF When there is no activity or disc playback remains paused for a period of about 5 minutes the Screen Saver will load protecting the...

Страница 16: ...omatically come up after inserting a disc with MP3 or WMA files 2 16 During playback of JPEG files you can use the Pause button to stop the slide show Also o rotate the image either clockwise or counterclockwise 5 6 3 4 and keys t During Thumbnail mode above use the through the navigation buttons keys to cycle 3 4 5 This unit supports CD R RW discs recorded with JPEG WMA and MP3 files JPEG files m...

Страница 17: ...urce 1 Connect the desired AV input source 2 Press and use the SOURCE 3 4 keys to select your desired input source Press ENTER You can now view the content from the AV source you connected to the unit 3 Insert a recordable DVD R or DVR RW disc and press to begin recording REC 4 You may choose from the following input sources Tuner VIDEO1 S VIDEO DVD VIDEO2 DV The DVD Recorder s built in TV Tuner a...

Страница 18: ...rily halt recording The PAUSE icon appears on screen PAUSE 2 Press to resume recording session REC or PAUSE Pausing CM SKIP and Resume Recording At this point recording has started with no specific end time so you ll have to press the key to manually end the recording Alternatively you can specify the length of the recording in 30 minute intervals by pressing the key repeatedly STOP REC Specifying...

Страница 19: ...ys to navigate to the Set A window press ENTER to set point A To set point B press ENTER again Thumbnail pictures will allow you to view each point created 3 4 Use the keys to select from menu on the left 3 5 6 FORMAT DISC Use the keys to select from the Edit menu 5 6 FINALIZE DISC A B Erase allows you to erase a portion of a title You simply mark the beginning point A and the end point B of the s...

Страница 20: ...cordings are designed for unattended operation and requires the recorder to be in Standby Mode to record automatically 1 To begin programming a scheduled timer recording select or press the button on the remote control TIMER RECORDING SCHEDULE through the Setup Screen under Recording NOTE Setup of date and time required before creating a timer recording Timer Recordings Scheduling a Recording Reco...

Страница 21: ...lt setting Off Determines the audio format output by the Optical and Coaxial Digital Audio Output When playing a Dolby 5 1 soundtrack leave the setting on to output the encoded digital signal to a Digital Receiver with a Dolby 5 1 Decoder If your receiver is not capable of decoding a Dolby signal use the setting Default setting RAW PCM RAW Audio Video DVDs usually feature Dolby 5 1 channel soundtr...

Страница 22: ...assword is not changed After you have defined a New password you would enter that value in this field If you forget the value of your user password later you can always use the factory password to change the value 1369 2 After completing the entry in the Current field the New field will be highlighted 3 Use the keys to enter your new user password using a maximum of 4 digits NUMBER 6 The OK select...

Страница 23: ...es a Parental Control option By default this option is set to the level the default setting will allow play of all discs NOTE remove any disc in the disc tray to access these setup options Available options include ADULT To change Parental Control level Angle Mark Memory Closed Caption CC Changing Setup Options Setup Menu When used with discs supporting multi angle features set the Angle Mark feat...

Страница 24: ...vailable languages are Set this to Off if you do not want any subtitles to appear Default Setting English French Spanish Off Note A subtitle option with your selected language must be on the disc for this feature to work Changing Setup Options Setup Menu You may add channels in the future by going through the same steps as above To add any channel directly enter the channel number to add using the...

Страница 25: ...atically adjust your system time back or ahead one hour in the fall or spring seasons respectively Default Setting On Set this to your time display preference 12 Hours Standard time format default 06 00PM 24 Hours Military time format 18 00H Displays internal information about your unit This is for informational purposes only and may only be needed if your unit needs servicing Resets all settings ...

Страница 26: ...e set wrong for your Television type Enter the SETUP MENU and select the A V OUTPUT VIDEO menu Try changing the TV SHAPE setting to 4 3 PanScan Pan Scan if you are using a standard TV or 16 9 Wide if your TV is a widescreen type 4 Common Problems and Solutions Troubleshooting Live Recording Will Not Start The Video Input Source may be protected with MacroVision Copy Protection The disc may already...

Страница 27: ...ynamic Range 90dB Harmonic Distortion 0 001 W PEAK Audio Performance Component Video Y 1 0Vp p 75 Ohm Negative Sync Pb Pr 7Vp p 75 Ohm Mini DIN 4 Pin 75 Ohm S Video One Pin Jack 1Vp p 75 Ohm Composite Video Coaxial Digital One Pin Jack 5Vp p 75 Ohm Analog Audio Stereo 2 0VRMS 470 Ohm Input Connections Output Connections Physical Mini DIN 4 Pin 75 Ohm Front Rear S Video One Pin Jack 1Vp p 75 Ohm Fr...

Страница 28: ...sults from misuse abuse or an act of God such as flood are not covered This warranty does not permit recovery of consequential or incidental damages Some states do not allow the exclusion or limitation of incidental or consequential damages so the above limitation may not apply to you 5 HOW DO YOU GET SERVICE You must be issued a Return Merchandise Authorization RMA number by CyberHome s Customer ...

Страница 29: ... Barrido Progresivo VIDEO DVD R W RECORD STAND BY L AUDIO R VIDEO IN 2 DV IN DVR 1600 DVD RECORDER WITH PROGRESSIVE SCAN PLAYBACK TM TM Guía de Operación TM Grabador y Reproductor de DVD DVR 1600 DVR 1600 Con TM TM JPG JPG ES ...

Страница 30: ... de tiempo Cómo repetir un disco título o capítulo Cómo repetir un segmento deseado Favorito Visualización JPEG Reproducción MP3 y WMA 16 Imágenes y Slideshows presentación de fotografías JPEG Reproducción MP3 y WMA Conexiones de entrada traseras 18 Selección de la fuente de entrada Conexiones de entrada frontales 19 Cómo controlar una videocámara DV Cómo realizar una grabación 19 Grabación de pro...

Страница 31: ...sulte toda reparación con personal especializado Se requieren reparaciones cuando el aparato ha sido dañado de cualquier manera como cuando se daña el cable de alimentación o el enchufe se ha derramado líquido han caído objetos dentro del aparato el aparato ha sido expuesto a la lluvia o humedad o cuando la unidad no opera normalmente o se ha caído Protección del cable de alimentación Para evitar ...

Страница 32: ...s con este modelo de reproductor de DVD de 525p comuníquese con el centro de servicios de atención al cliente Funciones de grabación en vivo y por temporizador Modos de grabación múltiples HQ SP LP EP SLP Hasta 6 horas de grabación en un disco de DVD R RW El Navegador de títulos del disco en pantalla le brinda un acceso rápido y fácil a sus grabaciones Sintonizador de TV incorporado Entradas A V f...

Страница 33: ...os y no rasgue ni dañe la superficie Para evitar que los discos se doblen o deformen deben guardarse de manera vertical en el estuche para CD Para evitar el daño no deje los discos en el automóvil donde pueden quedar expuestos a la luz directa del sol y a alta temperatura No utilice accesorios en los discos para mejorar la calidad del sonido soluciones para proteger los discos ni limpiadores de cr...

Страница 34: ...etener la reproducción y guardar en la memoria la última posición Puede retomarse la reproducción desde donde se detuvo presionando PLAY Presiónelo dos veces para eliminar la última posición de reproducción Lento Modo de reproducción en cámara lenta Presione PLAY para retomar la reproducción normal Avanza hasta la pista siguiente en el DVD u otro disco Silencio Cancela temporalmente la reproducció...

Страница 35: ...ería Reemplace la batería verifique la polaridad correcta de la batería en el soporte Vuelva a deslizar el soporte de la batería en el control remoto 3 15 Funciones Panel de visualización frontal AUDIO 1 2 3 4 5 6 8 VIDEO DVD R W TIMER RECORD PHOTO 7 AUDIO PLAY PAUSE TITLE CLOCK TIMER VIDEO DVD R W PHOTO RECORD Se visualiza durante la reproducción de un CD de audio de MP3 etc Reprod pausa Muestra ...

Страница 36: ...Cr AUDIO VIDEO OUTPUT INPUT 1 OUT IN AUDIO AUDIO OUTPUT TOMACORRIENTE DEL CABLE DE ALIMENTACIÓN ENTRADA SALIDA DE ANTENA ENTRADA DE VIDEO 1 ENTRADA DE S VIDEO ENTRADAS DE SONIDO ESTÉREO SALIDA DE VIDEO COMPUESTO SALIDA DE S VIDEO SALIDA DE VIDEO POR COMPONENTES CON EXPLORACIÓN PROGRESIVA SALIDA DE SONIDO ESTÉREO SALIDA COAXIAL DE AUDIO DIGITAL Conecte el extremo equivalente del cable de alimentaci...

Страница 37: ...ntal 2 Su televisor debe estar equipado con entradas AV como las que se ilustran a la derecha a fin de conectar esta unidad Si su televisor no cuenta con entradas AV necesitará un Modulador RF para conectar el grabador a la entrada de antena cable de su televisor como se muestra más abajo Puede adquirir un Modulador RF en la mayoría de los comercios de electrónica i Modulador RF Televisor más anti...

Страница 38: ...nar Video 2 o AV2 con el control remoto En algunos televisores esto se realiza mediante el selector de canales Consulte el manual de su televisor para obtener más detalles En el televisor seleccione la entrada de S Video Esto se realiza normalmente al seleccionar Video 2 o AV2 con el control remoto En algunos televisores esto se realiza mediante el selector de canales Consulte el manual de su tele...

Страница 39: ... prestaciones de decodificación Dolby o DTS Estas salidas requieren de cables especiales no incluidos COAXIAL Salida de audio Conexiones 11 El Grabador Amplificador o receptor de sonido estéreo CABLE DE AUDIO NO INCLUIDO 1 Puede conectar la salida coaxial del grabador a la entrada coaxial digital de un amplificador o receptor de AV Primero adquiera un cable especial de audio Conecte la salida esté...

Страница 40: ... los canales disponibles y luego agregando o suprimiendo los Exploración automática de canales Presione y use los botones para seleccionar General presione para aceptar Seleccione TV Signal señal de TV presione Seleccione el tipo de señal disponible SETUP ENTER ENTER 5 6 2 Seleccione Automatic Search búsqueda automática Presione La unidad busca canales de manera automática Una vez que ENTER 3 Ésta...

Страница 41: ...se presiona se almacena la ubicación en la que se suspendió la reproducción y usted puede retomarla donde la detuvo anteriormente presionando Si presiona dos veces la ubicación de la reproducción vuelve al comienzo del disco 2 PAUSA PLAY PAUSE PAUSE PLAY PAUSE PLAY Para congelar el video en una imagen o pausar la reproducción de música presione el botón panel frontal o el botón control remoto dura...

Страница 42: ...s discos de DVD están grabados con pistas de audio múltiples Éstas pueden contener diferentes idiomas y diferentes formatos de audio como de 5 1 canales de 2 canales y otros idiomas Cómo cambiar la pista de audio Durante la reproducción presione el botón subtítulo para acceder al MENÚ SUBTITLE SUBTITLE 1 La mayoría de los discos de DVD incluye al menos una pista de subtítulos en un idioma Los subt...

Страница 43: ...deseado 15 Cuando usted llega al final del segmento que desea repetir presione nuevamente el botón Ahora el icono aparece en la pantalla Ahora comenzará a repetirse el segmento REPEAT A B REPEAT A B Para cancelar la repetición y volver a la reproducción normal presione nuevamente El icono de repetición en pantalla cambia a REPEAT A B REPEAT OFF Cuando no hay actividad o la reproducción del disco p...

Страница 44: ...P3 MP3 WMA music jam3 mp3 MP3 music jam2 mp3 Rep Carpeta 1 2 3 4 5 6 7 8 9 JPG Información de archivo del disco y barra de estado de la reproducción Barra para mostrar la lista de archivos Muestra hasta 8 archivos de música al mismo tiempo Utilice los botones para navegar por esta lista Utilice los botones para ajustar el volumen Muestra la carpeta o el archivo actual Muestra la información sobre ...

Страница 45: ...os botones para seleccionar las pistas que desea reproducir luego presione para iniciar la reproducción Utilice el botón repetir A B para repetir un segmento del archivo MP3 o WMA Presione el botón repetir 1 todo varias veces para seleccionar las distintas opciones de repetición Presione el botón hasta seleccionar el modo deseado 5 6 PLAY REPEAT A B REPEAT 1 ALL REPEAT 2 17 Con la grabación de DVD...

Страница 46: ...sponibles la primera vez que seleccione Tuner como fuente de entrada la Entrada de video compuesto ubicada en la parte posterior de la unidad Se utiliza con cualquier dispositivo de video que tenga salida de video compuesto está ubicada en el panel posterior brinda una mejor imagen que el video compuesto estándar Utilice esta entrada con videocámaras u otros dispositivos de video cuando sea posibl...

Страница 47: ...po el cuadro de diálogo desaparecerá una vez finalizada la operación Ahora se ha creado el título nuevo Cómo detener una grabación Cuando detiene una grabación se crea un título nuevo DVR 1600 1 Presione para detener temporalmente la grabación El icono PAUSE aparece en la pantalla PAUSE 2 Presione o para retomar la sesión de grabación REC PAUSE Es posible poner el grabador en pausa durante una gra...

Страница 48: ...título que desea reproducir luego presione TITLE ENTER 5 6 Durante reproduccion presione la tecla para mostrar informacion sobre el disco como audio y subtitulos y navegar por los Titulos y Capitulos en un DISPLAY Cómo utilizar Edit Screen Pantalla de edición Presione el botón Utilice los botones para seleccionar el título que desea editar luego presione Utilice los botones para seleccionar en el ...

Страница 49: ...tilice los botones para seleccionar Finalizar el disco del menú Edit 5 6 FINALIZE DISC 1 Cómo finalizar un disco 3 Seleccione luego presione para borrar OK ENTER para establecer el punto A Para establecer el punto B presione ENTER nuevamente Las imágenes en miniatura le permitirán visualizar cada punto creado Cómo utilizar SETUP MENU Menú de config Es sencillo cambiar las configuraciones del graba...

Страница 50: ... grabación con temporizador TIMER RECORDING SCHEDULE Cómo programar una grabación Fecha de grabación Inicio Duración Fuente Calidad Repetir Resultado Fecha y hora se programa la fecha de grabación hora del día en el que se llevará a cabo la grabación duración de la grabación programada con temporizador elije una fuente de entrada de video elije la calidad de video elije si un evento se repetirá di...

Страница 51: ... automática en una hora 2 1 El siguiente campo al que debe ingresar es START TIME Hora de inicio o cuando desee comenzar la grabación con temporizador Utilice los botones para subir bajar y los botones para navegar entre campos 5 6 3 4 3 El siguiente campo es ingresar la duración de la grabación Aquí establezca hora y minutos Cómo establecer la hora de inicio y la duración de la grabación 08 00 PM...

Страница 52: ...ará ese número en este campo Si después olvida el número de su contraseña de usuario siempre puede utilizar la contraseña de fábrica para cambiarlo 1369 2 Después de completar la entrada en el Current field Campo actual se resaltará New field Campo nuevo 3 Utilice los botones para ingresar su nueva contraseña que debe tener un máximo de 4 dígitos NUMÉRICOS 6 Se seleccionará la opción OK presione p...

Страница 53: ...ios ángulos en pantalla Al configurar la ANGLE MARK marca de ángulo en no se permitirá la selección de diferentes ángulos Configuración predeterminada desactivado On Off Off Memoria Esta configuración le recordará dónde detuvo un disco de DVD y comenzará la reproducción desde ese punto cuando presione PLAY o después de que el reproductor salga del modo STANDBY en espera Al configurarlos en los dis...

Страница 54: ...de canal que desea agregar con los botones y seleccione Confirm NUMÉRICOS 3 Presione para salir del SETUP MENU SETUP 4 Agregar Borrar canal General Aquí puede personalizar su lista de canales al PASAR o MOSTRAR cualquier canal que elija NOTA seleccione la función búsqueda automática antes de utilizar esta función para agregar o borrar la configuración de canal AUTOMATIC SEARCH Seleccione la opción...

Страница 55: ...relo en On si vive en un área que cumple con cambio de horario estacional como en la mayor parte de los Estados Unidos Esto ajustará automáticamente su sistema de horario restando o adelantando una hora en el otoño o la primavera respectivamente Configuración predeterminada activado On Cambio de horario estacional Formato de hora Muestra información interna acerca se su unidad Es sólo para fines i...

Страница 56: ...arece ampliada o reducida Es posible que el Formato de imagen de video esté mal configurado para su tipo de televisor Ingrese al SETUP MENU y seleccione la A V OUTPUT VIDEO menu Intente cambiar la configuración de la FORMA del televisor a 4 3 PanScan Pan Scan si utiliza un televisor estándar ó a 16 9 Wide si su televisor es de pantalla amplia 4 Problemas comunes y soluciones Solución de problemas ...

Страница 57: ... CD de audio Relación señal a ruido 90dB Amplitud de audio 90dB Distorsión armónica 0 001 MÁXIMA Funcionamiento del audio Video por componentes Y 1 0Vp p 75 Ohm Sincronizador negativo Pb Pr 7Vp p 75 Ohm Mini DIN 4 Pin 75 Ohm S Video Un Pin Jack 1Vp p 75 Ohm Video compuesto Coaxial Digital On Pin Jack 5Vp p 75 Ohm Sonido analógico estéreo 2 0VRMS 470 Ohm Conexiones de entrada Conexiones de salida F...

Страница 58: ...s Esta garantía no permite recuperos por daños fortuitos o consecuentes Algunos estados no admiten la exclusión o limitación de los daños fortuitos o consecuentes por lo tanto la limitación precedente puede no aplicarse en su caso 5 CÓMO DEBE TRAMITAR UNA REPARACIÓN Se le debe entregar un número de Autorización de Devolución de Mercadería ADM en español RMA en inglés de parte del Centro de Atenció...

Отзывы: