background image

19

I.B. 8926-1A

Part 8

INSPECTION PRIOR TO ENERGIZING

1.  Before energizing the motor control center

(MCC), conduct a thorough inspection to make
certain that all foreign materials such as tools,
scraps of wire and other debris are removed
from all units and the structure. Remove any
accumulation of dust and dirt with a vacuum
cleaner.

2.  All circuit connections are tightened at time of

assembly by power-driven tools with controlled
torque. However, the vibrations experienced in
transit may loosen some of these connections.
Check at least 10% of the total connections for a
tight connection. 

Should this spot-check

reveal some loose connections, it will be
necessary to check all connection points.

The connections to be checked include bus
hardware, circuit breaker and switch terminals,
contactor and relay terminals and terminal
blocks. Always check the incoming line
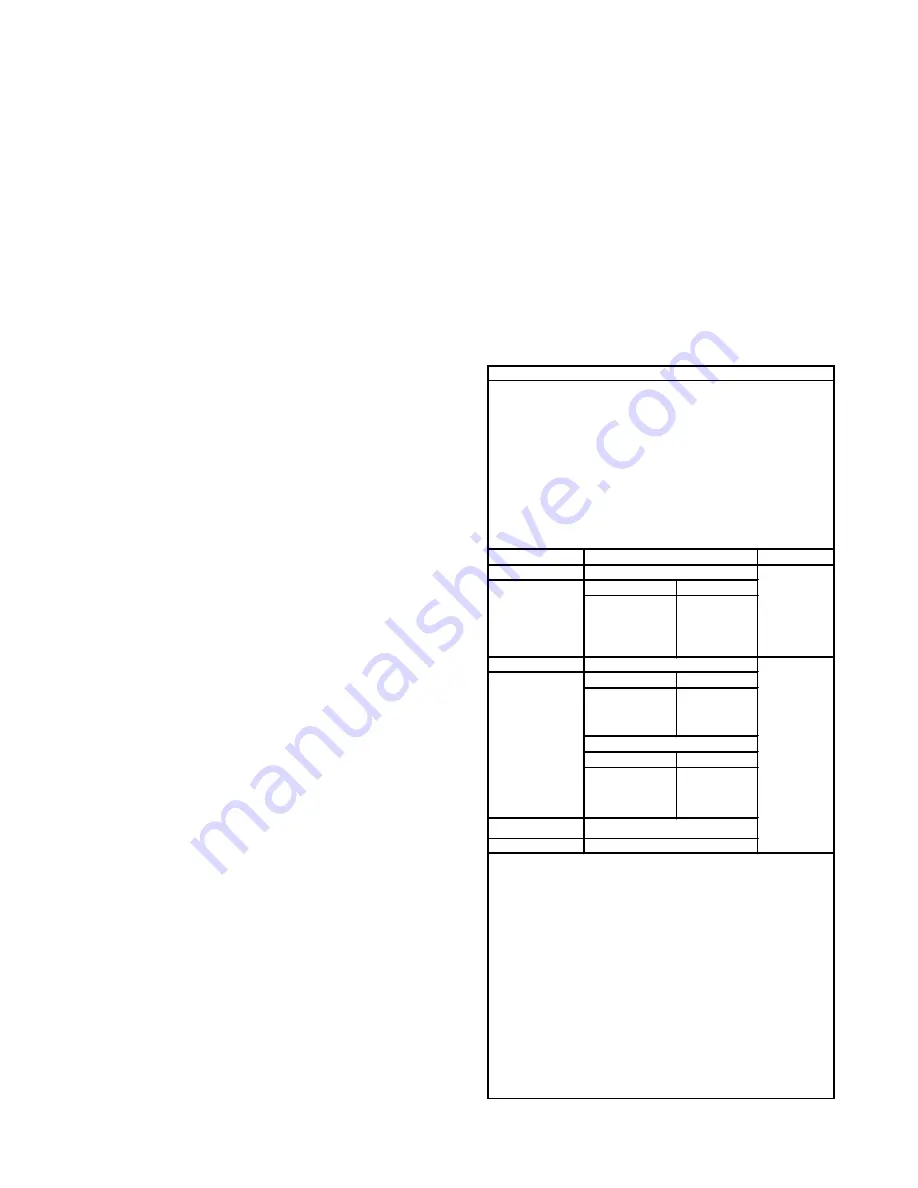
connections. Tighten to the torque values shown
in Tables 8-1.

3.  Remove all blocks or other temporary holding

means used for shipment from all component
devices in the MCC interior.

4.  Check the enclosure to see that it has not been

damaged so as to reduce electrical spacings.

5.  Compare all circuits for agreement with the

wiring  diagrams which accompany the MCC. Be
sure that each motor is connected to its intended
starter.

6.  Make certain that field wiring is clear of live

busses and physically secured to withstand the
effects of fault current.

7.  Check to determine that all grounding

connections are made properly.

8.  Check all devices for damage. Make all

necessary repairs or replacements, prior to
energizing.

9.  Manually exercise all switches, circuit breakers,

and other operating mechanisms to make
certain that they are properly aligned and
operate freely.

10.  Test any ground-fault protection systems that

were furnished.

11.  Set any adjustable current and voltage trip

mechanisms to the proper values.

12.  Ensure that overload relay heater elements are

installed and selected to the full-load current
shown on the nameplate of each motor.

13.  Install power circuit fuses in the fusible switches

in accordance with NEC application
requirements. Make sure that fuses are
completely inserted in the clips provided. Do not

attempt to defeat the rejection feature on the
fuse clip, when provided.

14.  Do not operate a current transformer with its

secondary circuit open. Insure current
transformer is connected to a load, or a
secondary shorting bar is installed.

15.  To prevent possible damage to equipment or

injury to personnel, check to insure that all parts
and barriers that may have been removed
during wiring and installation have been properly
reinstalled.

Coil Leads……………………………………………. …….8 lb.-in.
Relays……………………………………………………

…….8 lb.-in.

Push Buttons……………………………………….. …….8 lb.-in.
Control Fuse Blocks……………………………………

…….8 lb.-in.

Auxiliary Contacts………………………………………….8 lb.-in.
Control Wiring Terminal Blocks
   Side Mounted Lug/Compression………………… …....9 lb.-in.
   Rail Mounted Lug Type…………………………….…...12 lb.-in.
   Rail Mounted Compression Type………………….

…...18 lb.-in.

Using Overload 

Catalog Number

Conductors

C306DN3

Wire size (AWG) Torque (lb.-in.)

14-10

35

8

40

6 - 4

45

3 - 2

50

For Starters

Wire size (AWG) Torque (lb.-in.)

8

40

6 - 4

45

3 - 2

50

Socket Size (In.) Torque (lb.-in.)

3/16

120

1/4

200

5/16

250

Size N and Size 4
Size 5 and Size 6

30 Amp Fuse Assy………………………………… ……25 lb.-in.
60 Amp Fuse Assy………………………………… ……50 lb.-in.
100 Amp Fuse Assy………………………………………50 lb.-in.
200 Amp Fuse Assy………………………………. …..300 lb.-in.
400 Amp Fuse Assy………………………………. …..300 lb.-in.
600 Amp Fuse Assy………………………………. …..300 lb.-in.

#2/0-350  MCM…………………………………….. …..360 lb.-in.
#2/0-650  MCM…………………………………….. …..360 lb.-in.
#2/0-750  MCM…………………………………….. …..500 lb.-in.
500-1000 MCM…………………………………….. …..600 lb.-in.

All………………………………….. ………….275 lb.-in.(23lb.-ft.)

20 lb.-in.

BREAKERS- 

Refer to Torque Values on Breaker Case

Incoming Line Lugs:

Bus Bolts:

Size 3

Socket Head Screw

275 lb.-in.

500 lb.-in.

Use 75 

Degrees C 

copper or 

aluminum 

conductors

Slotted Head Screw

Fused Switches:

TABLE 8-1 DRIVING TORQUE

Control Wiring:

Power Wiring: Starters

C306GN3 and 

size 2 Contactor

Tightening Torque - Load Side

Use 75 

Degrees C 

copper 

conductors

Содержание Freedom 2100 Series

Страница 1: ...Views 31 12 Related Instruction Leaflets 33 This electrical control equipment is designed to be installed operated and maintained by adequately trained workmen These instructions do not cover all det...

Страница 2: ...10 which can be removed for installation and maintenance operations Adequate space is provided for control wiring and top cable entry At the bottom of each section a door 18 provides ready access to...

Страница 3: ...on each handle The device panel 5 is mounted on the drawout unit It will accommodate up to six pilot devices The overload reset button 20 is mounted on the unit door 1 Unit Door 2 Drawout Unit 4 Turn...

Страница 4: ...and after unloading the motor control center inspect each section and unit exterior for evidence of damage that may have been incurred during shipment If there is any indication that the control cent...

Страница 5: ...rdance with both the National Electrical code NEC NFPA 70 and the National Electrical Safety Code NESC ANSI C2 Caution If work is involved in connecting the control center with existing equipment ensu...

Страница 6: ...nd wire having a size in accordance with NEC 250 94 from the grounding electrode to the MCC ground bus or ground terminal provided See also NEC 250 91 a and 92 b ii If the system is grounded at any po...

Страница 7: ...amp the rear upright channels together In front mounted only structures this will require removal of the adjacent back sheets In a back to back mounted structure remove the vertical wireway doors and...

Страница 8: ...hrough 10 represents the backside of the MCC The top portion of each of these figures applies to 20 deep enclosures and the lower portion to 16 deep enclosures Note that for all but the single bar per...

Страница 9: ...TROL Consult the assembly instruction supplied with every Freedom 2100 Motor Control Center set up for splice to Freedom Unitrol or F10 Unitrol Fig 11 Splice Plates Attached to Freedom 2100 Horizontal...

Страница 10: ...oad be sure to have each conduit carry conductors from each phase and the same number of conductors per phase If the phase conductors are not distributed uniformly eddy currents will be generated in t...

Страница 11: ...be wired outside of the vertical wireway To engage the terminal block align the fingers of the male connector with the slot at the back of the female portion of the terminal block Then rotate the mal...

Страница 12: ...C and the 10 foot rule and the 25 foot rule of NEC 240 21 apply These latter exceptions to the general rule allow the disconnect means and Fig 17 Main Disconnect with Stab Load Connections overcurrent...

Страница 13: ...metrical the installing electrician needs to anchor the cables at the incoming line connections sufficiently and tighten the lugs correctly Each incoming line compartment is equipped with a two piece...

Страница 14: ...applications such as jogging Class 10 or 20 heater packs Fig 24 Use Class 10 heaters with fusible or thermal magnetic breaker disconnects only Bimetallic ambient compensated operated Trip free mechan...

Страница 15: ...trip setting which does not exceed the calculated figure of Item 2 This is the maximum setting that should be used 4 Depress and turn the screwdriver adjustment counter clockwise one setting at a tim...

Страница 16: ...used select the wire size as if the conductors had an insulation temperature rating of 75 C even if the conductors actually used have a temperature rating higher than 75 C Protect heater and starter a...

Страница 17: ...TIC RESET The overload relay is factory set at M for manual reset operation as shown in the illustration For automatic reset operation turn the reset adjustment dial to the A position Automatic reset...

Страница 18: ...MPERES 3 90 N 14 4 135 MAXIMUM RATINGS Minimum Wire Size 6 AWG l NOTES Part Winding Starters Select heater packs for 50 of the motor FLA Wye Delta Starters Select heater packs for 58 motor FLA u For m...

Страница 19: ...shed 11 Set any adjustable current and voltage trip mechanisms to the proper values 12 Ensure that overload relay heater elements are installed and selected to the full load current shown on the namep...

Страница 20: ...emoving the unit door the control unit is exposed With a screwdriver push in on the latch at the top center of the unit and rotate turn counterclockwise CAUTION Units 18 or more high have a retaining...

Страница 21: ...is withdrawn free of the linkage a spring automatically moves the shutter to its closed position See Figure 31 and Figure 4 With the control unit removed the shutter should completely cover the stab...

Страница 22: ...1 Remove the existing blank door 2 Position the new unit door over the open space to ensure the hinges and latches are aligned If the spaces differ the hinges and latches on the structure must be re l...

Страница 23: ...g and adjusting the electrical equipment refer to the applicable drawings covering the specific motor control center MCC and any other related interconnection drawings Follow any instructions which ma...

Страница 24: ...nts charred insulation discolored terminals etc Mechanically clean to a bright finish don t use emery paper or replace those terminations that have become discolored Determine the cause of the loose j...

Страница 25: ...racket does not need field adjustment The interlock bracket will be adjusted to almost touch the side of the unit interlock rod when the operator is in the on position Fig 35 6 Inch Breaker Unit Slide...

Страница 26: ...d to coil Correct any mechanical defects or misalignment Abrasive dust on contacts Do not use emery cloth to dress contacts Load current is too high Reduce load Use larger contactor Jogging cycle is t...

Страница 27: ...er opening indicates deterioration beyond normal wear and tear such as overheating contact blade or jaw pitting insulation breakage or charring the switch must be replaced Fuse holders Deterioration o...

Страница 28: ...ore quickly than the other three corners This wear is normally due to misalignment of the moving and stationary contacts Contacts should be replaced if it is apparent that one contact is nearly making...

Страница 29: ...9 2756 13 9 1891 20 9 1891 20 380 415V 50 Hz L 9 2703 8 9 2703 8 380V 50 Hz L 9 2756 12 9 1891 14 9 1891 14 415V 50 Hz M 9 2756 8 9 1891 21 9 1891 21 550V 50 Hz N 9 2756 14 9 1891 8 9 1891 8 C306KN3 C...

Страница 30: ...t Guides Included with Item 3 5 Quarter Turn Latch Included in Item 9 4 Freedom Starter 3 Unit Frame 2 Heater Mounts 1 8 Stab Assembly 9 Unit Drawout Handle 10 Unit Terminal Blocks 11 Control Power Tr...

Страница 31: ...31 I B 8926 1A Part 11 PLAN VIEWS...

Страница 32: ...e removed to provide maximum unrestricted conduit space at the bottom of the MCC 5 This conduit space is not recommended when a neutral bus is required Otherwise available See side View A far right fo...

Страница 33: ...t height above floor line is 3 50 inches 3 Maximum conduit space with channel sills is 17 50 X 9 73 inches 4 For multiple structure assemblies either one or both of these members are removed to provid...

Страница 34: ...g and Reversing vacuum I L 16999 Size 5 Non Reversing and Reversing vacuum I L 17088 Circuit Breakers Series C F frame I L 29C101 Series C J frame I L 29C103 Series C K frame I L 29C104 Series C L fra...

Отзывы: