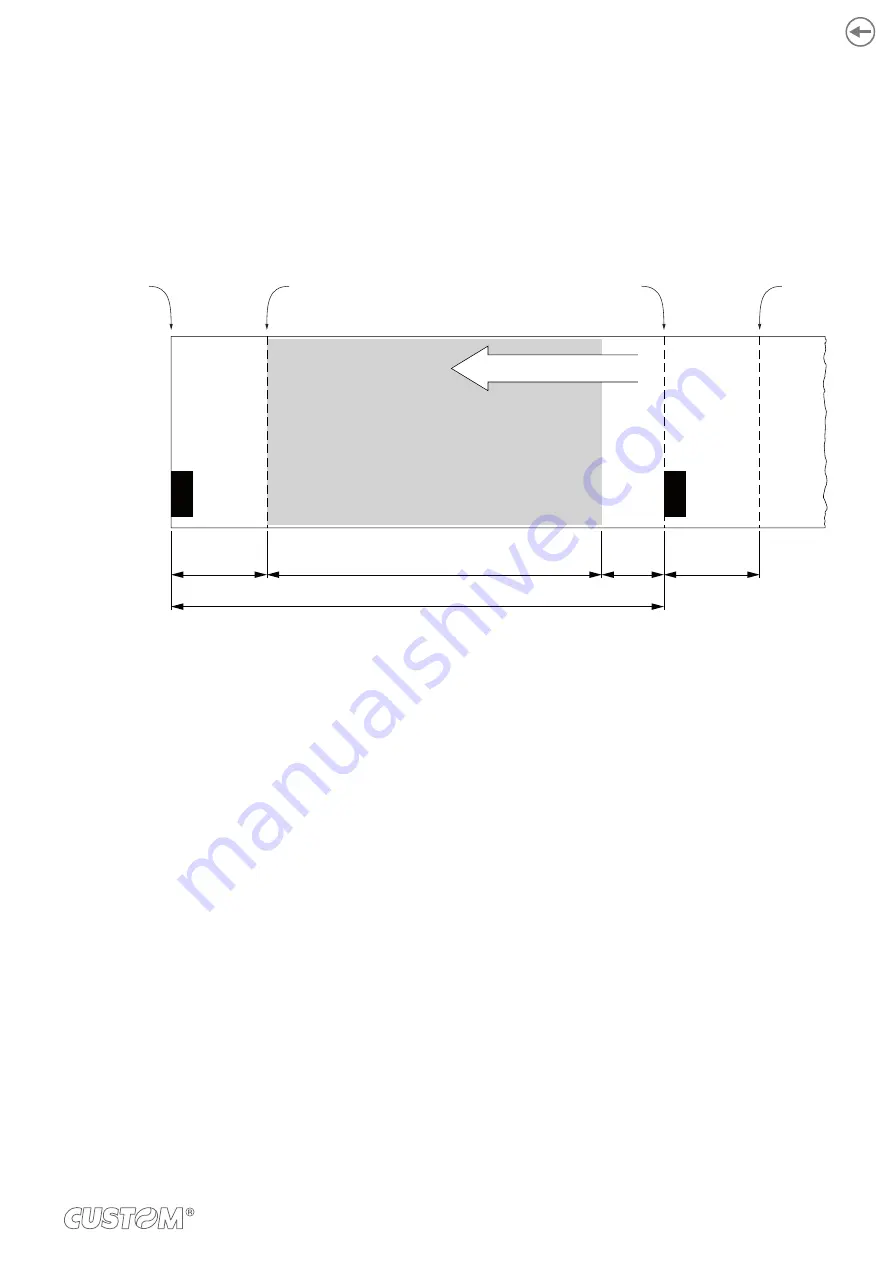
7.3 Printing area
In order to print ticket containing only one black mark and to not overlay printing to a black mark (that will make it useless
for the next alignment), it is important to well calibrate the length of the printing area of ticket according to the inter-black
mark distance.
The following igure shows an example of tickets with “Black Mark Distance” set to 0:
A
A
L
D
H
PRINTED
AREA
PRINTING DIRECTION
Printing line
Printing line
Line of manual
tear off
Line of manual
tear off
A
“Non-printable area” = “Distance between autocutter/printhead”
H Distance between the irst and the last print line, called “Height of the printing area”.
L
Distance between an edge of the black mark and the next one, called “Inter-black mark distance”.
D
Automatic feed for alignment at the next black mark.
To use all the black marks on the paper, you must comply with the following equation:
H + A ≤ L
The height of the printing area H can be increased to make no progress on alignment D but no further.
85
Содержание TG1260HIII BP
Страница 1: ...USER MANUAL TG1260HIII TG2460HIII ...
Страница 2: ......
Страница 4: ......
Страница 6: ......
Страница 10: ...10 ...
Страница 12: ...12 ...
Страница 14: ...TG1260HIII BP 1 Documentation installation instruction sheet 2 Device 1 2 14 ...
Страница 15: ...TG1260HIII CUT BP 1 Documentation installation instruction sheet 2 Device 1 2 15 ...
Страница 16: ...TG1260HIII CHROMED 1 Documentation installation instruction sheet 2 Device 1 2 16 ...
Страница 17: ...TG2460HIII CHROMED 1 Documentation installation instruction sheet 2 Power supply cable 3 Device 1 2 3 17 ...
Страница 18: ...TG2460HIII TRANSP 1 Documentation installation instruction sheet 2 Power supply cable 3 Device 1 2 3 18 ...
Страница 19: ...TG2460HIII CUT 1 Documentation installation instruction sheet 2 Power supply cable 3 Device 1 2 3 19 ...
Страница 20: ...TG2460HIII EJC 1 Documentation installation instruction sheet 2 Power supply cable 3 Device 1 2 3 20 ...
Страница 46: ...The green status LED turns on and the device is ready COM 24Vdc 2 46 ...
Страница 48: ...Wait until the paper is automatically loaded and cut VROOM 3 48 ...
Страница 56: ...The user withdraws the ticket from the paper mouth Ejector rollers Paper output sensor Ticket withdrew 5 56 ...
Страница 66: ...66 ...
Страница 86: ...86 ...
Страница 88: ...Rotate the platen roller in the shown direction to eject the paper from the rear side of the device 3 88 ...
Страница 90: ...Remove the paper from the rear side of the device Lift the unlocking lever for the printhead 4 3 90 ...
Страница 100: ...100 ...
Страница 113: ...TG1260HIII BP 54 8 26 8 77 5 145 136 3 108 3 40 5 173 145 77 5 113 ...
Страница 114: ...TG1260HIII CUT BP 38 8 10 8 99 166 5 152 3 124 3 56 5 194 5 166 5 99 114 ...
Страница 115: ...TG1260HIII CHROMED TG2460HIII CHROMED 53 2 25 91 158 5 138 110 42 2 186 5 158 5 91 115 ...
Страница 116: ...TG2460HIII TRANSP 131 6 103 6 59 5 36 31 4 191 4 163 4 95 7 95 7 163 4 116 ...
Страница 117: ...TG2460HIII EJC 134 5 106 7 56 5 39 3 28 4 188 1 160 2 92 5 92 5 160 2 117 ...
Страница 124: ...124 ...


