background image

1

SETUP WITH THE BRIDGE AND APP………………………………………

...........................

…………

.

…….Page 2

SETUP WITH THE BRIDGE (NO APP)……………………………………

.........................

……………

..

…….Page 3

CHANGE POSITIONS ON THE DRAPERY TRACK (SINGLE)…………………

....................

……

.

…….Page 4

CHANGE POSITIONS ON THE DRAPERY TRACK (DUAL)…………………

....................

……

.

……….Page 6

CHANGE THE OPEN POSITION FOR THE WINDOW SIDE DRAPERY (MOTOR 2)…

............

..Page 8

CHANGE THE CLOSE POSITION FOR THE WINDOW SIDE DRAPERY (MOTOR 2)…

.............

Page 9

PAIR THE REMOTE TO THE DRAPERY (ZIGBEE)……………………………………

.....................

…..Page 10

INTEGRATE WITH AMAZON ECHO OR ECHO PLUS ZIGBEE USING THE CURRENT PRODUCTS 

CORP BRIDGE………………………………………………………………

......................................................

…...Page 11

INTEGRATE WITH AMAZON ECHO PLUS- USE ALEXA’S BUILT IN ZIGBEE HUB…...

..........

Page 12

INTEGRATE WITH GOOGLE HOME - ZIGBEE USING THE CURRENT PRODUCTS CORP 

BRIDGE………………………………………………………………………………………

..................................

…...Page 13

SILENTRAC REMOTE PROGRAMMING INSTRUCTIONS WITHOUT A BRIDGE….…

............

.Page 15

PAIR THE REMOTE TO THE DRAPERY (FM)…………………………………………

.....................

……Page 18

ENABLE OR DISABLE SMART ASSIST……………………………………………………

.........................

...Page 19

GROUPING MULTIPLE DRAPERY TOGETHER……………………………

......................

……

.

…………Page 20

REMOVE THE DRAPERY FROM A NETWORK………………………………

.........................

.

……….Page 21

MASTER RESET THE DRAPERY……………………………………………………

...........................

.

…….Page 22

Содержание SilenTrac

Страница 1: ...E DRAPERY ZIGBEE Page 10 INTEGRATE WITH AMAZON ECHO OR ECHO PLUS ZIGBEE USING THE CURRENT PRODUCTS CORP BRIDGE Page 11 INTEGRATE WITH AMAZON ECHO PLUS USE ALEXA S BUILT IN ZIGBEE HUB Page 12 INTEGRATE WITH GOOGLE HOME ZIGBEE USING THE CURRENT PRODUCTS CORP BRIDGE Page 13 SILENTRAC REMOTE PROGRAMMING INSTRUCTIONS WITHOUT A BRIDGE Page 15 PAIR THE REMOTE TO THE DRAPERY FM Page 18 ENABLE OR DISABLE S...

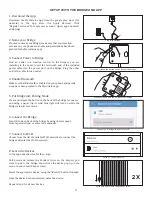
Страница 2: ...ooth Make sure that Bluetooth is enabled on your phone and permis sions have been granted to the Mycurtains app 5 Put Bridge into Pairing Mode Press and release the button on the back of the bridge for one sec ond using a paper clip A solid blue light will turn on while the bridge is in discover mode 6 Connect the Bridge Scan QR code on back of the bridge by using camera needs camera permissions o...

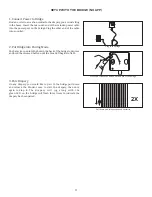
Страница 3: ...k or pen into the hole in the back of the bridge to depress and hold the recessed button until the blue LED begins to flash 3 Pair Drapery On any drapery you would like to pair to the bridge pull down and release the Pendant once to start the drapery then once again to stop it The drapery will jog along with the green LED on the bridge will flash three times to indicate the drapery has been paired...

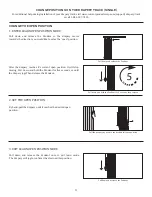
Страница 4: ...by hand to the desired full open position 2 SET THE OPEN POSITION By hand pull the drapery until it reaches the desired open position Pull down and hold the Pendant for 5 seconds then release Pull down and release the Pendant Change Positions on the drapery Track Single For additional help during installation of your drapery track visit www currentproductscorp com support drapery track or call 1 8...

Страница 5: ...you would like to set as the close position 2 SET THE CLOSE POSITION By hand pull the drapery until it reaches the desired close position Pull down and release the Pendant to close drapery Pull the drapery by hand to the desired full close position Pull down and hold the Pendant for 5 seconds then release Pull down and release the Pendant After the drapery reaches the position it will stop moving ...

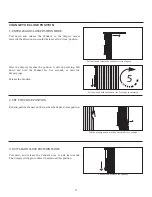
Страница 6: ... down and release the Pendant so the room side drapery moves towards the direction you would like to set as the open position Pull down Pendant to move room side drapery to open position Change Positions on the drapery Track dual Pull down and hold the Pendant for 5 seconds then release Pull the drapery by hand to the desired full open position Pull down and release the Pendant After the drapery r...

Страница 7: ...curtain until it reaches the desired close position 3 EXIT LEARN CLOSE POSITION MODE Pull down and release the Pendant once to exit learn mode The drapery will jog to confirm it has learned this position Pull down Pendant to move room side drapery to closed position Pull the drapery by hand to the desired full closed position After the drapery reaches the position it will stop moving Pull down and...

Страница 8: ...se the Pendant so the drapery moves towards the direction you would like to set as the open position Lift up and hold Pendant for 5 seconds then release Lift up and release Pendant to move drapery to open position Pull the drapery to full open position Pull down and release Pendant After the drapery reaches the position it will stop moving Lift up and hold the Pendant for five seconds or until the...

Страница 9: ...rapery Motor 2 1 ENTER LEARN CLOSE POSITION MODE Lift up and release the Pendant so the drapery moves towards the direction you would like to set as the close position Lift up and hold Pendant for 5 seconds then release Pull drapery to full closed position Lift up and release Pendant to move drapery to closed position Pull down and release Pendant After the drapery reaches the position it will sto...

Страница 10: ...p left button on the remote The drapery will jog to confirm pairing has been successful Pull down and release the Pendant twice Press the channel button until the desired channel is selected Press and release the back button on the remote Press and release the top left button to pair 1 Connect Remote to Bridge If using the Current Products Corp bridge use a tack or other object to depress and hold...

Страница 11: ...on at the top right hand corner Search for the skill title MyCurtains or Current Products If you want to be able to trigger Alexa using both phrases be sure to download both skills 3 SIGN IN Use the login credentials you created when you first set up your bridge and app You are now able to control your devices via Amazon Alexa 4 USING ALEXA Trigger Alexa using the trigger word selected when you in...

Страница 12: ...e screen Select Light from the menu on the next screen Scroll down to the bottom of the next screen to select Other as the brand then hit Discover Devices While Alexa is searching pull down and release the Pendant twice on each drapery you want to pair to Alexa Each drapery you are pairing will show up as a lightbulb Alexa App Steps 3 CUSTOMIZE IN APP In the Alexa app you can change the name of ea...

Страница 13: ...pp have been setup For instructions on how to set up your bridge and app see the Bridge Set Up Guide 2 SET UP DEVICE Open the Google Home app on your smart device and navigate to the correct home some users may have multiple homes connected to one account Press the Add button then Set Up Device then Works with Google Use the search function to locate Current Products Drapery Open App and hit Add S...

Страница 14: ... using the phrase Hey Google You can say open or close and use percentages to get your curtain to a specific position Example Hey Google close the living room or Hey Google open the kitchen to 50 Google Home will know the names of the devices and groups based on what they are named in the app You can control devices groups or trigger scenes through Google and create custom names for each in the My...

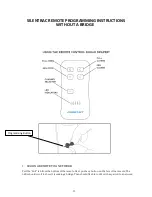
Страница 15: ...E TO A NETWORK Pull the Pull tab from the bottom of the remote Next push any button on the face of the remote The LEDs should scroll to show it is seeking a bridge Then should flash to confirm it has paired to a network Programming Button 15 WITHOUT A BRIDGE ...

Страница 16: ... The LEDs on the front will scroll Press and release the top right button on the remote The drapery will jog to confirm its deleted 4 REMOVE A REMOTE FROM THE NETWORK Depress the programming button on the back of the remote six times by pushing a pen or other object through the hole in the back of the remote If the remove command is successful the LEDs on the front will scroll when any button on t...

Страница 17: ... with the appropriate channel is lit Depress the programming button on the back of the remote twice by pushing a pen or other object through the hole in the back of the remote The LEDs on the front will all flash Press and release the top right button on the remote All draperies on that associated channel will jog Tug and release the pendant The drapery will jog to confirm the swap command has bee...

Страница 18: ...el button until the LED corresponding with the appropriate channel is lit 2x Pull down and release Pendant Select channel by pressing channel button Depress pairing button on back of remote Press and release top left button on remote Depress the pairing button on the back of the remote by pushing a pen or other object through the hole in the back of the remote The LEDs on the front will scroll Pre...

Страница 19: ...st is disabled the drapery will remain in place 2 ENABLE OR DISABLE SMART ASSIST To disable Smart Assist pull down and hold the Pendant for five seconds or until the drapery jogs then release Be sure to pull down on the Pendant before the drapery reaches its limit 3 CONFIRM Pull down and release the Pendant once to confirm The drapery will jog to confirm Smart Assist has been enabled or disabled M...

Страница 20: ...uld like to group press and hold all three buttons on the sensor box until all three LEDs flash green Press and hold all 3 buttons Press and hold all 3 buttons Grouping Multiple Drapery Together The grouping feature is available on all units with a sensor box Grouping allows users to control multiple units simultaneously with one manual command Grouping also allows units to move together simultane...

Страница 21: ...from the network will remove the drapery from the bridge and you will need to re add it back to your network before you can use the remote or app 4 Perform Half a Master Reset Pull down on the Pendant and hold for 10 seconds or until the drapery jogs Your drapery has now been removed from the network 1 Remove Power Disconnect power from the unit For hardwired units simply unplug the device For bat...

Страница 22: ...conds or until the drapery jogs Your drapery has now been master reset Reconnect power Pull down and hold Pendant and lift up and hold Pendant Master Reset the Drapery In some instances it may become necessary to master reset your drapery Performing a master reset will restore the drapery to its factory settings erasing saved open and closed positions groups and all paired remotes 1 REMOVE POWER D...

Страница 23: ...e the receiving antenna Increase the separation between the equipment and receiver Connect the equipment into an outlet on a circuit different from that to which the receiver is connected Consult the dealer or an experienced radio TV technician for help RF WARNING STATEMENT This equipment complies with FCC ISED radiation exposure limits set forth for an uncontrolled environment This equipment shou...

Страница 24: ...844 307 7435 service currentluxury com www currentluxury com 24 ...

Отзывы: