BEFORE YOU BEGIN...
Motors are shipped in FACTORY MODE without limit settings
and transmitter Id’s.
Power must ONLY be connected to
the current window covering being programmed. All
other window coverings must be disconnected from
their respective power while programming to avoid
overwriting shade limits.
For deactivating internal battery motors, see “Deactivate
RTS.”
CONNECT POWER
With the motor installed in the window covering, connect
power to the motor (120V AC, or 12V DC or 24V DC
transformer or 12V battery wand).
Battery Motors
Battery motors must be “woken up” to
initiate programming. To confirm the status
of the motor, plug in the charger or tap the
programming button on the motor head.
The shade will jog 3 times. “Jog”- A brief
“up and down” movement or shake of the
shade. This indicates the motor is on.
Battery Motors should be charged for 4-6
hours after installation.
PROGRAMMING MODE
NOTE:
Motor will exit PROGRAMMING MODE if left inactive
for 2 minutes.
Initiate Programming
Select the channel you wish to program. On the transmitter
(wall switch or remote/hand-held control), press and hold
both the UP and DOWN buttons simultaneously until the
window covering jogs.
Check the Direction of Operation
Press and hold UP or DOWN . When pressing DOWN, the
window covering should go down. If the window covering
does not correspond with UP or DOWN you must REVERSE
the output direction. To reverse output direction, simply press
& hold the STOP (wall switches) or MY button (remote) until
the window covering jogs. Output direction should now
correspond.
021622
Setting Limits
Step 1: Upper Limit
Bring the window covering to desired UPPER limit stop
point with the UP button. Press and hold both STOP/
MY and DOWN simultaneously until the shade starts to
move, then release. The window covering should continue
moving after you release the buttons. Stop the motor
when desired LOWER limit is reached. You can
adjust by pressing UP or DOWN after stopping the motor.
NOTE
If the window covering stops moving when the STOP/
MY and Down buttons are released, take it back to the
UPPER limit and repeat.
Step 2: Lower Limit
Once the window covering is at the desired lower
limit position, press and hold both STOP/MY and UP
simultaneously until the window covering starts to move,
then release. The window covering will stop at the UPPER
limit that was previously set.
Step 3: Confirm Limit Settings
Press and hold STOP/MY until the window covering jogs
to confirm the limit settings. A jog is a brief up and down
motion.
Step 4: Programming Completed
Plug-In/Hardwired Motors
With a paper clip, press and hold the recessed
PROGRAMMING BUTTON on transmitter until the
window covering jogs.
Battery Motors
Quickly tap the programming button on the transmitter
and release.
The window covering is now in USER MODE. In USER
MODE, the window covering will operate by briefly
pressing the UP or DOWN buttons.
Once programmed, disconnect power before programing
any additional RTS shades.
R28 Wirefree RTS
Sonesse 30 RTS
Sonesse 40 RTS
Sonesse 409 RTS
Sonesse 506 RTS
Sonesse 510 RTS
Paperclip for the programming button
Quick Programming Guide for RTS Motors
800.229.5300
HDhospitality.com
TROUBLESHOOTING
In case of problems with setting of limits during
PROGRAMMING MODE reset the motor. Make sure
to return to PROGRAMMING MODE to initiate the
programming process again.
• Check that battery shades are charged prior to
attempting to make changes.
• To check power status, plug in the charger.
• Charger will display green indicator if full or red if
charging is needed.
• If a transmitter does not light up to confirm
commands, please replace the battery.
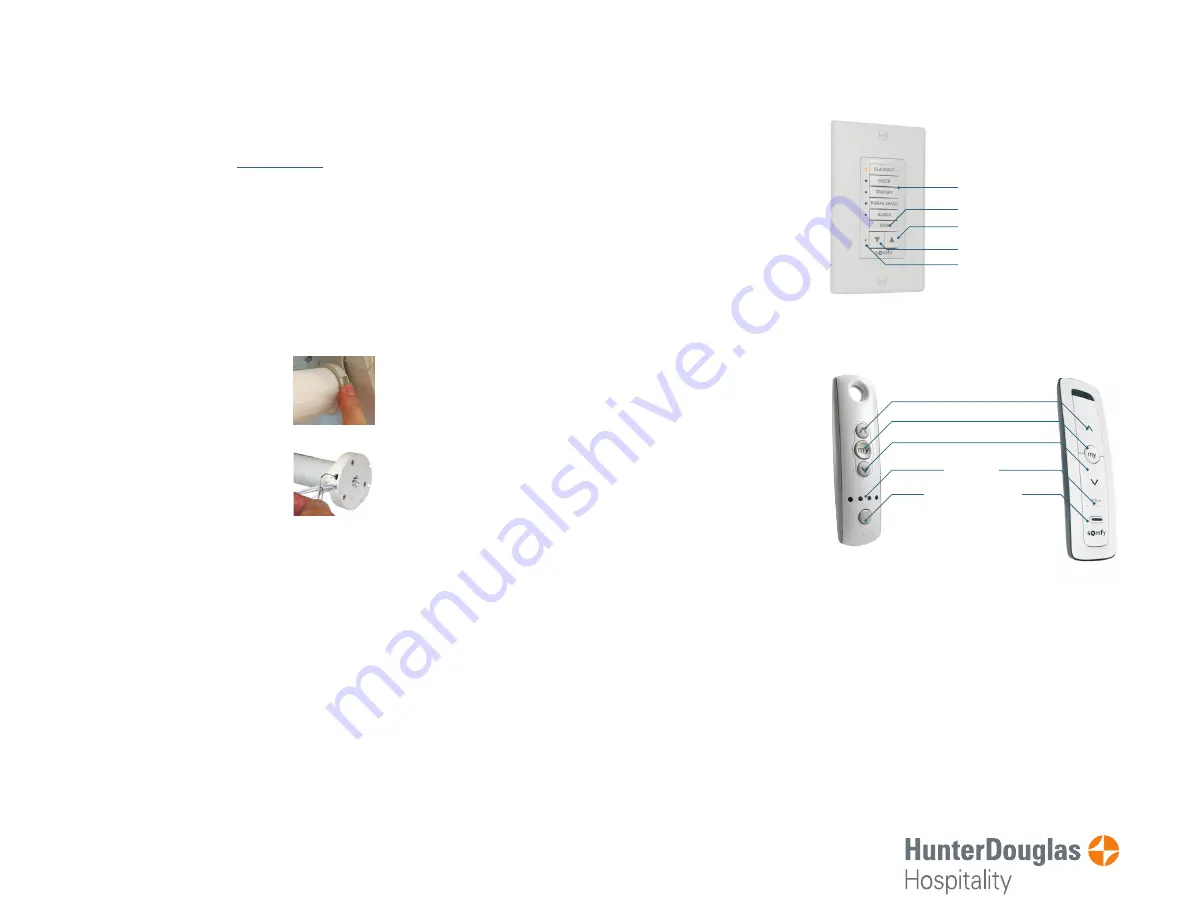
DecoFlex WireFree™ RTS Wall Switch
(Transmitter)
Telis
RTS Hand-held
Control (Transmitter)
Situo II RTS
Hand-held
Control
(Transmitter)
Up
Up
My/Stop
My/Stop
Down
Down
LED Channel
LED Channel
Indicator
Indicator
Channel Selector
Channel Selector
Programming
Programming
Button is on the
Button is on the
back
back
Channels
My/Stop
Up
Down
Programming Button
Compatible Motors
Tools Needed
Motor Head
Programming Button
V1 Style
V2 Style


