background image

29

A

B

D

C

B

ECO

ECO

25

°C

56

27/04/2018

13:00

300

20

NAPOLETANA

25

°C

100

27/04/2018

13:00

400

100

PYR

ok

exit

Conferma avvio pirolisi?

-:-

-:-

C

ECO

CUPPONE

Ven 27/04/2018

13:00

ECO

CUPPONE

Ven 27/04/2018

13:00

25

°C

80

27/04/2018

13:00

150

5

NAPOLETANA

-:-

A

B

CUPPONE

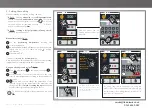
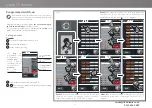
Fig.39. 

Fig.41. 

Fig.40. 

Ed. 0219 -  70702522 REV00     Michelangelo - Use and maintenance

Cleaning  the  chamber  with  the  pyrolysis 

function 

Inside the chamber, there are normally some food residues 
(e.g. fat, food residues, etc.) that must be removed frequently 
for  health  and  safety  reasons.    Pyrolysis  consists  in 

increasing the oven temperature up to 400°C: this way any food 
residue will go from a liquid or solid to gaseous state and will then 
be expelled via the chimney at the top of the oven.

Use  pyrolysis  only  when  normal  refractory  cleaning  is 
not enough.

Before  starting  the  pyrolysis,  remove  the  coarser  food 
residues with a natural fibre brush.

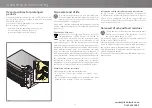
CD model ovens


Fig.39.

A

 Set the

 chamber temperature to 400°C

 using the “+” or 

“-” buttons, until the desired value is displayed (e.g. 300°C),

B

  Acting  on  the  “MIN”  e  “MAX”  buttons,  set  the 

top 

and


bottom power

 to 

MAX

C

  switch the lights in the cooking chamber o

;

D

  when the temperature is reached, switch the oven o

 with 

the ON/OFF key and let it cool down with the door closed;

E

  in a cold oven, clean the chamber from the crystallized food 

residues using a natural fibre brush and then vacuum with an 
ash extraction bin   

Fig.41.

TS model ovens


Fig.40.

A

  Touch the ON/OFF button 

11

;

B

  touch the pyrolysis button 

1

;

C

  confirm pressing “OK”: the heating of the cooking chamber 

starts  until  the  temperature  of  400°C  is  reached,  when 
the  function  stops  (to  stop  the  function  early,  press  the 
pyrolysis button 

1

 again); 

D

  in a cold oven, clean the chamber from the crystallized food 

residues using a natural fibre brush and then vacuum with an 
ash extraction bin   

Fig.41.

During pyrolysis, keep the light o

, to protect the bulb.

[email protected] 

0161 696 0052

Содержание Michelangelo

Страница 1: ...Michelangelo Use and maintenance manual ...

Страница 2: ...2 service linda lewis co uk 0161 696 0052 ...

Страница 3: ...th of our company have led us to design and patent the machinery and ovens that have revolutionized the way pizza is made Technical service The Manufacturer can solve any technical problem regarding use and maintenance Do not hesitate to contact him in case of doubt CUPPONE 1963 Cuppone F lli S r l Via Sile 36 31057 Silea TV ITALY T 39 0422 361143 F 39 0422 360993 info cuppone com www cuppone com ...

Страница 4: ...d involved Children must not play with the appliance Cleaning and user maintenance shall not be made by children without supervision The staff using the appliance must be professionally prepared and periodically trained on its use as well as the safety and accident prevention regulations Children must be supervised to make sure they do not play with the appliance or parts of it Always use tools res...

Страница 5: ...r s advice The company cannot be held liable for any print or transcription errors reserving the right to make changes where deemed suitable without prior notice Partial reproduction without the manufacturer s consent is prohibited Measurements are purely indicative and not binding The original language used to prepare this manual is Italian the Manufacturer is not responsible for any translation ...

Страница 6: ...commend you set the temperature at 150 C for at least 8 hours without placing any food inside During this time keep the chimney flue fully open In this first phase because of the humidity evaporating from the insulating materials the oven will give out unpleasant smells and fumes that will gradually disappear during the following operating cycles To switch the oven on and set its parameters refer ...

Страница 7: ...uction the bottom elements heat the refractory surfaces on which the products lie this parameter is controlled by the percentage mod TS setting mod CD of the BOTTOM Unsatisfactory cooking results If the cooking results are not as expected try and check the following incorrect oven parameters temperature in the chamber either too high or too low percentages settings of the BOTTOM or TOP either too ...

Страница 8: ... 4 min NEAPOLITAN 1 2 min 370 C 80 0 1 2 min BAKING TIN 7 8 min 280 C 30 100 7 8 min PADDLE PRECOOKING 5 min 270 C 40 60 5 min FINISHING 3 min 270 C 40 60 3 min CD CHECK Manual stretching Stretching with Pizzaform Preheating for both types manual stretching or with Pizzaform TYPE COOKING COOKING TIME TEMP TOP BOTTOM TIME TEMP TOP BOTTOM CLASSIC 3 min 300 C MAX OFF MIN 3 min 290 C MAX OFF time 1 ho...

Страница 9: ...e selection made 5 Bottom power check Allows checking the power of the elements in the bottom offering three adjustments OFF MIN 33 MAX 100 5A Bottom LEDs show the selection made 6 ON OFF switch Switches the display on and off 7 Light button Switches the light in the cooking chamber on and off 8 Clock button With the oven on activates an end of cooking acoustic signal With the oven off sets the progra...

Страница 10: ...e table on page 8 preheating information After setting these three parameters the oven starts heating straight away The preheating temperature must be the same as the next cooking and depends on the type of product to cook If necessary check page 7 for some advice During preheating the steam holes in the back of the cooking chamber must be kept always closed to prevent the elements from being on t...

Страница 11: ...t to bake in the cooking chamber To open the vents keep the 9 button pressed they start opening progressively To block them in the desired position just release the button G Activatinganend of cookingsignal buzzer Fig 11 If you wish you can enable a buzzer that will go off when the set time expires warning that cooking is complete To activate it with the oven on press the clock button 8 The display...

Страница 12: ... 99 5 that is 99 hours and 50 minutes Once set the countdown starts at the end of which the oven will switch on automatically with the temperature and power parameters used for the last cooking If you wish to change them exit programmed cooking pressing the clock button 8 switch the oven on with the ON OFF 6 button set a cooking cycle with the desired parameters Fig 6 Fig 7 switch the oven off with...

Страница 13: ... diary page 10 SERVICE button settings Gives access to the user s settings 11 ON OFF switch Powering the oven on and off FUNCTION BAR A Current date B Chamber light Shows the state of the light in the chamber on or off C Vent If on it shows the chimney is opening the user is acting on the chimney button 7 D Warning Highlights a warning to read e g maintenance E Current time Contents of TS models Kno...

Страница 14: ...elete with x PROGRAMMED SWITCH ON button Gives access to the Weekly programmed switch on page it is possible to program the oven automatically switching on and off for the whole week HOLIDAY button Gives access to the Holiday page this function allows interrupting for a certain period of time the oven switching on and off every week without having to cancel it DIARY button Gives access to the Diary ...

Страница 15: ... refer to Fig 14 A Turning the oven on manually Fig 15 After powering the oven the display lights up and shows the STAND BY page Pressing the ON OFF 11 key the display shows the cooking page preheating or cooking temperature top power bottom power end of cooking signal optional See page 18 What needs to be set for every manual preheating or cooking cycle During cooking or preheating if the current...

Страница 16: ...eady stored previously saved by the user Manual insertion Fig 17 A Set the preheating temperature touching the corresponding field B an alphanumeric keypad will appear on which the desired valued can be set see table on page 8 cooking information C confirm with OK Similarly set the top as well as the bottom power see table on page 8 cooking information After setting these three parameters the oven...

Страница 17: ...very time To avoid this operation you need to create a recipe as explained on page 20 Fig 20 starting a recipe program already stored previously saved by the user Manual insertion Fig 19 A Set the preheating temperature touching the corresponding field B an alphanumeric keypad will appear on which the desired valued can be set see table on page 8 cooking information C confirm with OK Similarly set...

Страница 18: ...at is three minutes and ten seconds After setting it the countdown starts at the end of which a buzzer will sound to highlight the end of cooking To stop the buzzer press the buzzer button 5 Warning the oven continues heating when the buzzer goes off E Filling the oven Fig 22 Fill the oven using personal protection equipment e g gloves and tools suitable for contact with food and made in a material...

Страница 19: ...cooking press the ON OFF button 11 the oven goes into stand by mode A special program MAX program the MAX program heats the refractory surface quickly when the user realizes it is too low and raises the temperature in the chamber according to the set time A To start the program touch its symbol B A screen appears that allows you to B1 start the program by pressing OK in this case the program will ...

Страница 20: ...ame A3 the list of the available recipes is displayed touch the name of the recipe you wish to use B the oven starts to heat with the relative parameters If during cooking you wish to change the parameters of the selected recipe e g increase the temperature act the usual way points C D and E the changes will affect only the cooking in progress and will not affect the original recipe temporary effect ...

Страница 21: ... it for your own recipes The MAX and Pyrolysis programs do not appear in this list because they cannot be changed in a permanent way Program P01 has changed name and parameters taking on those set by the user With the alphanumeric keypad it is easy to assign a name to the program this way it will be easy to recognize the recipe you need The temperature in the chamber the top and bottom power and t...

Страница 22: ... 30 19 00 22 30 CLASSICA 11 00 14 30 CLASSICA 11 00 14 30 CLASSICA NAPOLETANA 19 00 24 00 CLASSICA 19 00 22 30 NAPOLETANA EXIT Mer Mar Lun Ven Gio Sab Dom M CUPPONE Ven 27 04 2018 13 00 F G I L H CUPPONE A Fig 28 Programmed switch on The programmed switch on function is very useful because the oven can be already hot and therefore ready to bake when the restaurant is opened With this function you ...

Страница 23: ...OLETANA EXIT Mer Mar Lun Ven Gio Sab Dom 27 04 2018 13 00 Settimanale evento 1 evento 2 evento 3 evento 4 11 00 14 30 19 00 22 30 CLASSICA CLASSICA NAPOLETANA 11 00 14 30 19 00 22 30 NAPOLETANA 11 00 14 30 19 00 22 30 CLASSICA NAPOLETANA 11 00 14 30 19 00 22 30 CLASSICA 11 00 14 30 CLASSICA 11 00 14 30 CLASSICA NAPOLETANA 19 00 24 00 CLASSICA 19 00 24 00 CLASSICA EXIT Mer Mar Lun Ven Gio Sab Dom B...

Страница 24: ... new note or modify an existing one enter the text that is what must be displayed enter its expiry date that is when it must be displayed enter when it has to be repeated that is how often it must be displayed do not repeat the note is displayed on the expiry date and not repeated every day the note is displayed and then repeated the following day every month the note is displayed and then repeate...

Страница 25: ...8 the end time of the holiday e g 10 30 D Confirm the entered details pressing OK E At the end make the weekly function operational touching the icon in the bottom RH corner If it is white the holiday function is not active but is programmed orange the holiday function is active oven in stand by until the set time date The main screen displays the message Holiday mode active until with the set tim...

Страница 26: ... a m winter time starts the first Sunday in November at 2 00 a m automatic change Europe version automatic change USA version At the end of the settings confirm with OK or delete with EXIT Language Fig 35 In this section you can set the language used in the menu displays the active language is highlighted in red At the end of the setting confirm with OK or delete with EXIT Program management In th...

Страница 27: ...ano Ore di lavoro 27 04 2018 13 00 Data e ora Gestione Programmi HACCP Versioni firmware Ore di lavoro Lingua Parametri Test I O Ore di lavoro Ore funzionamento 91 h Ore da ultima manutenzione 170 h Ore lavoro 2 00 h Ore lavoro 3 00 h Ore lavoro 4 00 h x EXIT Fig 35 Fig 36 Ed 0219 70702522 REV00 Michelangelo Use and maintenance service linda lewis co uk 0161 696 0052 ...

Страница 28: ...ed service centre perform maintenance and inspection on the appliance at least once a year to ensure top working and safety conditions Keep the vents of the electrical compartment clean and clear Oven cleaning Cleaning the external steel parts Use a cloth dampened with hot soapy water and end with rinsing and drying Cleaning the refractory surface Fig 38 Remove the coarser food residues with a nat...

Страница 29: ...s with a natural fibre brush CD model ovens Fig 39 A Set the chamber temperature to 400 C using the or buttons until the desired value is displayed e g 300 C B Acting on the MIN e MAX buttons set the top and bottom power to MAX C switch the lights in the cooking chamber off D when the temperature is reached switch the oven off with the ON OFF key and let it cool down with the door closed E in a cold...

Страница 30: ...power to the appliance acting on the system switch and wear suitable personal protection equipment e g gloves etc Any replacement must be carried out with the oven completely cold and wearing adequate personal protection devices e g gloves etc Replacing the door glass Fig 42 Replacing the internal bulb and glass Fig 43 Before replacing the bulb switch off the power to the appliance acting on the s...

Страница 31: ... x3 ECO ECO A B Fig 44 Fig 45 Ed 0219 70702522 REV00 Michelangelo Use and maintenance Replacing the refractory bricks Fig 44 Replacing the door handle Fig 45 User s exploded view page 37 service linda lewis co uk 0161 696 0052 ...

Страница 32: ...on Centres also named eco islands or eco platforms the dealer where new equipment is purchased who must withdraw it free of charge one to one withdrawal Information on disposal in European Union countries The EU Directives on WEEE equipment has been adopted in different ways by different countries therefore in order to dispose of this equipment correctly we suggest that you contact your local author...

Страница 33: ...uccessfully carry out the final test of the product after installing it the appliance is used as stated in the instruction manual supplied for all the products The warranty is not valid for damages caused by chemical and atmospheric agents fires faults in the room electrical system product misuse lack of maintenance product modifications or tampering ineffective and or inadequate flue and or other ...

Страница 34: ...sure the main switch is ON The oven turns on but cooking does not start Make sure you set the cooking parameters correctly Setting the c o o k i n g parameters see page 7 The oven does not cook evenly Make sure you set the cooking parameters correctly In case of incomplete baking cycles change the positions of the pizzas The first pizzas are burnt In preheating the percentage mod TS setting mod CD...

Страница 35: ...s Fig 40 Fig 49 if the cooling fans are working looking through the vents without removing the side Fig 50 Once these checks have been made if the problem remains contact Technical Service W2 Cold junction temperature too high The cold junction is a sensor built into the control board that detects the temperature of the latter and the surrounding atmosphere W3 The oven is fitted with a meter count...

Страница 36: ... Max 35 C Max 70 Min 5 C Max 104 F Min 41 C ECO ECO Fig 48 Fig 50 min 50 mm in 1 97 min 50 mm in 1 97 1000 mm in 40 min min 500 mm in 19 7 Fig 49 Cooling fans Something is not working service linda lewis co uk 0161 696 0052 ...

Страница 37: ... 4 6 7 80600331 GLASS SEAL ML 6L 9 8 71200022 HORIZ GLASS SPACER ML 4 6 8 71200025 HORIZ GLASS SPACER ML 6L 9 9 70310002 ML CR BLACK HANDLE 9 70310005 SAFETY WASHER FOR ML CR HANDLE 10 80600340 TBCE STAINLESS STEEL SCREW 12X30 A2 10 80600341 CRUMB TRAY ML 4 6 11 70400080 CRUMB TRAY ML 6L 9 12 70400090 SAFETY WASHER FOR ML CR HANDLE 13 70200000 TBCE STAINLESS STEEL SCREW 12X30 A2 14 80600390 CRUMB ...

Страница 38: ...38 Notes service linda lewis co uk 0161 696 0052 ...

Страница 39: ...service linda lewis co uk 0161 696 0052 ...

Страница 40: ...CUPPONE 1963 Cuppone F lli S r l Via Sile 36 31057 Silea TV ITALY T 39 0422 361143 F 39 0422 360993 info cuppone com www cuppone com service linda lewis co uk 0161 696 0052 ...

Отзывы: